
Troubleshooting guide

PAGE 4 TECH SHEET - DO NOT DISCARD
PART NO. 326038065 FOR SERVICE TECHNICIAN'S USE ONLY
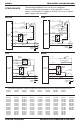
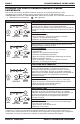
CONTROL BOARD REMOVAL OR
REPLACEMENT
IMPORTANT:Electrostatic(static electricity)
discharge may cause damage to electronic
control assemblies. See page 1 for details.
NOTE: Be sure to perform the Diagnostic
Tests before replacing the control board.
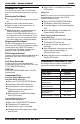
To remove Electronic Control Board (PCB)
and Interface Board:
1. Unplug washer or disconnect power.
2. Remove the Top.
3. Remove the PCB’s protective covering.
4. Pull out the connectors from the PCB
terminals.
5. Remove the six screws fastening the PCB
and the Interface Board.
6. Remove each board from the support.
To reassemble PCB and Interface Board:
1. Place the PCB and Interface Board into the
support.
2. Use the six screws to fasten the boards
together.
3.
Attach the connectors to the PCB terminals.
4. Secure the PCB’s protective covering in
place.
5. Secure the Top in place.
6. Plug in washer or reconnect power.
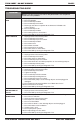
PROBLEM
POSSIBLE CAUSE/TEST
NOTE: Possible Cause/Tests MUST be performed in the sequence shown
for each problem.
WON’T POWER UP
1. Press START/OFF button.
2. Open and close the lid.
3. Unplug washer or disconnect power.
4. Check water connections to the unit and within the unit. Check for plugged
screen in water source.
5. Check that unit is plugged into a working outlet and for blown fuses.
6. Check installation.
7. Check continuity of lid switch.
8. Check wiring harness connections.
9. Check the PCB by running the Diagnostic Test.
LEDS DON’T LIGHT
2. Check that unit is plugged into a working outlet and for blown fuses.
3. Unplug washer or disconnect power.
4. Check continuity of line cord and coil.
5. Check harness connections to Electronic Control board (PCB).
6. Check the PCB by running the Diagnostic Test.
WON’T START CYCLE
1. Unplug washer or disconnect power.
2. Check continuity of lid switch.
3. Check that water pump is clear of foreign objects and not plugged or
damaged.
4. Check the brake lining for foreign objects or wear.
5. Check inlet valve for abnormal condition. See “Won’t Fill.”
6. Check motor for abnormal condition. See “Motor doesn’t run.”
7. Check wire harness connections.
8. Check the PCB by running the Diagnostic Test.
WON’T FILL
1. Unplug washer or disconnect power.
2. Check installation. Verify hot and cold water faucets are open.
3. Check inlet valves.
4. Check water connection to the unit and within the unit. Check for plugged
screen in water source.
5. Check continuity of lid switch.
6. Replace the water inlet valve.
7. Check the PCB by running the Diagnostic Test.
TROUBLESHOOTING GUIDE