
Installation guide

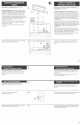

Remove tape and save for future use,
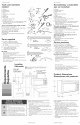
Remove contentsfrom inside microwave oven including
turn tabb, turn table support and hub.
Mounting plate is gray metal plate attached to back of
microwave hood.
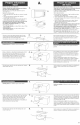
Remove the mounting plate:
o Tiit the griiie@ forward, then iift out to remove. Set grille
aside.
o PulI hook ® to releasemounting plate. Separate
mounting plate and set aside.
o Replacegriiie. Grasp the sides of the griiie. Aiign griib in
lm
Qaite la ¢inta y gadrdela para uso ee el futuro.
Saqoetodo Io qoeeat_ dentrodel homode microondasincloyondo
el plato giratorio, el soporlo del plato giratorio y el eje.
La piacade montajees ia piaca met_Iicagds queest_en la parte
trasera deIa campanadeI homo.
Quite Iaplaca de montaje:
oInclineIa rejilIa@ haciaadetante,y luego b%ntela haciafuera
paraquitarla.DejeIa rejilIaaparte.
o Quite Ia rejilIadeiantera®. AparteIos tornilIos y Ia rejilIa.
o Jab el gancho® parasoitar [a piacade montaje. Quitela placa
de montajey ap_rtela.
front of the grille opening and push back into piace.
Completemycmooedoor and replace tape so that door does
not owing open while microwave is being handled.
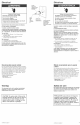
For ventless(reciroulating)operation, go to "Prepare
cabinet opening" page 12=
o Vuelvaa colocarIa rejilIatom_ndoia por Ios Iados.Alineela
rejiiiaen ia porte deianterade ia aberturade la misma y
emp_jeia haciaatr_sen su Iugar.
Cierre la puerto compiefamentey vuelva a cotocarla cinta para
que la puerta no se ahra mieetraa se trabaja en el homo.
Tovent through the wall, go to step 2 then to step 3, "Wail= Parafuncionamiento sin salida de aire (recircuiaci6n), vayaa la
venting installation"= secci@"Preparela aberturadei gabinete"en ia p@ina12.
Tovent through the roof, go to step 2 then to step 6, Para sacar emaire a tray,s de la pared, vayaaI paso 2, iuegoal
"Roof=ventinginstallation", paso 3, "Instalaci@ con saiidade airea trav6s de ia pared".
Para sacar el aire a trav_s del cieloraao, vayaai paso 2,iuego
aI paso 6, "lnstalaci6nconsalida deaire a trav6s delcielo raso".
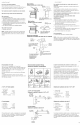
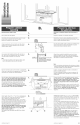
Removethe screw that attaches damper piate® to top
of microwave hood cabinet. Siide the damper awayfrom
retaining tabs and removethe damper piate.
Keepdamper plate and screw together and set aside.
Quite et tornilIo que fija Ia ptaca de ia compuerta ® a ia
parte superior del gabinete de ia campana dei homo. Desiice
la compuerta iejos de ias iengOetasde retenci6ny quite la
piaca de ia compuerta.
Mantengajuntos la compuerta y los tornillos y ap_rtelos.
Carefully stide the air deflector ® out of the cabinet.
Deslice con cuidado el deflector de aire ® para sacarlo del
gabinete.
Rotate air deflector so that deflector feet ® face the front of
the microwave hood and the exhaust port ® of the air
defiector faces the exhaust port @ in microwave hood.
Siide air defbctor back into cabinet as far as it will go.
Checkthat defiector feet face the front of the microwave
hood and that the exhaust ports face each other.
m
Gire el deflector de aire de manera que ias aletas dei deflector
® queden orientadas hacia ia parte deiantera dei homo de
microondas y la iumbrera de escape peque¢ia® de! deflector
de aire quede orientada hacia ia iumbrera deescape@ de la
campanadei homo.
Deslice comptetamentee! deflector de aire paravoiver a
coiocario en et gabinete. Verifique que ias abtas deI deflector
queden orientadas hacia ia parte detanterade ia campana
del microondas y que ias iumbreras de escapepequefias 10
queden odentadas la una hacia la otra.
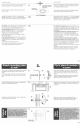
Slide the damper piate® under the retaining tabs. Reattach _o
damper plate with screw.
Deslice Ia ptaca de Ia compuerta ® debajode IasIengOetasde
retenciOn.Vuelvaa fijar la placa de la compuerta con el
tornillo.
Carefully slide the air deflector ® out of the cabinet.
Deslice con cuidadoet deflector de aire @ para sacarlo del
gabinete.
Rotate air deflector so that deflector feet ® facethe bottom
of the microwave hood andthe exhaust port ® of the air
deflector faces the exhaust port in microwave hood @.
Siide air deflector back into cabinet as far as it wiii go.
Checkthat deflector feet face the bottom of the cabinet and
that the exhaust ports face each other.
m
C_...
Gire e! deflector de aire de manera que ias atetasdel deflector
® quedenorientadas hacia ia parte inferior de ia campanadei
homo de microondas y Ia Iumbrera deescape peque_a® det
deflector de aire quedeorientada hacia Ia Iumbrera deescape
de Ia campana det homo @.
Deslice completamente el deflector de aire para volver a
coiocarIo en el gabinete. Verifique que iasatetas del deflector
queden orientadas hacia ia porte inferior detgabinete y que ias
lumbreras de escapepequefiasqueden orbntadas la una hacia
la otra.
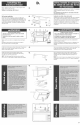
Slide the damper plate © under the retaining tabs. Save
screw for later use.
m
Desiice ia placa de ia compuerta © debajo de ias iengOetasde
retenci6n. Guardeel tornillo para usarlo postedormente.
£1