SPEEDCOOK APPLIANCE Lii_!iil;_:!!_, ¸ _i;_:_ ¸ill¸ ¸iili!i_:i%!_ ill ¸_i:i:_i ::i_ii!_ For questions about features, operation/performance parts, accessories or service, call: 1-800-253-1301. or visit our website at... www.whirlpool.eom Table of Contents .......................................
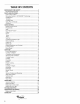
TABLEOF CONTENTS MICROWAVE OVEN SAFETY ........................................................ Electrical Requirements ............................................................... PARTS AND FEATURES ................................................................ 3 5 5 Oven Cavity Coating .................................................................... Microwave System - ACCUWAVE ®Technology ......................... Grill Element ...................................................................
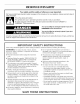
MICROWAVEOVENSAFETY Your safety and the safety of others are very important. We have provided many important safety messages in this manual and on your appliance. Always read and obey all safety messages. This symbol alerts you to potential hazards that can kill or hurt you and others. All follow the safety alert symbol and either the word "DANGER" or Thissafety is themessages safety alertwillsymbol. "WARNING.
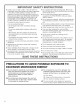
mMPORTANT SAFETY mNSTRUCTIONS " Liquids, such as water, coffee, or tea are abb to be overheated beyond the boiling point without appearing to be boifing. Visible bubbling or boiling when the container is removed from the microwave oven is not always present. THIS COULD RESULT IN VERY HOT LIQUIDS SUDDENLY BOILING OVER WHEN THE CONTAINER iS DISTURBED OR A SPOON OR OTHER UTENSIL iS INSERTED INTO THE LIQUID. " Do not clean with metal scouring pads.
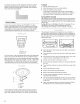
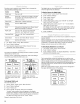
PARTSAND FEATURES This manual may cover several different models. The model you have purchased may have some or all of the features shown here. The appearance of your particular model may differ slightly from the illustrations in this manual. A i B D C E FG H ElectricalShockHazard Plugintoa grounded3 prongoutlet. Donot removegroundprong. Donot useanadapter. Donot usean extension cord. Failure to follow these instructions death, fire, or eJectrical shock.
In contrast, microwave ovens utilizing this microwave system deliver the selected power level continuously. This constant stream of microwave power helps to minimize overcooking of foods and messy food spatters. To Install: 1. Remove tape from the hub. 2. Place the support on the oven cavity bottom. 3. Place the turntable on the support. Fit the raised, curved lines in the center of the turntable bottom between the three spokes of the hub.
Thecircular grillrackisdesigned forgrillingintheoven.Place the grillracksecurely onSizzle Pan,theSizzle Panontheturntable, TheSizzle Pan,withanonstick surface andadetachable handle, andposition foodongrillrack.See"Assistance orService" to hasbeenspecially designed formicrowave use,andisidealfor orderreplacement parts. pan-frying (pan-browning) foodsintheoven.TheSizzle Panis alsousedasadrippanforgrilling. Usethehandle tograspthepan.Placegripping endontheedge ofpan,squeeze handle andliftpan.
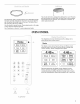
Touch "Doneness" if desired. (See "Doneness" Use" section. Display shows: Touch Screen Doneness The LCD touch screen is used to input commands. A light- to medium-pressure touch of the fingertip will activate the menu choice. However, sensitivity of the touch screen may vary, and using the tips or backs of fingernails may provide more accuracy when inputting commands. Press + button to change doneness level. I LESS From the "Home" screen, touch "Cook.
TheSTART control willstartanyfunction. Ifcooking isinterrupted, touching theSTART control padwill resume thepresetcycle. Foraddedconvenience, the"Start"touchpadisalsoavailable on somedisplay screens, andprovides thesamefunction asthe START controlpad. Thenumerical pads1-5sharefunction withtheEasyMinute controls. Whenoneofthesecontrols istouched (whileno function isoperating), theovenwillbegincooking athighpower for1to5 minutes, depending onwhichpadistouched.
Functions canbeselected, anddisplays canbechanged by usingtheHints& Settings menu. Option Setting Child Lock Turn on or off. Display Brightness Set at full, or reduced or off after 2 minutes of inactivity. See "Display Brightness and Contrast" section. The Night Light can be programmed when low light levels are detected. to automatically come on To Set the Sensor for Night Light: 1. On the "Home" screen, touch "More Choices." 2. 3. Touch "Hints & Settings." Touch "More Choices." 4.
To Activate Learning The oven must be off. Mode: 1. On the "Home" screen, touch "More Choices," 2. 3. Touch "Hints & Settings." Touch "More Choices," 4. 5. Touch "Learning Mode." Touch "On/Off" to set. 6. Touch "Finished," The Demo Mode demonstrates the features and capabilities the oven on the display screen. To Activate Repeat to deactivate Learning Mode, of Demo Mode: 1. On the "Home" screen, touch "More Choices," 2. 3. Touch "Hints & Settings." Touch "More Choices," 4.
Do Not Use Cookware and dinnerware must fit on the turntable. Always use oven mitts or pot holders when handling because any dish may become hot from heat transferred from the food. Do not use cookware and dinnerware with gold or silver trim. Use the following chart as a guide, then test before using. For Use with Grill Element MATERIAL RECOMMENDATIONS Aluminum Foil, Metal See "Aluminum Browning Dish Bottom must be at least 3/16"(5 mm) above the turntable. Follow manufacturer's recommendations.
To Use the Auto Cooking Functions: When using preset cooking powers and cook times for selected food types (Cereal, Eggs, Frozen Food, Vegetable, Grains, Meat, Poultry, and Fish), follow the "Cook" menus to select amounts and begin the auto function, See "Display/Touch Screen" section for sample programming. To Cook Manually: 1. Touch COOK TIME/POWER. 2.
Popcorn is a sensor function. The sensor determines the appropriate popping time of commercially packaged microwavable popcorn. Times and cooking power have been preset for reheating specific foods, plus manual. FOOD TO BE REHEATED • Remove rectangular cooking rack before use. • Do not use regular paper bags or glassware. Dinner Plates: 1 plate* of food, 2-4 plates of food • Pop only 1 package of popcorn at a time. Beverage: 1 or 2 cups (250 or 500 mL) • Follow manufacturer's popcorn popper.
The auto defrost feature has 3 categories: Meat, Poultry and Fish. It should not be used for food left outside the freezer more than 20 minutes and frozen ready-made food. The oven can also be manually set to defrost. The oven has a baking function which uses the grill element in conjunction with the Sizzle Pan and microwaves. Times and cooking powers have been programmed for 5 baked goods settings. • Food should be 0°F (-18°C) or colder at defrosting for optimal results.
4. Doneness may be adjusted at this time by touching "Doneness," and then touching "+" or "-." The Grill function uses 1,000-watt halogen and 500-watt quartz elements that heat quickly to grill a variety of foods. • Oven cavity and door will become very hot during grill element use. The use of oven mitts is recommended. Touch number pads to enter amount. Preparation instructions by touching "Prepare." 5. The circular grill rack and Sizzle Pan will become very hot.
To Use Simmer Rice/Simmer Pasta: To Use Steam Cook: 1. 2. On "Home" screen, touch "More Choices." Touch "Simmer Rice" or "Simmer Pasta." 1. 2. On "Home" screen, touch "More Choices." Touch "Steam/Simmer." 3. Follow menu to select specific food to be simmered. Enter amount. 3. Touch "Steam Cook." 4. Enter steam time. Doneness may be adjusted at this time by touching "Doneness," and then touching '%" or "-." 5. Touch "Start" or START pad. 4. Preparation instructions by touching "Prepare." 5.
Touch "Start" or START pad. If preheating is required for the food, "Preheating Pan" will appear in the display. When Sizzle Pan is preheated, 2 short tones will sound, and "Place food in pan." will appear in the display. Open door, place food in Sizzle Pan, close door and touch "Continue." The Sizzle Pan feature uses the pan to brown, crisp, and pan-fry foods in the oven. The Sizzle Pan reaches its optimal cooking temperature in approximately 3 minutes.
To Soften or Melt: 1. Place container of food on turntable. 2. On "Home" screen, touch "More Choices." 3. 4. On "More Choices" screen, touch "Soften & Melt." Select either "Soften" or "Melt." 5. Select food item to be softened or melted. 6. Enter amount. Food Poisoning Hazard Do not let food sit in oven more than one hour before or after cooking. Doneness may be adjusted at this time by touching "Doneness," and then touching "+" or "-." Preparation instructions by touching "Prepare." 7.
OVENCARE OVEN DOOR AND EXTERIOR (iii_i!!_ _i !,_ _:!_i:_i_i_ iiiiii _i_iiiiill !/_:!_' :ii_i_,:_i_ i_:ii_i_, i:!!ii ¸¸ IMPORTANT: Before cleaning, make sure all controls are off and the oven is cool. Always follow label instructions on cleaning products. Soap, water and a soft cloth or sponge are suggested first unless otherwise noted. GREASE Soak filters, then scrub and swish to remove embedded and grease. Rinse well and shake to dry. dirt Rinse with clean water and dry with soft, lint-free cloth.
RACK SUPPORTS Clean often to avoid soil buildup. Soil buildup may lead to arcing and cause damage to the oven. Do not attempt to remove supports from cavity walls. Do not use soap-filled scouring pads, abrasive cleaners, steelwool pads, gritty washcloths or some recycled paper towels. • Mild, nonabrasive soap or detergent and washcloth, toothbrush or cotton swab: The cooktop light is a 10W low-voltage halogen capsule bulb. See "Assistance or Service" section to reorder. To Replace: 1.
6. Remove the burned-out bulb by squeezing the wire clip together, pulling to the right and lifting, 7. Replace bulb, using tissue to handle bulb, or wearing cotton gloves. Do not touch bulb with bare fingers. 8. Close bulb cover. 9. Replace charcoal odor filter. 10. Slide the top of the vent grille into place. Push the bottom until it snaps into place. 11. Plug in oven or reconnect power.
Cooking • times seem too long Radio, TV or cordless phone interference into the same outlet? Is the cooking power set properly? See "Cooking Power" section. • Is the oven plugged Try a different outlet. Are large amounts of food being heated? Larger amounts of food need longer cooking times. • Is the radio or TV receiver near the oven? Move the receiver away from the oven, or adjust the radio or TV antenna. • Are the oven door and sealing surfaces clean? Make sure these areas are clean.
WHIRLPOOL®MICROWAVEHOODCOMBINATION WARRANTY ONE-YEAR FULL WARRANTY For one year from the date of purchase, when this appliance is operated and maintained according to instructions attached to or furnished with the product, Whirlpool Corporation will pay for FSP ® replacement parts and repair labor costs to correct defects in materials or workmanship. Service must be provided by a Whirlpool designated service company.