Instructions for Installation and Use 60 cm Slot-in Cookers Contents GB English, 1 WARNING,2 Introduction, 3 Installation, 4 Safety Information, 5 Features, 6 The Controls, 7 Clock/Minute Minder Operation8 Use and Care of the Ceramic Hob, 10-12 Grill, 13 Top Oven Cookery Notes, 14 Main Oven Cookery Notes, 15 Oven Temperature Charts, 16-17 Using The Main Oven for other Functions, 18 Care and Cleaning, 19-21 Cooking Results Not Satisfactory?, 22 Something Wrong with your Cooker?, 23-24 Disposal of the prod
WARNING WARNING: The appliance and its accessible parts become hot during use. Care should be taken to avoid touching heating elements. Children less than 8 years of age shall be kept away unless continuously supervised.
Introduction To the Installer: Before installation, fill in the product details on the back cover of this book. The information can be found on the rating plate. To the User: You must read the instructions prior to installing and using the appliance and then retain them for future reference. ! Before operating your new appliance please read this instruction booklet carefully. It contains important information concerning the safe operation, installation and maintenance of the appliance.
Installation GB WARNING - THIS APPLIANCE MUST BE EARTHED. Mains Connection Your cooker should have been checked to ensure that the voltage corresponds with your supply voltage, this is stated on the rating plate, which is situated on the outer rear panel. The model number and serial number are located on the front of the cooker, as shown on the Feature’s page.
Safety Information When used properly your appliance is completely safe but as with any electrical product there are certain precautions that must be observed. PLEASE READ THE PRECAUTIONS BELOW BEFORE USING YOUR APPLIANCE. · · · · Always · · · · · · · · · · · · · · · · · · • Remove all packing from the appliance before switching on for the first time. Understand the controls prior to using the appliance.
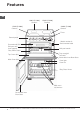
Features GB 1200W (B1600) Ceramic 1500W (B2000) Ceramic 1500W (B2000) Ceramic 1200W (B1600) Ceramic Timer Control panel Conventional Grill Grill pan and food support Model number & Serial number label Grill pan handle 'Stay Clean' liners Top Oven door Top oven/grill rod shelf Removable Inner Door Glass Main Oven door Oven light Oven fan 'Stay Clean' liners Main oven rod shelves Removable Inner Door Glass 6 PLEASE PHONE US TO REGISTER YOUR APPLIANCE AND ACTIVATE YOUR PARTS GUARANTEE ON 08448 2
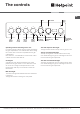
The controls GB GRILL LEFT FRONT PLATE LEFT REAR PLATE RIGHT REAR PLATE RIGHT FRONT PLATE GRILL/ TOP OVEN PILOT LIGHT MAIN OVEN TOP OVEN TOP OVEN THERMOSTAT LIGHT ELECTRONIC TIMER MAIN OVEN THERMOSTAT LIGHT Operating controls when the grill is in use In common with all cookers having controls sited above the grill compartment, care must be taken when setting the controls, due to the hot air expelled from the grill compartment.
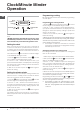
Clock/Minute Minder Operation Programming cooking GB ! A cooking mode must be selected before programming can take place. DISPLAY END OF COOKING icon DURATION icon •• •• DECREASE TIME button CLOCK icon TIMER icon INCREASE TIME button SET TIME button ! Only the Main Oven can be controlled by the automatic timer. ! NEVER operate the grill when the oven is set to cook automatically because the oven cavity can become warm and this may cause bacterial growth in food.
Cancelling a programme To cancel a programme: button until the icon corresponding to • press the the setting you wish to cancel and the digits on the display are flashing. Press the “-” button until the digits 00:00 appear on the display. • Press and hold the “+” and “-” buttons; this will cancel all the settings selected previously, including timer settings.
Using the Ceramic Hob GB WARNING: IF THE SURFACE IS CRACKED, SWITCH OFF THE APPLIANCE TO AVOID THE POSSIBILITY OF ELECTRIC SHOCK, FOR HOB SURFACES OF GLASSCERAMIC OR SIMILAR MATERIAL WHICH PROTECT LIVE PARTS. After connecting the cooker to mains, all segments of all displays are activated and a beep sounds. Switching on the cooking zones: To switch on a heating zone turn the knob corresponding to a chosen heater clockwise or anticlockwise choosing a desired power level from 1 to 10.
Maximum operating time in hours 1 10 2 5 3 5 4 4 5 3 6 2 7 2 8 2 9 1 High-flame cooking Overheating protection If the electronic elements overheat, the number signalizing the power level starts flashing, and the letters „F” and “c” (alternately) appear on the display. When the temperature has reached a suitable level, this message disappears and the hob may be used again.
Care of the Ceramic Hob GB Choice of saucepan’s It is essential that the saucepan’s you use on the ceramic hob are suitable. Do Always ALWAYS USE: Good quality pans with smooth, flat, heavy bases. Correct size saucepan's. The base of the pan must cover the heating zone completely. saucepan's with lids which are well fitting to reduce cooking time and energy use. We do not recommend the use of utensils with a base diameter greater than 25cm (l0ins).
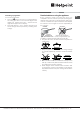
Grill Setting the Grill Grill Pan Handle CAUTION: Accessible parts may become hot during use. Young children should be kept away. The grill pan handle is detachable from the pan to facilitate cleaning and storage. Fix the pan handle securely before use: 1. Fit the handle to the grill pan so that the external ‘hooks’ embrace the edge of the pan (fig. 1) 2. Make sure that the middle part of the handle fits exactly the protruding support of the pan (fig .2) and holds the pan from the bottom.
Top Oven Cookery Notes GB The top oven should be used to cook small quantities of food.The oven is designed so that the grill element operates at a reduced heat output, this is combined with a heating element situated underneath the floor of the oven. To ensure even cooking of the food it is important that cooking utensils are positioned correctly on the oven shelf so that the element is directly above.
Main Oven Cookery Notes To heat the oven turn the knob clockwise, selecting the require temperature between 80°C (176°F) and 220°C (450°F) as recommended in the temperature chart. The pilot light will immediately come on and remain on until the oven reaches the required temperature. This light will then automatically go off and on during cooking as the oven thermostat maintains the correct temperature.
Oven Cooking Charts - Baking Top Oven Cooking GB Baking Pre-heat Temperature °C Time in mins.
Oven Cooking Charts - Meat GB Top Oven Cooking Meat Pre-heat Temperature °C Time (approx.) Beef/ Lamb (slow roasting) Yes 170/180 35 mins per 450g (1lb) + 35 mins over.
Using The Main Oven for other Functions GB ‚S’ SLOW setting „Slow” cook is identified as ‚S’ on the oven temperature scale. This is used for slow cooking, keeping food warm and warming plates for short periods. Extra care should be taken when warming bone china, as it may be damaged in a hot oven. DO NOT place food or plates directly on the oven floor as this could damage both the oven lining and the plates which are being warmed.
Care and Cleaning TURN OFF THE MAIN SWITCH AND ENSURE THE COOKER IS COLD BEFORE CLEANING. BEFORE SWITCHING ON AGAIN, ENSURE THAT ALL CONTROLS ARE IN THE OFF POSITION. NEVER USE BIOLOGICAL WASHING POWDER,HARSH ABRASIVES, SCOURING PADS, AEROSOL CLEANERS OR OVEN CHEMICAL CLEANERS OF ANY KIND, UNLESS SPECIFIED BELOW. ! Never use steam cleaners or pressure cleaners on the appliance. ! Clean the glass part of the oven door using a sponge and a non-abrasive cleaning product, then dry thoroughly with a soft cloth.
Care and Cleaning GB It should not normally be necessary to clean the ‚Stay clean’ panels in water. If the user feels it is desirable to do so, wash them in warm soapy water, followed by rinsing in clean water. Do not use enzyme/biological washing powder, harsh abrasives or oven chemical cleaners of any kind. Decorative trims (all models): It is advisable to clean the decorative trims regularly to prevent any build up of soiling which may detract from the appearance of the cooker.
Care and Cleaning Cleaning the glass doors Ensure anti-rattle bungs are fitted before fitting inner door glass. DROP DOWN DOORS Open the door fully and carefully slide the first inner glass towards you, taking care not to allow the glass to fall. If necessary, the glass can be pushed delicately from the back side. Repeat the same procedure with the next glass. Now the external glass panel can be washed. GB BE CAREFUL NOT TO DAMAGE THE GLASS PANELS BY PUSHING THEM TOO HARD.
Cooking Results Not Satisfactory? GB Problem Check Grilling Uneven cooking front to back Ensure that the grill pan is positioned centrally below the grill element. Fat splattering Ensure that the grill is not set to too high a setting. Baking (General) Uneven rising of cakes Ensure that the oven shelves are level by using a spirit level on the rod shelf and adjusting the wheels/feet. The oven should be checked both left to right and front to back.
Something Wrong with your Cooker? Before contacting your nearest Service Centre/Installer, check the problem guide below; there may be nothing wrong with your cooker. Problem Check Slight odour or small amount of smoke when grill / oven used for first time This is normal and should cease after a short period. Nothing works If you find that the timer display is blank, then it is likely that there is no electricity supply to your oven.
Something Wrong with your Cooker? GB Problem Check Oven lamp does not work The oven lamp is not covered by the guarantee. The part is easily changed (see the section on oven lamp replacement). A new lamp may be obtained from our Parts department see Key Contacts, back page. Draught from beneath control panel A gentle flow of air will be blown from beneath the control panel when the appliance is used.
Disposal of your product To minimise the risk of injury to children please dispose of your product carefully and safely. Remove all doors and lids. Remove the mains cable (where fitted) by cutting off flush with the appliance and always ensure that no plug is left in a condition where it could be connected to the electricity supply. To help the environment, Local Authority instructions should be followed for the disposal of your product.
GB Product Guarantee and Repair Information Guarantee 12 Months Parts and Labour Guarantee Your appliance has benefit of our manufacturer’s guarantee, which covers the cost of breakdown repairs for twelve months from the date of purchase.
GB PLEASE PHONE US TO REGISTER YOUR APPLIANCE AND ACTIVATE YOUR PARTS GUARANTEE ON 08448 24 24 24 27
Whirlpool EMEA S.p.A. Via Carlo Pisacane n.1 20016 Pero (MI), Italy VAT number: IT00693740425 www.hotpoint.co.