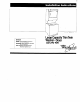
w IMPORTANT Installer: Leave Installation Instructions with the homeowner. Homeowner: Keep Installation Instructions for future reference. Save Installation Instructions for local electrical inspector’s use. Part No. 3389584 Rev.
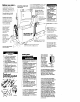
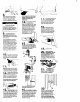
-. Before YOU start-e- Check locofion where washer/dryer WIII be Installed Proper Installation 1syour responslbllity Moke sure you hove everyihlng necessary for correct lnstollotlon Important: govermng nrdinancns observe all coaes and Check llmlt or ciornes moblle Contact Grounded eleclrical outlet ISrequired See Electrlcol requIremen& code requirements. Some codes do no1 permit the lnsfallaflon of aryers In garages. closets. homes and sleeplna auarlers.
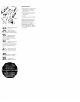
Four-inch Rrgid Metal Pipe 15preferred Plan instollal!on to use ihe lewest number of elbows and IurnS 5. For four -wire insiollation the threewire power supply cord must be removed and the oppl~ance wiring must be revised. The appltance cabinet must not be grounded to the neutral terminot. but must be connected to the Qroundrng wire (green) of power s6pply cord See Panel G. Alternate electrical connection - Mobile home installation, for detailed instructions.
6. Now Start.. . with washer/dryer area. in laundry Personal Injury Hazard More than one person is required to WI, tilt or move the washer/dryer because of its weight and size. Failure IO lollow these instructions may result in personal injury. I Truck only from the rear to prevent product damage. I Pull the yellow St&ping strap completely oui of the washer/dryec. 3 Remove label that covers the , yellow shipping strop. Pull to Completely remove the Shipping strap from the inside of the washer/dryer.
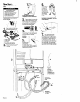
Insert comer posts or other type of suoaorl6 inches tram lett lea. Do Ndt’insed comer posts or otlier support In the center of the washer/dryer. Place hose clamp over washer drain connector. Push coupling end of drain hose onto washer connector. Use pliers to open clamp and slide clamp over drain hose. Check for QOOd fii. 14 If it is not level, carefully n tilt washerldrver backward until front of washer/ dryer Is 3-4 inches off of floor.
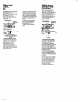
If washer/dryer does operate properly... Check the foIlowIng not to be sure that I Electric supply IS connected 2 House fuse or circuit breaker 1s Intact and light 3 Washer IId or dryer door IS closed 4 Controls are set In a runntng or “ON’ position j Dryer start button has been firmly pushed 6 Make sure yellow shippIng strap has been completely removed 23 24 leak; IS leaking . Check that you of your tools have all Turn on the water .
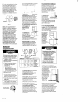
-. Alternate electrical connection Electrical Shock Hazard . Electrical ground is required on this appliance. . Improper conneclion of the equipment-grounding conductor line con result in electrical shock. . Check with a auakfied eleclrician if ydu are in doubt OS to whether Ihe appliance is properly grounded. - Do NoI modlly the power supply cord plug. If it will not fit the outlet, have a proper outlet installed by a aualilied electrician. . Use Q new 30-ampere power supply cord kit.
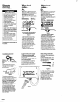
-. When local codes.. . C. Do Not Permit the use of the flexible power SUODIV cord eauiooed with the wash&/dryer and’ Permti copper, power-supply cable and Do Not Pen-nit connecting cabinet-grounding conductor to the neutral wire of the power supply cable: Figure 5 1. Disconnect the power supply. 2. Remove the power supply cord equipped with the washer/dryer as instructed. See “To remove the power supply cord’. Panel F. 3. lnstoll copper, power-supply cable through strain relief. 4.
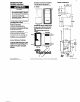
-. Recessed and closet installation Product dimensions Recessed, nonexhausted installation must use only the rear exhaust position and Exhaust Deflector Part instructions 3f B NO. 694609. I Fire Hazard l l It is recommended that the dryer be exhausted outside. Failure to do so may result in the risk of tire. If washer/dryer is installed in a closet, the dryer MUST be exhausted outside. Failure to do so may cause a fire. This washer/dryer may be installed in a recessed area ar clasd.