
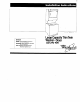
Service manual
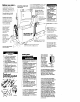
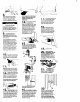

Place hose clamp over washer
drain connector. Push coupling
end of drain hose onto washer
connector. Use pliers to open
clamp and slide clamp over drain
hose. Check for QOOd fii.
Potential Floor Damage
Slide washer/dryer onto
cardboard or hardboard before
moving across floor. Failure to do
so may cause damage lo floor
covering.
9
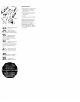
It you have room to work
n
from either side ot the
washer/dryer, move washer/dryer
close to final position so you can
easily complete the following steps
Go to Step 10.
If you are worklng In a closet or
recessed area, move the washer/
dryer into its final position and
remove cardboard or hardboard
from under washer/dryer, Remove
crccess panel bv removina three
Phillips-head screws and one
bumper. located at the top of the
access panel. Set panel. screws
and bumper aside. (See Step 17.
Panel D.) Complete the following
steps through the access area.
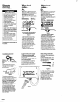
10
Put “hook’ end of droin
n
hose back in laundry tub or
stondpipe. Check for proper length
of drain hose. If drain hose is too
Iona. disconnect and repeat Steps
7 &id 8.
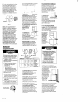
11
Before attaching water Inlet hoses,
run water through both faucets into
o bucket. This will get rld of particles
in water lines that might clog hoses.
12
Attach bottom hose (inlet
n
marked “H-) to hot woter
faucet. Attach top hose (inlet
marked ‘CY to cold water faucet.
Tighten the coupling to the faucet
bv hand. Use oliers to make final
Go-thirds turn
Move washer/dryer to its permanent
location. Remove cardboard or
hardboord from under washer/dryer.
13
I
Tllt washer/dryer forward
n
ralslng back legs 1’ off of
floor to adjust rear. setf-leveling legs.
Gently lower washer/dryer to floor.
Check levelness of the washer/dlyer
bv placlnct a carpenter’s level on
top of th&washdr,-first side to side,
then front to back. If washer/dryer
is level. go to Step 15.
Panel D
Insert comer posts or other type of
suoaorl6 inches tram lett lea. Do
Ndt’insed comer posts or otlier
support In the center of the
washer/dryer.
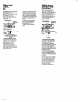
14
If it is not level, carefully
n
tilt washerldrver
backward until front of washer/
dryer Is 3-4 inches off of floor. Insert
4 comer posts under washer/dryer
about 6 Inches from the left leg.
Loosen nuts on each front leg.
Adjust the front legs up or down.
Titt washerldwer bockword and
remove comer posts. Gently lower
the washer/dryer to the floor.
Repeat Step 13. If it is still not level,
repeat Step 14 and then Step 13
until washer/dryer is level.
nuts on front legs UP tightly against
washer/dryer base. If nuts are not
tight against washer/dryer base, the
washer/dryer may vibrate.
CHECKTHAT I
KINKED AND
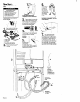
16
Secure drain hose to tub
n
or standpipe by wrapplng
the plastic strap around the hose as
shown In Figures A-C. lf draln hose
cannot be dropped in place, tt
must be cut exactly to length so
the ‘hooL’ end is held tighth/ over
the edge of the tub or standpipe
as shown in Figure D.
17
If you did not remove the
n
access panel in Step 9.
do so by removing three Phillips-
head screws and one bumper.
located at the top of the access
panel. Set panel. screws and
bumper aside.
18
Determine the length of
n
exhaust duct that is
needed to connect the drver to
the exhaust hood (see Exhbust
requirements. Panel 6). Connect
exhaust duct to the washer/dryer
and then to the exhaust hood.
. to seal all joints.
”
20
CHECK ELECTRICAL
. REQUIREMENTS. BE SURE
YOU HAVE CORRECT ELECTRICAL
SUPPLY AND RECOMMENDED
GROUNDING METHOD. Check the
Installation Instructions to see that
you have completed each step.
Complete any mlssed steps before
you continue.
Check that
all ports ore
n
now Instatlect. (See
parts Itst, Panel C.) lf there Is an
extra port. go back through steps to
see which step was sklpped.
22’ -
Check t&t vou removed all the
shipping pIekeS IklUdlnQ the
yellow shipplng strop with tts 3
cotterpins. Dispose of all shlpping
pieces in the proper manner.
It you do nol remove the yetlow
shipping strap, your washer/dryer
may “walk” away Worn Its location.