
Installation Guide


6
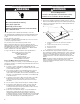
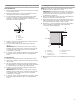
For Lift Top models only:
1. Raise cooktop. This will ensure that enough slack is left after
electrical connection to properly operate the lift top feature
of the cooktop.
2. If installing the cooktop over a lower built-in oven, check that
the cooktop lift top feature operates after oven installlation is
complete.
3. Reinstall the elements and burner bowls. Turn on the power
supply.
4. Depending on your model, push in and turn each control
knob to the”HI” position or touch “ON” and turn each
control knob to the “HI” position. Check the operation of the
cooktop elements and indicator lights.
Make Electrical Connection
This cooktop is manufactured with a frame connected, green or bare
ground wire. Connect the cooktop cable to the junction box through the
UL listed or CSA approved conduit connector.
Electrical Connection Options
For cooktops with a 4-wire cable:
If your home has: And you will be
connecting to:
Go to Section:
4-wire direct A fused disconnect
or circuit breaker
box
4-Wire Cable from
Power Supply to
4-Wire Cable from
Cooktop
3-wire direct A fused disconnect
or circuit breaker
box
3-Wire Cable from
Power Supply to
4-Wire Cable from
Cooktop
For cooktops with a 3-wire cable:
If your home has: And you will be
connecting to:
Go to Section:
4-wire direct A fused disconnect
or circuit breaker
box
4-Wire Cable from
Power Supply to
3-Wire Cable from
Cooktop
3-wire direct A fused disconnect
or circuit breaker
box
3-Wire Cable from
Power Supply to
3-Wire Cable from
Cooktop
A
D
B
C
E
F
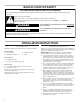
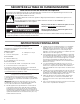
WARNING
Electrical Shock Hazard
Disconnect power before servicing.
Use 8 gauge copper wire.
Electrically ground cooktop.
Failure to follow these instructions can result in death,
fire, or electrical shock.
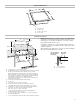
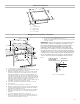
(12.7 cm)
5"
(8.9 cm)
3¹⁄₂"
(12.7 cm)
5"
(8.9 cm)
3¹⁄₂"
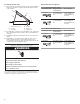
A. Switch box and cover
B. Cooktop
C. Countertop
D. Conduit
E. Burner box
F. Support rod