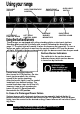
use&care guide Whirlpool SERIES GAS RANGE Continuous-Cleaning Model SF335ESR/ER(Shown) and Model SF315ESR/ER Microwave Ovens. Trash Compactors. Room Air Conditioners. Uehumidifiers. Automatic Washers. Clothes Dryers. Freezers.
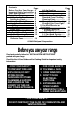
Contents Page Before You Use Your Range.... 2 Important Safety Instructions. 3 Parts and Features................ . 5 Using Your Range.................. . 6 Using the Surface Burners.... 6 Setting the Clock................ . 7 Using the Minute Timer..... . 8 Using the Oven Control..... . 9 Baking.............................. . 9 Broiiing ............................ . 10 Oven Vent............................ . 10 Lighting Standing Pilots.... . 11 Caring for Your Range.......... . 12 Control Panels ........
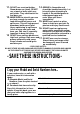
You are personally responsible for: • Reading and following all safety precautions in this Use & Care Guide and the Cooking Guide. • Having your range installed by a qualified installer. • Installing the range where it is protected from the elements, and on a level floor strong enough to hold its weight. • Having your range properly connected to electrical supply and grounded. (See "Installation Instructions’’.) • Having your range properly connected to the proper gas supply and checked for leaks.
11. DO NOT use a wet pot holder. 14. GREASE is flammable and should be handled carefully. Let Steam burns can result. DO NOT fat cool before attempting to use a towel or bulky cloth as a handle it. Do not allow grease to pot holder. They could catch fire collect around range or In and burn you. vents. Wipe spill-overs 12. MAKE SURE the utensils you use immediately. are large enough to contain 15. NEVER use a match or other food and avoid boil-overs and flame to look for a gas leak. Ex spill-overs.
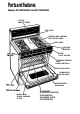
Parts and features Models SF335ESR/ER and SF315ESR/ER CLOCK/ MINUTE TIMER TOP LIGHT GRATES ANO CHROME REFLECTOR PANS OVEN VENT SURFACE URNERS OVEN LIGHT SWITCH SURFACE BURNER AND OVEN CONTROLS OVEN RACK GUIDE REMOVABLE OVEN DOOR OVEN BURNER (not shown) STANDARD OVEN (SF315ESR/ER) MODEL AND SERIAL NUMBER PLATE CONTINUOUSCLEANING OVEN (SF335ESR/ER)
Using your range TOP LIGHT SWITCH LEFT FRONT CONTROL KNOB RIGHT FRONT CONTROL KNOB OVEH TEMPERATURE CONTROL LEFT REAR CONTROL KNOB Using the Surface Burners SURFACE BURNER INDICATORS OVEN LIGHT SWITCH RIGHT REAR CONTROL KNOB These ranges are equipped with either standing pilots or electronic ignitors. Standing pilots must be lit initially with a match following the directions on page 11. The pilot light will remain lit when the burners are turned off.
WARNING; Burner flame should not extend beyond the edge of the cooking utensil. The flame can burn you and cause poor cooking results. SOe the “Cooking Guide” for Important utensil Information. Until you get used to the settings, use the following as a guide. Use LITE to light Use HI to start the burner. After the burner lights, turn control bock to o de sired setting to stop the clicking of the ignition. foods cooking or to bring liq uids to a boil.
Using the Minute Timer The Minute Timer does not start or stop the oven, it works like a kitchen timer. Set it in minutes up to an hour. You will hear a buzzer when the set time is up. DO NOT PUSH IN THE KNOB when setting the Minute Timer. 1. Without pushing It in, turn the Minute Timer Knob until the hand passes the setting you want. 2. without pushing in, turn the knob back to the setting you want. When the time is up, a buzzer will sound. To stop the buzzer, turn the Minute Timer hand to OFF.
Using the Oven Control Baking Rocks should be pla
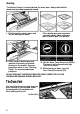
Broiling The Broiler Drawer is located below the oven door. Always broil with the drawer and oven door completely closed. 1. Pull the broiler drawer open and tilt the door panel down. 3. Place food on broiler pan and position the broiler pan before turning on the broiler. See pan placement chart in the "Cooking Guide" for recommended pan positions. Place broiler pan grid so grease can drain down sides into lower part of broiler pan. See picture. 4. Set the Oven Temp Control to BROIL.
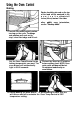
Lighting Standing Pilots To Light Cooktop Pilots: 3. To light, hold a lit match over the 2. Remove the grates and reflector pans from cooktop. Lift the cook top and rest on support rod. pilot light located between the front and back burners. The pilot flame should be Vi to % in (.635-.953 cm) high. 4. If the pilot flame needs adjusfment, turn the pilot adjustment screw on the manifold pipe. 5. Lower the cooktop and replace the grates before using the sur face burners. 3.
Caring for your range Control Panels WARNING: To avoid burns, first make sure all controls are off and the range is COOL. 1. Pull knobs straight off. 3. Wash knobs in warm soapy water or use baking soda and a damp, soft cloth or follow directions provided with glass cleaner. Rinse well and dry. CAUTION: Do not soak or use abrasive cleansers. They could rub off the markings. 12 . Usewarmsoapy water, baking soda and a damp soft cloth or spray glass cleaner to wipe the control panels.
Surface Burner Grates and Reflector Pans WARNING: To avoid burns, be sure the sur face burners are OFF and the surrounding parts are COOL. 3. Wash the grates and reflector pans in automatic dishwasher or use warm soapy water and plas tic scrub pad. Rinse and dry well. 2. Lift off grates and remove the reflector pans. 4. Replace reflector pans and grates. Lift-Up Cooktop 1. Lift front of cooktop at corners and swing up the support rod. 2. Carefully lower the cooktop onto the support rod.
Surface Burners Lift up the cooktop, following the instructions on poge13. Wipe off surface burners with warm soapy water and a soft cloth after each use. Occasionally check surface burner flames for size and shape as shown. If flames do not burn properly, you may need to remove the surface burners for cleaning (see pagel7), or call a qualified technician for burner adjustments. To adjust the LO settings on the control knobs: 1. Turn on the surface burners, then set the controls on LO. 2.
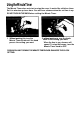
The Continuous-Cleaning Oven (Model SF335ESR/ER only) standard oven walls are coated with smooth porcelain. Your continuouscleaning oven walls are coated with a special, rougher porcelain. A fat spat ter beads up on the smooth surface, but spreads out on the rougher surface. The bead of fat on the smooth surface chars and turns black. The spread-out fat on the rough surface gradually burns away at medium to high baking temperatures so the oven can return to a presentably clean condition.
Hand Cleaning WARNING: DO NOT ' ■! USE COMMERCIAL A ^ - OVEN CLEANERS ^ ^ IN YOUR OVEN. They may become trapped in the porcelain, damage the finish and surface and give off harmfui fumes. RACKS - Use soapy steel wool pad for stubborn stains. Rinse well. sudsy wafer. Use a plastic scouring pod for stubborn spots. Rinse well. Do not use stool wool or abraslvo otoonors. WALLS AND DOOR - Wash with hot soapy water. Use a soapy steel wool pod for stubborn spots. Rinse well.
Cleaning Chart WARNING: To avoid burns, be sure all controls are OFF and the range is COOL. PART Exterior surfaces Surface burner grates Chrome reflector pans WHAT TO USE HOW TO CLEAN Soft cloth and warm soapy water or baking soda. • Wlp>e off regularly when cooktop and range are cool. Nylon or plastic scrubbing pad for stubborn spots. • Do not allow food containing acids (such as vinegar, tomato, lemon Juice or milk) to remain on surface. Acids will remove the finish.
Control knobs Warm soapy water and soft cloth. • Wash, rinse and dry well. Control panels Warm soapy water or baking soda, soft cloth and spray glass cleaner. • Wash, rinse and dry well. Oven racks Warm soapy water and plastic scrubbing pad. • Wash, rinse and dry well. Use plastic scrubbing pad for stub born areas. Oven door glass Spray glass cleaner; warm soapy water and soft cloth. • Make sure oven Is cool. • Do not soak. • Follow directions provided with cleaner.
Changing the Cooktop Light The Top Light switch is located on the ieft side of the front controi panel. WARNING: To avoid possible shock hazard, turn off electric power at the main power supply. 1. Lift up the cooktop and discon nect the electrical plug to the backguard. Lower the cooktop. 3. Turn backguard over. Remove the four screws holding the back cover panel, then remove the cover. 2. Grasp each side of the back- 4.
Changing the Oven Light The oven light will only come on when you push the Oven Light switch on the control panel. Push it again to turn off the light. o WARNING: To avoid possible shock haz ard, turn off elecfric power at the main power suppiy. 2. Remove the light bulb from its socket. Replace the bulb with a 40-watt appliance bulb. Turn the power back on at the main power supply. K you need service or assistance, we suggest you follow these four steps: L Before calling for assistance...
If control knob(s) will not turn: • Did you push in before trying to turn? If soil is visibie on ContinuousCieaning oven finish: • The special finish is designed to graduaily reduce oven soti during normal baking or roasting. It is not designed to keep your oven spot less, only presentably clean. • The door is cooler than the oven walls. Soil will be more visible on the door than other areas in the oven. See page 16 for how to clean. • Sugar and starchy spills may leave stains.
Notes 22
Notes 23
'1 AVhMpdol / Home .jE. Appliances Making your world a little easier. Part No. 75666-00/4157063 ©1986 Whirlpool Corporation Printed in U.S.A. Automatic Washers. Clothes Dryers. Freezers. Refrigerator-Freezers. Ice Makers. Dishwashers. Built-In Ovens and Surface Units. Ranges.