
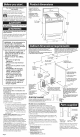
Installation guide


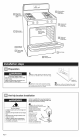
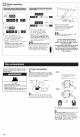


_,,Cooktopburners:Pull
rangeoutfromcountertop /..<
front about 4 inches. There _._._--"_
are two clips, one on each --_-_-_/X_.
side, located underneath the _-,_1 2-3/8"
cooktop 2-3/8 inches back - Ill _"
from the front of range. _j'
Carefully slide a putty knife
in between the cooktop and
the oven part of range. While gently lifting the
cooktop, push in on the putty knife to release the
clip. Repeat on other side.
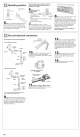
orifice spuds
NAT
Replace
orifice spud
with the
L.P,
gas
manifold
L_H L_J %:9
LR. L.F. R.F. R.R.
L.P. Gas
Surface Propane Rate Orifice
burner (BTU/hr) Number
Left rear 6,500 68
Left front 11,500 60
Right front 8,500 65
Right rear 5,500 .70
.. Prop open cooktop maintop. Remove the
venturi plates. Locate L.P. gas orifice spuds in
literature package. Orifice spuds are stamped
with a number. Remove Natural gas orifice
spuds using a 3/8" combination wrench. Install
LP. gas orifice spuds as listed in the chart to
replace the Natural gas orifice spuds.
Place Natural gas orifice spuds in plastic parts
bag for future use and keep with literature
package. Reinstall venturi plates. Lower maintop
to operating position. Reinstall burner bases,
screws, caps and burner grates.
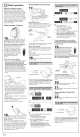
Natural gas
increase gas
increase flame size
pro-set at factory
for Natural gas
LP. gas
_Jdecrease gas
decrease
flame size
= Oven burner: Use 1/2" combination
wrench to turn the orifice hood down snug onto
pin (approximately 2 to 2-1/2 turns). DO NOT
OVERTIGHTEN. The burner flame cannot be
properly adjusted if this conversion is not made.
orifice hoe_
.. Broil burner: Use 1/2" combination wrench
to turn the orifice hood down snug onto pin
(approximately 2 to 2-1/2 turns). DO NOT
OVERTIGHTEN. The burner flame cannot be
properly adjusted if this conversion is not made.
.. Reinstall the storage drawer. Complete
installationsections D through E, Pages 5-7.
Checking for proper cooktop burner and oven
flame is very important.
YOU MUST ADJUST "LOW" SETTING FOR
EACH COOKTOP BURNER. SEESTEP 16,
PAGE 6.
The small inner cone should have a very distinct
blue flame 1/4" to 1/2" long. The outer cone is not
as distinct as the inner cone. L.P.gas flames
have a slightly yellow tip, If the flame is noisy or
blowing, it is getting too much air. If the flame is
soft and lazy, it is not getting enough air.
Natural gasconversion
[] Complete installation sections A-C (Pages
4-5) before converting cooktop to natural gas.
Check that main gas supply line has been shut
off and the power supply cord isdisconnected.
screws
burner base
cap
[] Remove storage drawer and oven racks.
Remove burner grates, caps and screws holding
burner bases to cooktop.
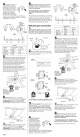
pressure
regulator \.
................... 11.4
pressure
regulator
L,P,
_lastic
over
cap
washer --
Nat, gas LP. gas
DO NOT REMOVE THE PRESSURE REGULATOR.
[] Pressure regulator: Remove plastic cover.
Turn cap marked "L.P." on front of pressure
regulator counterclockwise with a wrench to
remove. De Net disturb or remove the spring
beneath the cap. Turn the cap over and reinstall
cap on regulator so that the letter "N" is visible.
Replace plastic cover over cap.
,, Cooktop burners:
Pull range out from
countertop front about
4 inches.There are two
clips, one on each side,
located underneath the
cooktop 2-3/8 inchesback
from the front of range.
Carefully slide a putty
knife in between the
cooktop and the oven part of range. While gently
lifting the cooktop, push in on the putty knife to
release the clip. Repeat on other side.
L.R. LF. R.F. R.R.
Natural Gas
Rate Orifice
(BTU/hr) Number
Left rear 7,500 55
Left front 12,500 1.85
Right front 9,500 1.45
Right rear 6,500 1.20
[] Prop open cooktop maintop, Remove the
ventud plates. Locate Natural gas orifice spuds
in literature package. Orifice spuds are stamped
with a number. Remove LP. gas orifice spuds
using a 3/8" combination wrench. Install Natural
gas orifice spuds as listed in the chart to replace
the LP. gas orifice spuds.
Place LP. gas orifice spuds in plastic parts bag
for future use and keep with literature package.
Reinstall venturi plates. Lower maintop to
operating position. Reinstall burner bases,
screws, caps and burner grates.
orifice hood/
hood
pin
Natural gas
increase gas
increase flame size
pro-set at factory
for Natural gas
LP. gas
Jdecrease gas
decrease
flame size
[]Oven burner: Use 1/2" combination
wrench to loosen the orifice hood away from pin
(approximately 2 to 2-1/2 turns). The burner
flame cannot be properly adjusted if this
conversion is not made.
/
[] Broil burner: Use 1/2"combination wrench
to loosen orifice hood away from pin
(approximately 2 to 2-1/2 turns). The burner
flame cannot be properly adjusted if this
conversion is not made.
[] Reinstall the storage drawer. Complete
installationsections D through E, Pages 5-7.
Checking for proper cooktop burner and oven
flame isvery important.
YOU MUST ADJUST "LOW" SETTING FOR
EACH COOKTOPBURNER. SEESTEP 16, PAGE 6.
Natural gas flames do not have yellow tips.
Page8