Instructions for use Directives d’utilisation Инструкция по эксплуатации Инструкции за използване Інструкції з використання Пайдалану нұсқаулығы دليل االستعمال
SPIW409LLHA SPIW409LLHA/O SPIW412LLHA SPIW412LLHA/O SPOWHA 407 SPOWHA 407/O SPOWHA 409 SPOWHA 409/O SPOWHA 412 SPOWHA 412/O ENGLISH Instructions for use Page 4 FRANÇAIS Consignes d’utilisation Page 15 РУССКИЙ Инструкция по эксплуатации Стр. 26 БЪЛГАРСКИ Инструкции за използване Страница 37 УКРАЇНСЬКА Інструкції з використання стор.
SAFETY INSTRUCTIONS IMPORTANT TO BE READ AND OBSERVED • Download the complete instruction manual on docs.whirlpool.eu or call the phone number shown on the warranty booklet. • Before using the appliance, read these safety instructions. Keep them nearby for future reference. • These instructions and the appliance itself provide important safety warnings, to be observed at all times.
SAFETY INSTRUCTIONS • When moving or relocating the air conditioner, consult experienced service technicians for disconnection and reinstallation of the unit. • The appliance shall not be installed in the laundry. • Appliance shall be installed, operated and stored in a room with a floor area larger than 10 m2. Mount the indoor unit at least 2.5 m above floor or grade level.
SAFETY INSTRUCTIONS DISPOSAL OF PACKAGING MATERIALS The packaging material is 100% recyclable and is marked with the recycle symbol ( ). The various parts of the packaging must therefore be disposed of responsibly and in full compliance with local authority regulations governing waste disposal. DISPOSAL OF HOUSEHOLD APPLIANCES This appliance is manufactured with recyclable or reusable materials. Dispose of it in accordance with local waste disposal regulations.
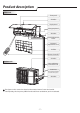
Product description Indoor unit Front panel Air Intake Display Panel Emergency Panel Air Outlet Vertical Adjustment Louver Horizontal Adjustment Louver Air Filter Remote Controller Air Intake Outdoor unit Pipes and Power Connection Cord Drain Hose Note: Condensate water drains at COOLING or DRY operation. Air Outlet The figures in this manual are based on the external view of a standard model. Consequently, the shape may differ from that of the air conditioner you have selected.
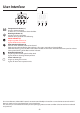
User Interface 5 6 Temperature indicator (1) Displays set temperature. It shows “FC” as a reminder to clean the filter. Running indicator (2) It lights up during operation. It flashes during outside unit defrosting. Smart indicator (3) It lights up when Smart is on. It goes off when Smart ends. Filter monitor indicator (4) It flashes when the filter needs to be cleaned. Filter monitor indicator flashes after 720 hours of usage as reminder to clean the filter.
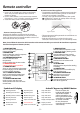
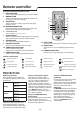
Remote controller Insert the batteries into RC 1. Insert a pin and gently press down on the battery cover and push in the direction of the arrow to remove, as shown. 2. Insert 2 AAA batteries (1.5V) into the compartment. Ensure that “+” and “-” polarity is correctly positioned. 3. Close the battery cover on the remote control. • Remote Control presetting Each time the batteries are replaced in the remote controller, the remote controller pre-set at Heat Pump mode.
Remote controller Function description of buttons (J1-39) 1. ON/OFF BUTTON Starts or Stops the appliance by pressing this button. 2. MODE BUTTON Used to select the operation mode in sequence of Cooling, dry, fan only or heating. 3. FAN BUTTON Used to select fan speed in sequence auto, high, medium or low. 4-5. TEMPERATURE BUTTON Used to select the room temperature. Used to set time in timer mode and real time clock. 6. SMART BUTTON Sets or cancels Smart operation. 7.
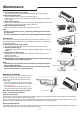
Maintenance Clean front panel of Indoor Unit 1. Disconnect from the power supply Turn off the appliance first before disconnecting from power supply. 2. Remove the front panel Open the front panel as shown by the arrow (Fig. A). Pull the slots at the side of the front panel with force to take out the front panel (Fig. B). 3. Clean the front panel Wipe it with a soft and dry cloth. Use lukewarm water (below 40°C) to clean if the appliance is very dirty. After cleaning let it dry. 4.
Installation instruction Installation diagram To get detail installation information, please go to: docs.whirlpool.eu Distance from ceiling should be over 200mm Distance from wall should be over 50mm Distance from the wall should be over 50mm Indoor unit Distance from floor should be over 2500mm Distance from the wall should be over 50mm NOTE: The figure is only a simple presentation of the unit, it may not match the external appearance of the product you purchased.
Troubleshooting Operation problems are often due to minor causes, please check and refer to the following chart before contacting the service. This may save time and unnecessary expenses.
AFTER SALES SERVICE Before contacting the Customer Care Centre: 1. Try to solve the problem yourself based on the descriptions given in the “Troubleshooting”. 2. Turn the appliance off and restart it to see if the fault persists. If after carrying out the above checks, the fault persists, contact the Customer Care Centre.
Whirlpool EMEA S.p.A. Socio Unico Via Carlo Pisacane, 1 - 20016 Pero (MI) - Italy GB 400011082095 FR RU BG UK KZ AR Whirlpool® Registered trademark/TM Trademark of Whirlpool group of companies - © Copyright Whirlpool Europe s.r.l. 2016. All rights reserved - http://www.whirlpool.