
Control Guide

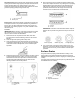
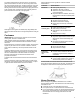
Table Of Contents
- Feature Guide_W11085353
- Touch Panel_WOBIMW_CG_OLD
- Display_W11085353
- Display Navigation_W11085353
- Setup and Demo Mode_W11085353
- Cooking Methods_W11085353
- Favorites_W11220320
- Assisted Cooking_W11220322
- Tools_W11085353
- More Modes_W11085353
- AquaLift Self-Cleaning Tech_GFSR_CG
- Surface Temperatures_GFSR_CG
- Surface Burners_W11085353
- Surface Grates_W11297617
- Cookware_W11085354
- Home Canning_GFSR_CG
- Oven Use_Ranges/Ovens_CG
- Racks and Bakeware_W11297617
- Baking and Roasting_W11085353
- Broiling_W11281996
- Convection Cooking_W11281987
- Cook Time_W11085353
- Feature Guide_W11085353_FR
- Touch Panel_WOBIMW_CG_FR
- Display_W11085353_FR
- Display Navigation_W11085353_FR
- Setup and Demo Mode_W11085353_FR
- Cooking Methods_W11085353_FR
- Favorites_W11220320_FR
- Assisted Cooking_W11220322_FR
- Tools_W11085353_FR
- More Modes_W11085353_FR
- AquaLift Self-Cleaning Tech_GFSR_CG_FR
- Surface Temperatures_GFSR_CG_FR
- Surface Burners_W11085353_FR
- Surface Grates_W11297617_FR
- Cookware_W11085354_FR
- Home Canning_GFSR_CG_FR
- Oven Use_Ranges/Ovens_CG_FR
- Racks and Bakeware_W11297617_FR
- Baking and Roasting_W11085353_FR
- Broiling_W11281996_FR
- Convection Cooking_W11281987_FR
- Cook Time_W11085353_FR
- Feature Guide_W11085353_SP
- Touch Panel_WOBIMW_CG_SP
- Display_W11085353_SP
- Display Navigation_W11085353_SP
- Setup and Demo Mode_W11085353_SP
- Cooking Methods_W11085353_SP
- Favorites_W11220320_SP
- Assisted Cooking_W11220322_SP
- Tools_W11085353_SP
- More Modes_W11085353_SP
- AquaLift Self-Cleaning Tech_GFSR_CG_SP
- Surface Temperatures_GFSR_CG_SP
- Surface Burners_W11085353_SP
- Surface Grates_W11297617_SP
- Cookware_W11085354_SP
- Home Canning_GFSR_CG_SP
- Oven Use_Ranges/Ovens_CG_SP
- Racks and Bakeware_W11297617_SP
- Baking and Roasting_W11085353_SP
- Broiling_W11281996_SP
- Convection Cooking_W11281987_SP
- Cook Time_W11085353_SP

6
To Enable and Activate Sabbath Mode:
1. Press the Tools keypad.
2. Select MORE MODES.
3. Select SABBATH MODE.
4. Press SABBATH MODE again to enable Sabbath Mode
(Sabbath Mode is preset to Off).
5. Select YES if you would like to have your oven on and baking
during the Sabbath.
6. Enter the desired temperature.
(Optional) For timed cooking in Sabbath Mode, Press ADD A
COOK TIME for the selected oven, Enter the desired cook
time and then press NEXT.
7. Select START.
To Disable and Exit Sabbath Mode:
1. Press the Oven Cancel keypad.
2. Press and hold the display screen for three seconds.
To Adjust Temperature:
1. Press the +/- 25 on the display screen to select the new
temperature.
NOTE: The temperature adjustment will not appear on the display,
and no tones will sound.
Temperature Calibration
IMPORTANT: Do not use a thermometer to measure the oven
temperature. Elements will cycle on and off as needed to maintain
a consistent temperature but may run slightly hot or cool at any
point in time due to this cycling. Opening the oven door will affect
cycling of the elements and impact the temperature.
The oven provides accurate temperatures and has been
thoroughly tested at the factory. However, it may cook faster or
slower than your previous oven, causing baking or browning
differences. If necessary, the temperature calibration can be
adjusted in either Fahrenheit or Celsius.
A minus sign means the oven will be cooler by the displayed
amount. The absence of a minus sign means the oven will be
warmer by the displayed amount. Use the following chart as a
guide.
The oven display will continue to show the original set
temperature and will not reflect the calibration offset. For example,
if set to 350°F (177°C) and calibrated to -20, the display will
continue to show 350°F (177°C).
Adjust the oven temp up to (+,-) 30°F (-18°C).
It is recommended to make changes in 5°F (3°C) increments until
desired results are achieved.
To Adjust Oven Temperature Calibration:
1. Press the Tools keypad.
2. Select MORE MODES.
3. Select TEMPERATURE CALIBRATION.
4. Scroll from left to right to increase or decrease the
temperature.
AquaLift
®
Self-Cleaning Technology
AquaLift
®
Self-Cleaning Technology is a first-of-its-kind cleaning
solution designed to minimize the time, temperature, and odors
that ordinarily come with traditional self-cleaning methods. With
AquaLift
®
Self-Cleaning Technology, an innovative coating on the
interior of the oven is activated with heat and water to release
baked-on soil. To use AquaLift
®
Self-Cleaning Technology, simply
wipe out loose debris, pour water into the oven bottom, and run
the AquaLift
®
Self-Cleaning cycle. When the cycle finishes in
under 1 hour at a lower temperature than in traditional self-
cleaning methods, just wipe out the remaining water and loose
debris. See the “Clean Cycle” section in the Owner’s Manual for
more detailed instructions. For additional information, frequently
asked questions and videos on using AquaLift
®
Self-Cleaning
Technology, visit our website at
http://whirlpoolcorp.com/aqualift.
Surface Temperatures
When the range is in use, all range surfaces may become hot,
such as the knobs and oven door.
Baking, Warming or Storage Drawer
When the oven is in use, the drawer may become hot. Do not
store plastics, cloth, or other items that could melt or burn in the
drawer.
Oven Vent
The oven vent releases hot air and moisture from the oven, and
should not be blocked or covered. Do not set plastics, paper, or
other items that could melt or burn near the oven vent.
Surface Burners
IMPORTANT: Do not obstruct the flow of combustion and
ventilation air around the burner grate edges.
Burner cap: Always keep the burner cap in place when using a
surface burner. A clean burner cap will help avoid poor ignition
and uneven flames. Always clean the burner cap after a spillover,
and routinely remove and clean the caps according to the
“General Cleaning” section in the Owner’s Manual.
NOTE: Each round burner base is marked with a letter indicating
the burner size.
Alignment: Be sure to align the gas tube opening in the burner
base with the orifice holder on the cooktop and the igniter
electrode with the notch in the burner base.
A. Burner cap
B. Gas tube opening
C. Burner base
D. Igniter electrode
E. Orifice holder