WASHER/DRYER USE AND CARE GUIDE Table of Contents . WASHER/DRYER SAFETY............................................2 ACCESSORIES...............................................................4 USING LESS WATER AND ENERGY............................4 CHECK YOUR VENT SYSTEM FOR GOOD AIRFLOW ..................................................5 CONTROL PANEL AND FEATURES.............................6 WASHER CYCLE GUIDE...............................................7 DRYER CYCLE GUIDE............................
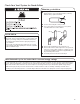
Washer/Dryer Safety IMPORTANT: When discarding or storing your old clothes dryer, remove the door.
Accessories Enhance your dryer with these premium accessories. For more high-quality items or to order, call 1-800-901-2042, or visit us at www.whirlpool.com/accessories. In Canada call 1-800-807-6777, or visit us at www.whirlpoolparts.ca. Part Number Accessory: Part Number Accessory 8212614 Dryer vent lint brush 49971 Compact dryer stand – white 3404351 Drying rack – fits 29" (737 mm) Super Capacity, 6.5 cu. ft (0.18 cu.
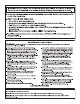
Check Your Vent System for Good Airflow Maintain good airflow: n n Clean your lint screen before each load. Replace plastic or foil vent material with 4" (102 mm) diameter heavy, rigid vent material. 4" (102 mm) n Use the shortest length of vent possible. n Use no more than four 90° elbows in a vent system; each bend and curve reduces airflow. Good Better Good airflow Along with heat, dryers require good airflow to efficiently dry laundry.
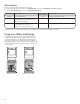
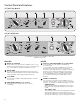
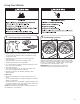
Control Panel and Features 27" (68.5 cm) Models 1 2 4 3 5 6 24" (61 cm) Models 1 2 3 5 6 Not all features and options are available on all models. Appearance may vary. WASHER 1 WASH CYCLE KNOB 2 WASH TEMP 3 SOIL LEVEL 4 Use the Wash Cycle knob to select available cycles on your washer. Turn the knob to select a cycle for your laundry load. See “Cycle Guide” for detailed descriptions of cycles.
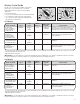
Washer Cycle Guide Not all cycles or options are available on all models. Refer to the cycle control knob on your washer. Wash temperatures are selected using the Wash Temp knob. For best performance: • Choose the cycle that best fits the load being washed. • Use Prewash or Soak for heavily soiled clothing. • Do not leave the washer lid open unattended once the washer has started to fill.
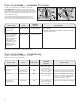
Dryer Cycle Guide — Automatic Dry Cycles Not all cycles and settings are available on all models. AUTOMATIC DRY – Automatic cycles give the best drying in the shortest time. They sense moisture in the load or air temperature and shut off when the load reaches the selected dryness level. Drying time varies based on fabric type, load size, and dryness setting. Select a drying temperature based on the fabrics in your load.
Using Your Washer 1. Sort and prepare your laundry • Empty pockets. Loose change, buttons, or any small object can pass under the agitator and become trapped, causing unexpected sounds. • Sort items by recommended cycle, water temperature, and colorfastness. • Separate heavily soiled items from lightly soiled. • Separate delicate items from sturdy fabrics. • Do not dry garments if stains remain after washing, because heat can set stains into fabric. • Treat stains promptly.
3. Load laundry into washer Load garments in loose heaps evenly around basket wall. For best results, do not pack the load tightly. Do not wrap large items such as sheets around the agitator; load them in loose piles around the sides of the basket. Try mixing different sized items to reduce tangling. 5.
7. Select SOIL LEVEL 9. Select Deep Water Wash option (on 27" models) Select the soil level setting most suitable for your load. On some models, set DEEP WATER WASH to ON for bulky loads such as sheets or bedding. 8. Select TEMPERATURE 10. Pull out Cycle knob to begin wash cycle Once you select a cycle, select the desired wash temperature by turning the WASH TEMP knob to the appropriate setting based on your load. All rinses are tap cold.
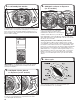
Using Your Dryer WARNING: To reduce the risk of fire, electric shock, or injury to persons, read the IMPORTANT SAFETY INSTRUCTIONS before operating this dryer. Before using your dryer, wipe the dryer drum with a damp cloth to remove dust from storing and shipping. 1. Clean the lint screen 27" models 3. Select cycle 24" models Clean the lint screen before each load. On 27" models, pull the lint screen straight up. Roll lint off the screen with your fingers. Push the lint screen firmly back into place.
4. Select End of Cycle Signal (optional, on 27" models only) Additional Features USING THE DRYING RACK To obtain a drying rack for your dryer, follow the instructions included in your dryer drum. Remove and discard any packing material before use. Use the drying rack for items that you do not want to tumble dry, such as sweaters and tennis shoes. When you use the drying rack, the drum continues to turn, but the rack remains stationary.
Washer/Dryer Maintenance WATER INLET HOSES Replace inlet hoses after 5 years of use to reduce the risk of hose failure. Periodically inspect and replace inlet hoses if bulges, kinks, cuts, wear, or leaks are found. When replacing your inlet hoses, mark the date of replacement on the label with a permanent marker. WASHER CARE (cont.) Chlorine Bleach Procedure (Alternative): a. Open the washer lid and remove any clothing or items. b. Add 1 cup (236 mL) of liquid chlorine bleach to the bleach compartment.
CLEANING THE WASHER/DRYER LOCATION Keep washer/dryer area clear and free from items that would block the airflow for proper washer/dryer operation. This includes clearing piles of laundry in front of the washer/ dryer. CLEANING THE LINT SCREEN Every load cleaning A screen blocked by lint can increase drying time. On 27" models, the lint screen is located in the door opening of the dryer. On 24" models, it is located inside the dryer on the back wall. To clean: 1.
CHANGING THE DRUM LIGHT (on some models) 1. Unplug dryer or disconnect power. 2. Open the dryer door. Locate the light bulb cover on the back wall of the dryer. Using a Phillips-head screwdriver, remove the screw located in the lower right-hand corner of the cover. Remove the cover. VACATION, STORAGE, AND MOVING CARE (cont.) 3. Turn bulb counterclockwise. Replace the bulb with a 10-watt appliance bulb only. Replace the cover and secure with the screw. 4. Plug into a grounded outlet or reconnect power.
WINTER STORAGE CARE In the U.S.A. IMPORTANT: To avoid damage, install and store washer/dryer where it will not freeze. Because some water may stay in hoses, freezing can damage washer/dryer. If storing or moving during freezing weather, winterize your washer/dryer. To winterize washer/dryer: 1. Shut off both water faucets, disconnect and drain water inlet hoses. 2. Put 1 qt. (1 L) of R.V.-type antifreeze in basket and run washer on RINSE cycle for about 30 seconds to mix antifreeze and remaining water. 3.
Troubleshooting — Washer First try the solutions suggested here or visit our website at www.whirlpool.com/product_help – In Canada www.whirlpool.ca for assistance and to possibly avoid a service call. If you experience Possible Causes Solution Vibration or Off-Balance Check the following for proper installation or see “Using Your Washer” section. Feet may not be in contact with the floor and locked.
Troubleshooting — Washer (cont.) In the U.S.A. In Canada First try the solutions suggested here or visit our website at www.whirlpool.com/product_help – In Canada www.whirlpool.ca for assistance and to possibly avoid a service call. If you experience Possible Causes Solution Washer not performing as expected (cont.) Washer won’t run or fill, washer stops working (cont.) Check proper electrical supply. Plug into a grounded outlet or reconnect power. Do not use an extension cord.
Troubleshooting — Washer (cont.) First try the solutions suggested here or visit our website at www.whirlpool.com/product_help – In Canada www.whirlpool.ca for assistance and to possibly avoid a service call. If you experience Possible causes Solution Washer not performing as expected (cont.) Water level seems too low, or the washer appears to not fill completely The top of the agitator is much higher than the highest water level. This is normal and necessary for clothes to move freely.
Troubleshooting — Washer (cont.) First try the solutions suggested here or visit our website at www.whirlpool.com/product_help – In Canada www.whirlpool.ca for assistance and to possibly avoid a service call. If you experience Solution Possible Causes Washer not performing as expected (cont.) Not cleaning or removing stains (cont.) Using too much detergent. The suds from too much detergent can keep washer from operating correctly.
Troubleshooting — Dryer First try the solutions suggested here or visit our website at www.whirlpool.com/product_help – In Canada www.whirlpool.ca for assistance and to possibly avoid a service call. If you experience Solution Possible Causes Dryer not performing as expected Clothes are not drying satisfactorily, drying times are too long Dryer will not run Unusual sounds 22 Lint screen clogged with lint. Lint screen should be cleaned before each load. The Fluff Air cycle has been selected.
Troubleshooting — Dryer (cont.) First try the solutions suggested here or visit our website at www.whirlpool.com/product_help – In Canada www.whirlpool.ca for assistance and to possibly avoid a service call. If you experience Possible Causes Solution Dryer not performing as expected (cont.) No heat Cycle time too short Household fuse is blown or circuit breaker has tripped. The drum may be turning, but you may not have heat. Electric dryers use 2 household fuses or circuit breakers.
WHIRLPOOL® LAUNDRY LIMITED WARRANTY ATTACH YOUR RECEIPT HERE. PROOF OF PURCHASE IS REQUIRED TO OBTAIN WARRANTY SERVICE. Please have the following information available when you call the Customer eXperience Center: n Name, address, and telephone number n Model number and serial number n A clear, detailed description of the problem n Proof of purchase including dealer or retailer name and address IF YOU NEED SERVICE: 1.