
Control Guide
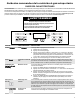
Table Of Contents
- Feature Guide_W11523786
- Surface Temperatures_GFSR_CG
- Sealed Surface Burners_W11523786
- Grates_W11523786
- Cookware_W11102912
- Home Canning_GFSR_CG
- Oven Use_W11122565
- Electronic Oven Controls_W11085354
- Sabbath Mode_W11085354
- Racks and Bakeware_W11523786
- Baking and Roasting_W11102912
- Broiling_W11102912
- Convection Baking and Roasting_W11523786
- Cook Time_W11085354
- Guide des caractéristiques_W11523786
- Températures de surface_GFSR_CG
- Brûleurs de surface scellés_W11523786
- Grates_W11523786
- Cookware_W11102912
- Mise en conserve à la maison_GFSR_CG
- Utilisation du four_W11122565
- Commandes électroniques du four_W11085354
- Mode Sabbath (Sabbat)_W11085354
- Grilles et ustensiles de cuisson_W11523786
- Cuisson et rôtissage au four_W11102912
- Broiling_W11102912
- Cuisson au four et rôtissage par convection_W11523786
- Durée de cuisson_W11085354
- Guía de funciones_W11523786
- Temperaturas de la superficie_GFSR_CG
- Quemadores de superficie sellados_W11523786
- Rejillas_W11523786
- Utensilios de cocina_W11102912
- Envasado casero_GFSR_CG
- Uso del horno_W11122565
- Controles electrónicos del horno_W11085354
- Modo Sabbath (Sabbat)_W11085354
- Parrillas y utensilios para hornear_W11523786
- Hornear y asar_W11102912
- Asar a la parrilla_W11102912
- Hornear y asar por convección_W11523786
- Tiempo de cocción_W11085354
7
Oven Temperature
While in use, the oven elements will cycle on and off as needed to
maintain a consistent temperature, but they may run slightly hot or
cool at any point in time due to this cycling. Opening the oven door
while in use will release the hot air and cool the oven which could
impact the cooking time and performance. It is recommended to
use the oven light to monitor cooking progress.
NOTE: On models with convection, the convection fan may run in
the non-convection Bake mode to improve oven performance.
The convection fan will shut off when the oven door is opened. If
the oven door remains open for too long, the heating elements will
shut off until the oven door is closed. All timers, including any
active Cook Time or Timed Cook functions, will continue to count
down.
Temperature Management System
The Temperature Management System electronically regulates
the oven heat levels during preheat and bake to maintain a
precise temperature range for optimal cooking results. The bake
and broil elements or burners cycle on and off in intervals. On
convection range models, the fan will run while preheating and
may be cycled on and off for short intervals during bake to provide
the best results. This feature is automatically activated when the
oven is in use.
Before baking and roasting, position racks according to the
“Positioning Racks and Bakeware” section. When roasting, it is
not necessary to wait for the oven preheat cycle to end before
putting food in unless it is recommended in the recipe.
Broiling
NOTE: The convection fan will shut off when the oven door is
opened. If the oven door remains open for too long, the heating
elements will shut off until the oven door is closed. All timers,
including any active Cook Time or Timed Cook functions, will
continue to count down.
When broiling, preheat the oven for 5 minutes before putting food
in unless recommended otherwise in the recipe. Position food on
grid in a broiler pan, then place it in the center of the oven rack.
IMPORTANT: Close the door to ensure proper broiling
temperature.
Changing the temperature when broiling allows more precise
control when cooking. The lower the broil setting is, the slower the
cooking. Thicker cuts and unevenly shaped pieces of meat, fish,
and poultry may cook better at lower broil settings. Use racks 4 or
5 for broiling. Refer to the “Positioning Racks and Bakeware”
section for more information.
On lower settings, the broil element will cycle on and off to
maintain the proper temperature.
� For best results, use a broiler pan and grid. It is designed to
drain juices and help avoid spatter and smoke.
If you would like to purchase a broiler pan, one may be
ordered. Please refer to the Quick Start Guide for contact
information.
NOTE: Odors and smoke are normal the first few times the oven
is used or if the oven is heavily soiled.
Convection Baking, Roasting and
Air Frying
NOTE: The convection fan will shut off when the oven door is
opened. If the oven door remains open for too long, the heating
elements will shut off until the oven door is closed. All timers,
including any active Cook Time or Timed Cook functions, will
continue to count down.
During convection baking, roasting or air frying the bake and broil
elements or burners cycle on and off in intervals to maintain the
oven temperature while the fan circulates the hot air.
If the oven door is opened during convection baking or roasting,
the fan will turn off immediately. It will come back on when the
oven door is closed.
NOTE: The convection fan will turn on approximately 5 minutes
into any convection cycle.
Cook Time
To Set a Timed Cook:
1. Press BAKE. The Bake indicator light will light up.
2. Press the Temp/Time “up” or “down” arrow keypad to enter a
temperature other than the one displayed.
3. Press COOK TIME. The Cook Time oven indicator light will
light up.
4. Press the Temp/Time “up” or “down” arrow keypad to enter the
length of time to cook.
5. Press the Start keypad. The display will count down the time.
When the time ends, the oven will shut off automatically.
6. Press the Cancel keypad to clear the display.
To Set a Delayed Timed Cook:
Before setting, make sure the clock is set to the correct time of
day. See “Clock” keypad feature in the “Feature Guide” section.
1. Press BAKE.
2. Press the Temp/Time “up” or “down” arrow keypad to enter a
temperature other than the one displayed.
3. Press COOK TIME. The cook time oven indicator light will
light up.
4. Press Temp/Time “up” or “down” arrow keypad to enter the
length of time to cook.
5. Press DELAY START. The Delay Oven indicator light will light
up.
6. Press Temp/Time “up” or “down” arrow keypad to enter the
time of day to start.
7. Press the Start keypad.
When the start time is reached, the oven will automatically
turn on. The Temperature and/or Cook Time settings can be
changed anytime after the oven turns on by repeating steps 2-
4 and pressing the Start keypad. To change to a different
delay time, cancel the features and repeat steps 1-7. When
the set cook time ends, the oven will shut off automatically.
8. Press the Cancel keypad to clear the display.