
Use and Care


5
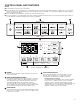
CONTROL PANEL AND FEATURES
NOTES:
■ Not all features and cycles are on all models.
■ If your model has a touch interface, the control panel features a sensitive surface that responds to a light touch of your nger. To
ensure your selections are registered, touch the control panel with your ngertip, not your ngernail. When selecting a setting or
option, simply touch its name.
■ If your model has physical buttons, make sure to press the button rmly.
■
At cycle completion, your setting and option choices will be remembered for the next cycle. However, if power to the washer is
lost, the settings and options will go back to the factory defaults.
1
2
2
WHAT to wash
HOW to wash
3
Cycles and settings vary by model.
POWER
Select to turn the washer on and off. Select to stop/cancel
a cycle at any time.
WHAT TO WASH/HOW TO WASH
First determine what items are in the load that you are trying
to wash. Use that to guide your “What to Wash” selection.
Then determine how you want the washer to wash them
and make the appropriate “How to Wash” selection.
See “Cycle Guide” for cycle details. If you do not make a
“How to Wash” selection, the washer will automaticlly select
the recommended or last-used “How to Wash” cycle.
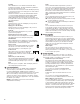
START/PAUSE
Touch and hold for three seconds until the light above Start/
Pause comes on to start a cycle, or touch once while a cycle
is in process to pause it.
1
2
3
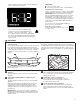
CYCLE STATUS DISPLAY
The Cycle Status Display shows the progress of a cycle.
At each stage of the process, you may notice sounds
or pauses that are different from traditional washers.
Estimated Time Remaining
The Estimated Time Remaining shows the time required
for the cycle to complete. Factors such as load size,
modiers, options selected, and water pressure may
affect the time shown in the display. Tightly packed loads,
unbalanced loads, or excessive suds may cause the
washer to lengthen the cycle time as well.
4
4
7
5
hold 3 sec for
Cycle Signal
hold 3 sec for
Control Lock
hold 3 sec for
FanFresh
hold 3 sec for
PreSoak
6