
Service Manual
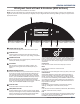

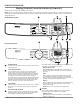
Table Of Contents
- Whirlpool & Maytag 27" Front-Load Gas & Electric Dryers
- Table of Contents
- Section 1: General Information
- Section 2: Diagnostics & Troubleshooting
- Section 3: Component Testing
- Testing - Safety Information
- Component Locations - Whirlpool
- Wiring Diagram - Whirlpool Electric
- Wiring Diagram - Whirlpool Gas
- Wiring Diagram - Maytag Electric
- Wiring Diagram - Maytag Gas
- Component Testing
- TEST #1: ACU Power Check
- TEST #2: Supply Connections
- TEST #3: Motor Circuit
- TEST #4: Heat System
- TEST #4a: Thermistors
- TEST #4b: Thermal Fuse
- TEST #4c: Thermal Cut-Off
- TEST #4d: Gas Valve (Gas Dryer)
- TEST #5: Moisture Sensor
- TEST #6: Buttons & Indicators
- TEST #7: Door Switch
- TEST #8: Drum LED
- TEST #9: Water Valve
- Section 4: Component Access
- Component Locations - Whirlpool
- Door Reversal - Round Shaped Doors
- Door Reversal - Square Shaped Doors
- Removing the Top Panel & Console/HMI
- Removing the Appliance Control Unit (ACU)
- Removing the Front Panel & Door Switch
- Removing the Drum Light & Moisture Sensor
- Removing the Belt, Drum, and Rollers
- Removing the Drive Motor
- Removing the Thermal Fuse & Outlet Thermistor
- Removing the Heater, High Limit Thermostat & Thermal Cutoff
- Removing the Ignitor, Flame Sensor, High-Limit Thermostat and Thermal Cutoff (Gas Models)
- Removing the Gas Burner Assembly Coils (Gas Models)
- Removing the Rear Panel
- Removing the Water Valve
- Section 5: Connectivity
- Product Specifications & Warranty Info

1-4
n
Whirlpool & Maytag Front-Load Dryers
GENERAL INFORMATION
Whirlpool Control Panel & Features (Console)
6
CONTROL PANEL AND FEATURES
POWER
Touch to turn the dryer on and off. Touch to stop/cancel
a cycle at any time.
WHAT TO DRY/HOW TO DRY
Once a “What to Dry” is selected, the dryer automatically
selects the recommended or last-used “How to Dry”
option, as well as the recommended/last-used modiers.
Both the “How to Dry” and modiers can be changed if
desired. See the “Cycle Guide” for details.
START/PAUSE
Touch and hold until LED counts down “3-2-1” and the
dryer starts; then let go to start a cycle, or touch once
while a cycle is in process to pause it.
MODIFIERS
Use to select available modiers for your dryer. Not all
cycles and options are available on all models.
Temp
When using Timed Dry/Quick Cycle, you may select
a dry temperature based on the type of load you are
drying. Use the warmest setting that is safe for the
garments in the load. Follow garment label instructions.
NOTE: Automatic Cycles will give you up to four
temperatures to adjust, depending on the model and
the “What to Dry” or “How to Dry” selections that have
been made.
Dryness
You may adjust the Dryness on Automatic Cycles
(except for the Sanitize cycle), if desired.
NOTE: Dryness is for use with Automatic Cycles only.
1
2
3
4
Not all features and cycles are available on all models.
More Time/Less Time Timed Dry Adjust
Touch MORE TIME or LESS TIME with the Timed Dry/
Quick cycle to increase or decrease the length of the
cycle.
OPTIONS
Use to select available options for your dryer. Not all
cycles and options are available on all models.
Wrinkle Shield
™
Option
If you will be unable to remove a load immediately,
touch WRINKLE SHIELD™ to add up to 150 minutes
of periodic tumbling to help reduce wrinkling. You
may select the “+ Steam” setting (on some models)
to add a short steam cycle after 60 minutes to help
smooth out wrinkles.
NOTE: If you open the dryer door prior to the end
of the Wrinkle Shield™ option, the dryer will go into
standby.
Steam Refresh (steam models only)
This cycle is best for reducing wrinkles and odors
from dry items. Cycle time will increase, depending
on number of items. This is an independent cycle that
cannot be combined with any other cycle.
Cycle Signal
Use this option to turn the signal indicating the end
of a drying cycle to low, medium, high, or off. The
volume you select here will also be applied to the
Damp Dry Signal.
NOTE: You may also turn off the tones that sound
when a feature, setting, or option is touched. Touch
and hold CYCLE SIGNAL for about 3 seconds to turn
sounds to low, medium, high, or off.
5
NOTE: The control panel features a sensitive surface that responds to a light touch of your nger. To ensure your selections are
registered, touch the control panel with your ngertip, not your ngernail. When selecting a setting or option, simply touch the
appropriate button.
STEAM MODELS
NON-STEAM MODELS
1
2
3 6
4
5
1
2
3 6
4
5
5
4
4
5
-XO('7_5(/($6('
,QVRPH(XURSHDQIDFWRULHVWKHOHWWHU:RIWKHSDUWFRGHPHQWLRQHGKHUHLQZLOOEHDXWRPDWLFDOO\
UHSODFHGE\WKHQXPEHUHJ:EHFRPHV