
Use and Care Manual

9
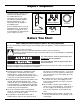
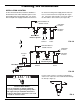
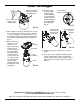
9. Slide the lid assem-
bly down over the
replacement car-
tridge’s ports until it
sits flat on top of
the sump, then lock
the clamp onto the
sump by pinching
together the latch-
es, as shown in Fig.
15, until they snap.
The clamp will not
snap unless the
cartridge and sump
are properly seated
and aligned.
Filter Cartridges
Questions? Call Toll Free 1-866-986-3223
Monday- Friday, 8 AM - 7 PM EST
or visit whirlpoolwatertreatment.com
When you call, please be prepared to provide the model number and date code, found on the rating decal.
FIG. 15
Pinch latches
together to snap
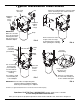
FIG. 13
Align filter cartridge
in sump using these
triangular points
11. Pivot the sump all the way down to the service
position.
12. Some types of filter cartridges contain activated
carbon, a black powder. Open a faucet down-
stream from the filter to purge air and fine carbon
particles from the cartridge. Flush for at least 5
minutes.
FIG. 16
Pivot sump down
to service
position
Insert ports and
push sump up
into filter head
until seated
Remove protective
caps from filter
cartridge ports
8. Filter cartridges can only be installed in one orienta-
tion, and are “keyed” to assure proper fit. Insert the
new filter cartridge into the sump, and turn it until
the triangular points on its top edge align with, and
drop into the corresponding detents in the sump (see
Fig. 13).
10. Insert the sump
assembly into the
head by guiding
the filter ports into
the corresponding
receptacles in the
head and pushing
the sump upward
until it stops (See
Fig. 16).
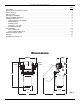
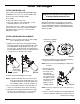
FIG. 14
Filter
cartridge
Sump
Lid
assembly
Filter ports