
Installation Guide

8
INSTALLATION INSTRUCTIONS
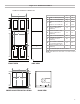
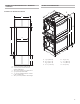
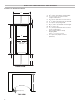
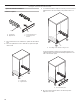
Prepare Built-In Oven
1. Decide on the nal location for the oven. Avoid drilling or
cutting into house wiring during installation.
2. To avoid oor damage, set the oven onto cardboard prior
to installation. Do not use handle or any portion of the front
frame for lifting.
3. Remove the shipping materials and tape from the oven.
4. Remove the hardware package from inside the bag
containing literature.
5. Remove and set aside racks, oven bottom trim, and other
parts from inside the oven.
6. Move oven and cardboard close to the oven’s nal location.
7. Remove oven door.
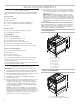
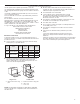
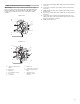
Remove Oven Door(s)
IMPORTANT: Use both hands to remove oven doors.
1. Open oven door all the way.
2. Flip up the hinge latch on each side.
3. Close the oven door as far as it will shut.
4. Lift the oven door while holding both sides. Continue to push
the oven door closed and pull it away from the oven door
frame.
5. Repeat steps for double oven installations.
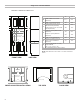
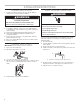
Make Electrical Connection
This oven is manufactured with a neutral (white) power supply
wire and a cabinet-connected green (or bare) ground wire
twisted together.
1. Disconnect power.
2. Feed the exible conduit from the oven through the opening
in the cabinet.
3. Remove junction box cover if it is present.
4. Install a UL listed or CSA approved conduit connector to the
junction box.
5. Route the exile conduit from the oven to the junction box
through a UL listed or CSA approved conduit connector.
6. Tighten screws on conduit connector.
WARNING
Electrical Shock Hazard
Disconnect power before servicing.
Use 12 gauge copper wire.
Electrically ground oven.
Failure to follow these instructions can result in death,
fire, or electrical shock.
A
WARNING
Excessive Weight Hazard
Use two or more people to move and install oven.
Failure to do so can result in back or other injury.
A. UL listed or CSA approved conduit connector