
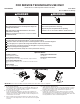
Tech Sheet

6
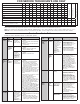
Service Diagnostics with Error Codes
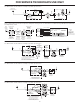
Entry sequence: Press any 3 keys in the sequence 1-2-3-1-2-3-1-2-3 with no more than 1 second between key presses.
NOTE: Some models have replaced the “CLEAN” LED with “COMPLETE.” If no error, “Clean” LED stays on for 5 seconds or display shows “F-” or “E-”.
NOTE: Once error codes are extracted, refer to the “Service Error Codes Table” section to diagnose and correctly resolve the root cause condition.
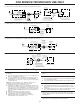
Service Error Codes Table
Example: 6-1 means “Inlet Water” function, “Low/No Water” problem.
Function
Code
Problem
Code
Causes What to Check
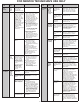
1-
Control
1-
Pilot
Stuck On
Control
detected
K1 pilot relay
stuck closed.
1. Unplug dishwasher or disconnect
power.
2. Check all loads on K1 Pilot Relay
for shorts.
3. Replace control and all shorted
components.
2-
Control
Software
Issue
All LEDs are
on.
1. Unplug dishwasher or disconnect
power.
2. Replace UI (for models with
numeric display only).
Damaged or
corrupted
memory on
control board.
Incompatible
software
components
inside micro.
1. Unplug dishwasher or disconnect
power.
2. Replace control board.
2-
User
Interface
(UI)
2-
No
response
from UI
UI cannot
communicate
with main
control. Loose
UI connection.
1. Unplug dishwasher or disconnect
power.
2. Check the connection between
the UI and the control P1A
connector. If the connection(s)
are loose or if wires are loose or
damaged, reconnect, repair, or
replace as needed.
- Disassemble door and disconnect
keypad connection from control.
- Reassemble door, but do not close
door (leave keypad disconnected).
- Plug in dishwasher or reconnect
power.
- Wait at least 7 seconds for control
to power up completely.
- Close dishwasher door and
monitor control response:
A. If control is OK (no longer sees
stuck keys with keypad unplugged),
it will respond by turning on the
drain motor for 2 minutes. Replace
keypad and console.
B. If control is not OK (still sees
stuck keys with keypad unplugged),
it will not turn on drain motor. Wait
for at least 10 seconds. If still no
drain response, then replace control
or LCD display module (whichever
one the keypad was connected to).
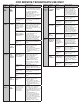
3-
Thermi-
stor/OWI
1-
Open
Open
connector or
component in
Temperature
Sensing circuit.
Open or faulty
temperature
sensor.
Temperature
sensor input on
control.
1. Check operation of temperature
sensor in Service Diagnostics
cycle.
2. Unplug dishwasher or disconnect
power.
3. Check all components and
connections in the Temperature
Sensing circuit with meter. Fix/
replace open connection/part.
Function
Code
Problem
Code
Causes What to Check
3-
Thermistor
/OWI
(cont.)
2-
Shorted
Incoming water
temperature
above 167°F
(75°C). Shorted
connection or
component in
Temperature
Sensing
circuit. Shorted
or faulty
temperature
sensor.
Temperature
sensor input on
control.
1. Check incoming water
temperature.
2. Check operation of
temperature sensor in
Service Diagnostics cycle.
3. Unplug dishwasher or
disconnect power.
4. Check all components
and connections in the
Temperature Sensing circuit
with meter. Fix/replace
open connection/part.
3-
Failed
Calibra
tion
1. OWI failure. 1. Check all connections in
Soil Sensing circuit.
2. Check OWI lens surface.
Clean if needed.
3. Run Service Diagnostics
to check OWI operation.
OWI should see low soil
with clear water. Unplug
dishwasher or disconnect
power and replace OWI or
control if needed.
NOTE: Run diagnostics
after installing OWI to force
calibration on next regular
wash cycle.
2. Drain hose
check valve not
sealing.
Dirty water backs into
dishwasher after draining.
1. Disconnect drain hose at
plumbing connection.
2. Elevate hose above
dishwasher and ll with
water. If water ows into
dishwasher, replace entire
drain loop (install as high
as possible and attach to
underside of countertop if
possible).
4-
Wash
Motor
3-
Motor
Not
Running
1. Loose
connection in
Motor circuit
and/or faulty
wash motor.
1. Check operation of wash
motor during diagnostics.
2. Unplug dishwasher or
disconnect power.
3. Check resistances of
connections in the Wash
circuit.
4. Check/x loose
connections or replace
wash motor.
2. Control Motor
Drive circuit or
Sense circuit.
1. Unplug dishwasher or
disconnect power.
2. If meter check of Wash
Motor circuit shows normal
resistance and still not
getting power to the wash
motor, replace control.
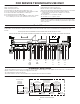
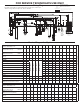
Pilot Relay PLT PLT PLT PLT PLT PLT PLT PLT PLT PLT PLT PLT PLT
Service Error 1
Service Error 2
S
T
A
N
D
B
Y
Fill Valve
Wash Pump Motor WSH WSH WSH WSH WSH
Dispenser (detergent/rinse aid) DISP
Diverter DIV DIV (DIV) (DIV) (DIV)
Diverter Position ON ON UPR UPR TZ LOW LOW LOW LOW LOW LOW
Drain Pump Motor DRN DRN DRN
Heater HTR HTR HTR
DC Fan (if present) NOTE 6 FAN FAN (FAN)
AC Fan (if present) (FAN)
REFERENCE NOTES: See the “Service
Diagnostics Cycle Notes” section.
4,5 5 4
FOR SERVICE TECHNICIAN’S USE ONLY