
Owner's Manual
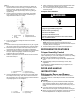
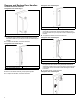
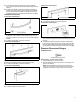
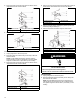
Table Of Contents
- REFRIGERATOR SAFETY
- MAINTENANCE AND CARE
- Cleaning
- Changing the LED Module
- Water Filtration System
- Vacation and Moving Care
- INSTALLATION INSTRUCTIONS
- Unpack the Refrigerator
- Electrical Requirements
- Location Requirements
- Water Supply Requirements
- Connect the Water Supply
- REFRIGERATOR FEATURES
- Crisper Humidity Control
- DOOR AND HANDLE INSTRUCTIONS
- Refrigerator Doors and Drawer
- Remove and Replace Door Handles
- Remove Doors and Hinges
- Reverse Doors (optional)
- Replace Doors and Hinges
- Remove and Replace Freezer Drawer
- PERFORMANCE DATA SHEET
- Performance Data Sheet
- SÉCURITÉ DU RÉFRIGÉRATEUR
- Sécurité du réfrigérateur
- ENTRETIEN ET RÉPARATION
- Nettoyage
- Remplacer le module à DEL
- Système de filtration de l’eau
- Précautions à prendre avant les vacances ou le déménagement
- INSTRUCTIONS D’INSTALLATION
- Déballage du réfrigérateur
- Spécifications électriques
- Exigences d’emplacement
- Spécifications de l’alimentation en eau
- Raccordement à la canalisation d’eau
- CARACTÉRISTIQUES DU RÉFRIGÉRATEUR
- Réglage de l’humidité dans le tiroir à légumes
- INSTRUCTIONS POUR LA PORTE ET LA POIGNÉE
- Portes et tiroir du réfrigérateur
- Consulter la section Retrait et réinstallation des poignées de porte
- Démontage des portes et charnières
- Inversion des portes (facultatif)
- Réinstallation des portes et charnières
- Retrait et réinstallation du tiroir de congélation
- FICHE DE DONNÉES DE PERFORMANCE
- Fiche de données de performance

7
Style 1
1. Remove plastic cap from water valve inlet port. Attach the
copper tube to the valve inlet using a compression nut and
sleeve as shown. Tighten the compression nut. Do not
overtighten. Confirm copper tubing is secure by pulling on
copper tubing.
2. Create a service loop with the copper tubing. Avoid kinks
when coiling the tubing. Secure copper or PEX tubing to
refrigerator cabinet with a “P” clamp.
A. Copper or PEX
tubing
B. “P” clamp
C.
Compression nut
D. Compression sleeve
3. Turn on water supply to refrigerator and check for leaks.
Correct any leaks.
Style 2
1. Create a service loop (minimum diameter of 2 ft. [61 cm]) with
the copper or PEX tubing. Avoid kinks when coiling the tubing.
2. Remove the plastic cap from water valve inlet port. Place a
compression nut and sleeve on the copper or PEX tubing.
3. Insert the end of the copper or PEX tubing into the water valve
inlet port. Shape tubing slightly so that the tubing feeds
straight into the port to avoid kinks.
4. Slide the compression nut over the sleeve and screw into the
water valve inlet port.
A. PEX water tubing
B. Sleeve
C. Compression nut
D. Copper or PEX tubing
5. Using an adjustable wrench, hold the nut on the plastic water
line to keep it from moving. Then, with a second wrench turn
the compression nut on the copper tubing counterclockwise to
completely tighten. Do not overtighten.
A. “P” clamp
B. PEX water line
C. Compression nut
D. Copper tubing
6. Check connection by pulling on tubing. Attach the PEX water
line to the refrigerator cabinet with a “P” clamp.
7. Turn on water supply to the refrigerator and check for leaks.
Correct any leaks.
Complete the Installation
WARNING
Electrical Shock Hazard
Plug into a grounded 3 prong outlet.
Do not remove ground prong.
Do not use an adapter.
Do not use an extension cord.
Failure to follow these instructions can result in death,
fire, or electrical shock.
1. Plug into a grounded 3–prong outlet.
NOTE: Allow 24 hours to produce the first batch of ice.
Discard the first three batches of ice produced. Allow 3 days to
completely fill the ice storage bin.
2. Flush the water system. See “Water and Ice Dispensers.”
REFRIGERATOR FEATURES
Crisper Humidity Control
You can control the amount of humidity in the moisture-sealed
crisper. Depending on your model, adjust the control to any setting
between Fruit and Vegetables or Low and High.
� Fruit/Low (open) for best storage of fruits and vegetables with
skins.
� Vegetables/High (closed) for best storage of fresh, leafy
vegetables.
For information on additional features for your appliance, see
online "Feature Guide."
DOOR AND HANDLE
INSTRUCTIONS
Refrigerator Doors and Drawer
TOOLS NEEDED: 5/16", 3/8", 1/4" hex head socket wrench, a
Torx† T20 screwdriver, a #2 Phillips screwdriver, and a flat-blade
screwdriver
IMPORTANT:
� Your refrigerator may have a standard reversible refrigerator
door with either a freezer door or freezer drawer, or French
doors. Follow the instructions specific to the door style of your
model.
� If you only want to remove and replace the doors, see
“Remove Doors and Hinges” and “Replace Doors and Hinges.”
� Before you begin, turn the refrigerator control Off, and remove
food and adjustable door or utility bins from the doors.