FRENCH DOOR REFRIGERATOR Use & Care Guide For questions about features, operation/performance, parts or service, call: 1-800-253-1301 In Canada, call for assistance 1-800-807-6777 or visit our website at www.whirlpool.com or www.whirlpool.
Table of Contents REFRIGERATOR SAFETY..............................................................3 PARTS AND FEATURES ................................................................4 What’s New Behind the Doors? ...................................................5 GETTING STARTED .......................................................................6 Installation Checklist ....................................................................6 Water Filter Installation ....................................
REFRIGERATOR SAFETY Your safety and the safety of others are very important. We have provided many important safety messages in this manual and on your appliance. Always read and obey all safety messages. This is the safety alert symbol. This symbol alerts you to potential hazards that can kill or hurt you and others. All safety messages will follow the safety alert symbol and either the word “DANGER” or “WARNING.
Proper Disposal of Your Old Refrigerator WARNING Suffocation Hazard Remove doors from your old refrigerator. Failure to do so can result in death or brain damage. IMPORTANT: Child entrapment and suffocation are not problems of the past. Junked or abandoned refrigerators are still dangerous—even if they will sit for “just a few days.” If you are getting rid of your old refrigerator, please follow these instructions to help prevent accidents.
What’s New Behind the Doors? Your Whirlpool® French door refrigerator comes equipped with various innovative storage and energy-efficient features. Energy and Normal Operating Sounds *OmOJUZ 4MJEF 4IFMG Your new French door bottom-mount refrigerator has been designed with a linear compressor to optimize energy efficiency and better regulate temperatures to match cooling demand. You may notice that it operates differently than your previously owned refrigerator.
GETTING STARTED WARNING ✔ Final Checks ■ Install air filter according to instructions in corresponding packaging. ■ Remove all shipping material. ■ Set temperature controls to the recommended setting. ■ Save instructions and other literature. ■ Send in Registration Card or register your product online. Electrical Shock Hazard Plug into a grounded 3 prong outlet. Water Filter Installation Do not remove ground prong.
Door Alignment Align Refrigerator Doors ✔ If doors are uneven: ■ Ensure the refrigerator is level. ■ Keeping both refrigerator doors closed, pull out the freezer drawer. Locate the bottom hinge pin of the right-hand refrigerator door. The alignment screw is inside the bottom hinge pin. ■ Insert the short end of the 1/8" hex key (packed with the Door Handle Installation Instructions) into the bottom hinge pin until it is fully engaged in the alignment screw.
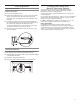
INSTALLATION INSTRUCTIONS Unpack the Refrigerator WARNING Location Requirements WARNING Excessive Weight Hazard Use two or more people to move and install refrigerator. Failure to do so can result in back or other injury. Explosion Hazard Refrigerator Delivery ■ ■ A minimum door opening of 33" (838 mm) is required. If door opening is 36" (914 mm) or less, then removal of doors, drawer, and hinges is required. Cart the refrigerator from the side for all door openings.
Remove and Replace Refrigerator Doors NOTE: Measure the width of your house door opening to see whether or not you need to remove the refrigerator doors to move the refrigerator into your home. If refrigerator door removal is necessary, see the following instructions. IMPORTANT: If the refrigerator was previously installed and you are moving it out of the home, before you begin, turn the refrigerator control off. Unplug the refrigerator or disconnect power.
3. Insert the bottom hinge and bushing into the corresponding slot in the bottom of the door. WARNING NOTE: Make sure that the base of the hinge is parallel to the bottom of the door. Excessive Weight Hazard A Use two or more people to move and install refrigerator. Failure to do so can result in back or other injury. Bottom Door Hinge For your convenience, the refrigerator doors have bottom hinges with door closers. These closers allow the doors to swing fully closed with just a gentle push.
Remove Refrigerator Doors WARNING Excessive Weight Hazard WARNING Use two or more people to lift the refrigerator door. Failure to do so can result in back or other injury. 5. Open the door until it is at a 90° angle to the front of the cabinet. Electrical Shock Hazard 6. Lift the refrigerator door from the bottom hinge pin. The top hinge will come away with the door. Disconnect power before removing doors. Failure to do so can result in death or electrical shock. Remove Right-Hand Door 1.
3. Disconnect the wiring plug located on top of the door hinge. ■ Grasp each side of the wiring plug. With your left thumb, press down to release the catch and pull the sections of the plug apart. NOTE: Do not remove the green ground wire. It should remain attached to the door hinge. 5. Lift the refrigerator door from the bottom hinge pin. The top hinge will come away with the door.
Remove and Replace Freezer Drawer Fronts 3. Tighten the 2 screws at the top of the drawer front (1 on the left-hand side and 1 on the right-hand side) and install the 2 screws on the bottom. Final Steps Freezer Drawer Remove Drawer Front 1. Open the freezer drawer to its full extension. WARNING 2. Loosen the 2 top screws that fasten the drawer front to the drawer glides. The 2 screws (1 on the left-hand side and 1 on the right-hand side) are located inside the drawer front. 3.
Reverse Osmosis Water Supply Electrical Requirements WARNING IMPORTANT: The pressure of the water supply coming out of a reverse osmosis system and supplying the water inlet valve of the refrigerator needs to be between 35 and 120 psi (241 and 827 kPa). If a reverse osmosis water filtration system is connected to your home cold water supply, the water pressure to the reverse osmosis system needs to be a minimum of 40 to 60 psi (276 to 414 kPa).
Connect to Water Line IMPORTANT: If you have turned the refrigerator on before the water was connected, turn off the ice maker. 1. Unplug refrigerator or disconnect power. 2. Turn off main water supply. Turn on nearest faucet long enough to reduce water pressure in the water line. 3. Use a quarter-turn shut-off valve or the equivalent, served by a 1/2" household supply line. NOTE: To allow sufficient water flow to the refrigerator, a minimum 1/2" (12.7 mm) size household supply line is recommended. 5.
Complete the Installation 2. Open a refrigerator compartment door. On the closed door, place a handle onto the shoulder screws so that the setscrews are facing the adjacent door. WARNING Electrical Shock Hazard A Plug into a grounded 3 prong outlet. B Do not remove ground prong. Do not use an adapter. Do not use an extension cord. Failure to follow these instructions can result in death, fire, or electrical shock. 1. Plug into a grounded 3 prong outlet. 2. Flush the water system.
8. Repeat steps 2 through 7 to install the other handle onto the adjacent refrigerator door. Remove the Handles Freezer Drawer 1. With the drawer closed, place the handle onto the shoulder screws so that the setscrews are facing down toward the floor. 1. While holding the handle, insert the short end of the hex key into a setscrew hole and slightly rotate the hex key until it is engaged in the setscrew. 2. Using a right-to-left motion, loosen the setscrew a quarter turn at a time. 3.
3. Move the refrigerator to its final location. 4. Using the 1/4" hex driver, lower the brake feet. Turn them clockwise until the rollers are off the floor and both brake feet are snug against the floor. This keeps the refrigerator from rolling forward when opening the refrigerator doors or freezer drawer. FILTERS AND ACCESSORIES IMPORTANT: If you need to make further adjustments involving the brake feet, you must turn both brake feet the same amount to keep the refrigerator level. 5.
3. Pull the filter out of the housing. 4. Remove the water filter cap from the water filter being replaced. 7. Twist the water filter and turn 90° clockwise until it locks into place and the arrows are aligned. 8. Push the water filter door closed. 5. Install the water filter cap onto the new filter. Be sure to align the arrows so the groves in filter align with ribs in filter cap. The Water Filter Status Lights The water filter status lights will help you know when to change your water filter. 6.
Install FreshFlow™ Air Filter An air filter is 15 times more powerful than baking soda at reducing common food odors inside the refrigerator. On some models, your refrigerator’s accessory packet includes an air filter which must be installed prior to use. Replacing the FreshFlow™ Air Filter The disposable air filter should be replaced every 6 months. Some air filters have an indicator that replacement is needed. To order a replacement air filter, contact us.
Installing the Produce Preserver REFRIGERATOR USE For your convenience, the suction-mounted produce preserver can be installed in either the crisper or the refrigerated drawers. CAUTION: IRRITANT MAY IRRITATE EYES AND SKIN. DANGEROUS FUMES FORM WHEN MIXED WITH OTHER PRODUCTS. Do not mix with cleaning products containing ammonia, bleach or acids. Do not get in eyes, on skin or clothing. Do not breathe dust. Keep out of reach of children.
Using the Controls The touch-activated controls are located above the external dispenser and on the side of the left inner refrigerator door. View Temperature Set Points Touch [▼]/[▲] for refrigerator or [▼]/[▲] for freezer to toggle through temperature set points. NOTE: To view temperature in degrees Celsius, touch and hold the [°F-°C] button for 3 seconds and the temperature display will change. To return to Fahrenheit, touch and hold [°F-°C] for 3 seconds and the temperature display will change.
Energy Saver Mode Max Cool The Max Cool feature assists with periods of high refrigerator use, full grocery loads, or temporarily warm room temperatures. ■ To turn on the Max Cool feature, press the Max Cool button. When the button is pressed, the icon will blink 3 times and appear on the display screen. ■ To manually turn off the Max Cool feature, press the Max Cool button and the display will blink 3 times and turn off. The Max Cool feature will remain on for 24 hours unless manually turned off.
Showroom Mode This mode is used when the refrigerator is on display in a retail store or if you want to turn the cooling off and deactivate all other functions except interior lighting. Showroom mode can be used when going on vacation. See the “Vacation and Moving Care” section for proper steps on leaving your refrigerator in this mode for long periods of time. If you turn on Showroom mode, the word “Showroom” will light up on the display.
Save Favorite Fill Calibrate Measured Fill Household water pressure may affect the accuracy of the Measured Fill feature. So, for optimum performance of your water dispenser, you must first calibrate Measured Fill. IMPORTANT: ■ Flush the water system before calibrating Measured Fill. For best results, calibration should be performed when water is not being used in the house. 1. Place a sturdy measuring cup (1-cup [237 mL] size) on the dispenser tray centered in front of the ice/water dispenser paddle.
Dispensing Water Measured Fill options are listed in the following chart: Units IMPORTANT: ■ Dispense at least 1 qt (1 L) of water every week to maintain a fresh supply. ■ If the flow of water from the dispenser decreases, it could be caused by low water pressure. ■ With the water filter removed, dispense 1 cup (237 mL) of water. If 1 cup (237 mL) of water is dispensed in 8 seconds or less, the water pressure to the refrigerator meets the minimum requirement.
NOTES: ■ The Favorite Fill dispenser will automatically time out after 1 minute of inactivity. To Dispense Ice—Paddle Dispensing 1. Select the desired type of ice by pressing CUBED ICE or CRUSHED ICE. You can refill several glasses with the same measurement by continuing to touch FILL (center button) after each glass fill. 4. Dispense water. ■ WARNING NOTE: While dispensing water, the flow of water will automatically stop once the desired volume has been dispensed.
The Dispenser Light 1. When you use the dispenser, the light will automatically turn on. 2. The dispenser light also serves as an automatic night light. Once the ambient light in the room is reduced, the auto sensor will cause the dispenser light to illuminate. Style 1: Ice Maker in the Refrigerator The ice maker is located on the left door behind the bins. Ice cubes are ejected into the ice storage bin located on the lefthand refrigerator door. Turn the Ice Maker On/Off 1.
Remove and Replace the Ice Storage Bin ■ Remove the ice storage bin by inserting your fingers into the hole at the base of the bin and pulling the latch to release the bin from the compartment. Lift the storage bin up and pull it straight out. ■ Replace the storage bin inside the ice compartment and push down to make sure it is firmly in place. ■ Ice Production Rate ■ Your ice maker should produce approximately 3.5 lbs (1.6 kg) of ice per day under normal operation.
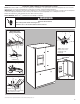
3. Apply pressure to the top of the shelf to ensure the shelf is properly seated on the shelf mounts. To remove and replace shelves: 1. Make sure adjustable shelf mounts are in the lower position before removing shelves. Doors will need to be open at a 90˚ angle. If open wider, it will make it harder to remove the shelves. 2. Remove the middle shelf or top shelf by lifting it up and out of the shelf supports. Then pull the shelf forward and tilt down to a vertical position.
Refrigerator Door Bins Audio Reference The bins on your refrigerator door are adjustable to meet your individual storage needs. The gallon-size bins make it easy to customize door storage to hold gallon containers. Door Bin Divider (on some models) This divider fits in the door bin to divide the bin and elevate smaller items at the back of the bin. Freezer Drawers Tone Assignment Tone Name Usage Examples POWER ON Cooling system is turned on every time the product is powered on.
REFRIGERATOR CARE Cleaning WARNING Style 2: Stainless Steel IMPORTANT: ■ Use recommended stainless steel cleaners and cloths only. Damage to stainless steel finish due to improper use of cleaning products or using non-recommended cleaning products is not covered under the warranty. ■ Avoid exposing stainless steel appliances to caustic or corrosive elements such as high-salt, high-moisture, or high-humidity environments. Damage due to exposure to these elements is not covered under the warranty.
4. Turn off the Temperature controls. See the “Using the Controls” section. Condenser Cleaning There is no need for routine condenser cleaning in normal home operating environments. If the environment is particularly greasy or dusty or there is significant pet traffic in the home, the condenser should be cleaned every 6 months to ensure maximum efficiency. If you need to clean the condenser, please call for service.
TROUBLESHOOTING First try the solutions suggested here. If you need further assistance or more recommendations that may help you avoid a service call, refer to the warranty page in this manual, visit producthelp.whirlpool.com, or call 1-800-253-1301. In Canada, visit www.whirlpool.ca. Contact us by mail with any questions or concerns at the address below: In Canada: Whirlpool Brand Home Appliances Customer eXperience Centre 200 – 6750 Century Ave. Mississauga, Ontario L5N 0B7 In the U.S.A.
TROUBLESHOOTING First try the solutions suggested here or visit our website at producthelp.whirlpool.com If you experience Possible Causes Solution Refrigerator Operation (cont.) The motor seems to run too much. High-efficiency compressor and fans Larger, more efficient refrigerators run longer at lower, more energy-efficient speeds. The room or outdoor temperature is hot. It is normal for the refrigerator to work longer under these conditions.
TROUBLESHOOTING First try the solutions suggested here or visit our website at producthelp.whirlpool.com If you experience Possible Causes Solution Unusual Noise (cont.) Rattling/Banging Movement of the water lines against the refrigerator cabinet or of items placed on top of the refrigerator cabinet Move excess water line away from the refrigerator cabinet or fasten excess tubing to the cabinet. See the “Connect the Water Supply” section or remove items from the top of the refrigerator.
TROUBLESHOOTING First try the solutions suggested here or visit our website at producthelp.whirlpool.com If you experience Possible Causes Solution Temperature and Moisture (cont.) There is frost/ice buildup in the freezer compartment. The drawer is opened often or left open. Minimize drawer openings and close drawer completely after use. Poor door seal Ensure door seals are making full contact with the refrigerator cabinet to allow for an adequate seal. Temperature controls are not set correctly.
TROUBLESHOOTING First try the solutions suggested here or visit our website at producthelp.whirlpool.com If you experience Possible Causes Solution Ice and Water (cont.) Off-taste, odor, or gray color in the ice or water Newly installed refrigerator requires flush of water system. Flush the water system. See the “Water and Ice Dispensers” section for water system flushing instructions. Recently installed or replaced plumbing connections.
TROUBLESHOOTING First try the solutions suggested here or visit our website at producthelp.whirlpool.com If you experience Possible Causes Solution Ice and Water (cont.) The refrigerator door or freezer drawer is not closed completely. Close the door or drawer firmly. If it does not close completely, see “The doors will not close completely” in this section. The refrigerator doors were recently removed.
TROUBLESHOOTING First try the solutions suggested here or visit our website at producthelp.whirlpool.com If you experience Possible Causes Solution Ice and Water (cont.) Crushed or cubed ice misses the glass when dispensing ice. The glass is not held close enough to where the ice exits the chute. Water from the dispenser Water from the dispenser is chilled to 50°F (10°C). is warm. Hold the glass close to where the ice exits the chute. This is normal. The refrigerator has just been installed.
PERFORMANCE DATA SHEET Water Filtration System Model P9WB2L/P9RFWB2L Capacity 200 Gallons (757 Liters) System tested and certified by NSF International against NSF/ANSI Standard 42, Standard 53, Standard 401, and CSA B483.1 for the reduction of contaminants specified on the Performance Data Sheet. This system has been tested according to NSF/ANSI Standards 42, 53, 401, and CSA B483.1 for the reduction of the substances listed below.
® WARRANTY WHIRLPOOL REFRIGERATION LIMITED WARRANTY ATTACH YOUR RECEIPT HERE. PROOF OF PURCHASE IS REQUIRED TO OBTAIN WARRANTY SERVICE. Please have the following information available when you call the Customer eXperience Center: ■ Name, address, and telephone number ■ Model number and serial number ■ A clear, detailed description of the problem ■ Proof of purchase, including dealer or retailer name and address IF YOU NEED SERVICE: 1.