
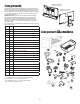
Installation Instructions

9
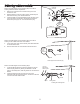
Top/Upright freezer models
Refer to the side diagrams for the following 2 steps. You will be
working inside the freezer compartment.
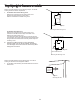
1. On models with a raised wiring cover:
Remove the screw from the ice maker wiring cover.
Squeeze top and bottom to loosen snaps.
Remove and discard ice maker wiring cover.
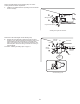
On models with a at cover:
Remove the screw from the ice maker wiring cover.
Unhook the side tab from the edge of the back cover.
Remove ice maker wiring cover.
Look at the back side of the at wiring cover and note the
grooved lines. Use a pair of pliers and bend the areas inside
the grooved lines back and forth until they break away from
the wiring cover.
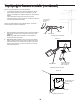
2. Pull the ice maker harness out from behind the
freezer’s back cover as far as possible, and hang it
over the edge of the cutout. Do not remove any other
wiring from the cutout.
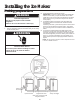
Refer to the side diagrams for the following step. You will be
working on the back of the refrigerator cabinet.
1. On the back of the cabinet, peel o the label that is over the
ll tube hole.
Removing the label
Label
Remove
this label
for Ice Maker
installation
Screw
Snap
Snap
Removing the raised wiring cover
Screw
Tab
Removing the at wiring cover
Break o and discard
Break o and discard