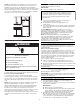
User Guide Top Mount Refrigerator Learn More In an effort to conserve natural resources, this refrigerator includes a condensed User Guide. A complete User Instructions manual can be downloaded at: www.whirlpool.com/manuals. The model number is located on the inside wall of the refrigerator compartment. In the U.S.A.: For assistance or service, call 1-800-253-1301. Register your refrigerator at www.whirlpool.com. In Canada: For assistance or service, call 1-800-807-6777. Register your refrigerator at www.
IMPORTANT SAFETY INSTRUCTIONS WARNING: To reduce the risk of fire, electric shock or injury to persons when using the refrigerator, follow basic precautions, including the following: Plug into a grounded 3 prong outlet. Do not remove the ground prong. Do not damage the refrigerant circuit. Do not use an adapter. Do not use an extension cord. Disconnect power before servicing. Replace all parts and panels before operating. Remove doors from your old refrigerator.
INSTALLATION INSTRUCTIONS Unpack the Refrigerator WARNING When Moving Your Refrigerator: Your refrigerator is heavy. When moving the refrigerator for cleaning or service, be sure to cover the floor with cardboard or hardboard to avoid floor damage. Always pull the refrigerator straight out when moving it. Do not wiggle or “walk” the refrigerator when trying to move it, as floor damage could occur. Excessive Weight Hazard Use two or more people to move and install refrigerator.
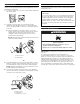
Install Levelers Clean Before Using After you remove all of the package materials, clean the inside of your refrigerator before using it. See the cleaning instructions in “Refrigerator Care.” IMPORTANT: Lay down the refrigerator ONLY to your left-hand side (as you are looking at the front of the refrigerator) to avoid damaging the refrigerator. 1. Locate the levelers. They are enclosed in a plastic bag inside the crisper drawer.
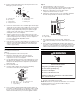
Water Supply Requirements NOTE: This refrigerator is intended for use in a location where the temperature ranges from a minimum of 55°F (13°C) to a maximum of 110°F (43°C). The preferred room temperature range for optimum performance, which reduces electricity usage and provides superior cooling, is between 60°F (15°C) and 90°F (32°C). It is recommended that you do not install the refrigerator near a heat source, such as an oven or radiator. Read all directions before you begin.
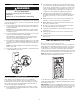
5. Using a cordless drill, drill a 1/4" (6.35 mm) hole in the cold water pipe you have selected. Style 2 1. Unplug refrigerator or disconnect power. 2. Disconnect the tube clamp on the back of the product and insert the copper tubing through the clamp as shown. 3. Attach the copper tube to the valve inlet using a compression nut and sleeve as shown. 4. Tighten the compression nut. Do not overtighten. Reattach the tube clamp and tube to the back of the cabinet. A B G C F A. B. C. D. 5. 6. 7.
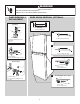
Refrigerator Doors TOOLS NEEDED: 5/16" hex-head socket wrench, #2 Phillips screwdriver, flat-blade screwdriver, 5/16" open-end wrench, flat 2" putty knife. IMPORTANT: Cabinet 1. From the top of the cabinet, remove the hinge hole plugs, move them to the opposite side, and insert the hole plugs into the holes from where you removed the hinge screws. See Graphic 1-2. 2. Remove the screws filling the holes to be used for the center hinge and install them on the opposite side. 3.
OR REMOVAL & REPLACEMENT DOOR SWINGWARNING REVERSAL (OPTIONAL) Electrical Shock Hazard Disconnect power before removing doors. Failure to do so can result in death or electrical shock. DOOR REMOVAL & REPLACEMENT DOOR SWING REVERSAL (OPTIONAL) 1-1 Top Hinge A A A. 5/16" Hex-Head Hinge Screws and Washers B 1-2 C A A. Cabinet Hinge Hole Plugs A. 5/16" Hex-Head Hinge Screws B. Top Hinge C. Spacer Center Hinge 2 A A A. Door Hinge Hole Plug B A. Center Hinge B.
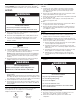
Leveling and Door Adjustment ■■ Your refrigerator is designed to run more efficiently to keep your food items at the desired temperatures and to minimize energy usage. The high efficiency compressor and fans may cause your refrigerator to run longer than your old one. You may also hear a pulsating or high-pitched sound from the compressor or fans adjusting to optimize performance. ■■ You may hear the evaporator fan motor circulating air through the refrigerator and freezer compartments.
OPERATING YOUR REFRIGERATOR Using the Controls panel Adjust the Airflow Control If you want to temporarily increase the cold airflow to a specific compartment, adjust the control. IMPORTANT: Once the performance is achieved, return the Airflow control to the Recommended setting to keep the refrigerator operating at optimum efficiency. Temperature Control FAST COOL Temperature Control For your convenience, the temperature 3 sec control is preset at the factory.
REFRIGERATOR CARE Cleaning To Clean Your Refrigerator: NOTE: Do not use abrasive or harsh cleaners such as window sprays, scouring cleansers, flammable fluids, cleaning waxes, concentrated detergents, bleaches or cleansers containing petroleum products on plastic parts, interior and door liners or gaskets. Do not use paper towels, scouring pads, or other harsh cleaning tools. 1. Unplug refrigerator or disconnect power. 2. Hand wash, rinse, and dry removable parts and interior surfaces thoroughly.
PROBLEM SOLVER First try the solutions suggested here. If you need further assistance or more recommendations that may help you avoid a service call, refer to the warranty page in this manual and scan the code there with your mobile device, or visit www.whirlpool.com/product_help. In Canada, visit http://www.whirlpool.ca. Contact us by mail with any questions or concerns at the address below: In the U.S.A.
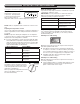
If you experience Possible Causes and/or Recommended Solutions The refrigerator will not operate ■■ ■■ ■■ ■■ ■■ The motor seems to run too much Not connected to an electrical supply - Plug the power cord into a grounded 3-prong outlet. Do not use an extension cord. No power to the electrical outlet - Plug in a lamp to see if the outlet is working. Household fuse blown or circuit breaker tripped - Replace the fuse or reset the circuit breaker. If the problem continues, contact an electrician.
WHIRLPOOL® MAJOR APPLIANCE LIMITED WARRANTY ATTACH YOUR RECEIPT HERE. PROOF OF PURCHASE IS REQUIRED TO OBTAIN WARRANTY SERVICE. Please have the following information available when you call the Customer eXperience Center: ■ Name, address, and telephone number ■ Model number and serial number ■ A clear, detailed description of the problem ■ Proof of purchase, including dealer or retailer name and address IF YOU NEED SERVICE: 1.
Guide d’utilisation Réfrigérateur à congélateur supérieur En savoir plus Afin de conserver les ressources naturelles, ce réfrigérateur comprend un guide d’utilisation rapide. L’utilisateur trouvera un manuel d’instructions complet téléchargeable au www.whirlpool.com/manuals. Le numéro de modèle se trouve sur la paroi interne du compartiment de réfrigération. Aux États-Unis : Pour l’assistance ou le service, composez le 1 800 253-1301. Enregistrer votre réfrigérateur au www.whirlpool.com.
AVERTISSEMENT : IMPORTANTES INSTRUCTIONS DE SÉCURITÉ Afin de réduire le risque d’incendie, de décharge électrique ou de blessures corporelles lors de l’utilisation du réfrigérateur, il convient d’observer certaines précautions fondamentales, notamment : Brancher l’appareil sur une prise à 3 alvéoles reliée à la terre. Ne pas enlever la broche de liaison à la terre. Ne pas utiliser d’adaptateur. Ne pas utiliser de rallonge. Déconnecter la source de courant électrique avant l’entretien.
INSTRUCTIONS D’INSTALLATION Déballage du réfrigérateur AVERTISSEMENT Déplacement de votre réfrigérateur : Votre réfrigérateur est lourd. Lors du déplacement de votre réfrigérateur pour le nettoyage ou un entretien ou réparation, veiller à recouvrir le plancher avec du carton ou un panneau de fibres dures pour éviter qu'il ne subisse tout dommage. Toujours tirer le réfrigérateur tout droit lors de son déplacement.
Installation des dispositifs de nivellement Nettoyage avant utilisation Après avoir enlevé tous les matériaux d’emballage, nettoyer l’intérieur du réfrigérateur avant de l’utiliser. Voir les instructions de nettoyage dans la section « Entretien du réfrigérateur ». IMPORTANT : Afin d’éviter d’endommager le réfrigérateur, le faire reposer UNIQUEMENT sur le côté gauche (lorsqu’on fait face à l’avant de l’appareil). 1. Repérer l’emplacement des dispositifs de nivellement.
Spécifications de l’alimentation en eau REMARQUE : Ce réfrigérateur est conçu pour être utilisé dans un endroit où la température est comprise entre un minimum de 55 °F (13 °C) et un maximum de 110 °F (43 °C). La plage de température ambiante idéale pour un rendement optimal est comprise entre 60 °F (15 °C) et 90 °F (32 °C). Respecter cette plage de température permet aussi de réduire la consommation d’électricité et d’optimiser l’efficacité du refroidissement.
4. Déterminer la longueur de tube de cuivre à utiliser. Mesurer depuis le point de connexion (angle inférieur arrière gauche du réfrigérateur) et la canalisation d’eau. Ajouter 7 pi (2,1 m) pour permettre les opérations de nettoyage. Utiliser un tube en cuivre de 1/4 po (6,35 mm) de diamètre extérieur. Veiller à ce que le tube soit coupé d’équerre aux deux extrémités. 5. À l’aide d’une perceuse sans fil, percer un trou de 1/4 po (6,35 mm) dans la canalisation d’eau froide sélectionnée. Style 2 1.
Portes du réfrigérateur OUTILS REQUIS : Clé à douille à tête hexagonale de 5/16 po, tournevis cruciforme no 2, tournevis à lame plate, clé plate de 5/16 po et couteau à mastic de 2 po. IMPORTANT : Caisse 1. Enlever les bouchons d’obturation des trous de charnière au sommet de la caisse et les transférer du côté opposé dans les trous d’où l’on a précédemment retiré les vis de charnière. Voir l’illustration 1-2. 2.
OU RETRAIT ET INVERSION DU SENS D’OUVERTURE DE LA PORTE AVERTISSEMENT (FACULTATIF) Risque de choc électrique REMPLACEMENT Déconnecter la source de courant électrique avant d'enlever les portes. Le non-respect de cette instruction peut causer un décès ou un choc électrique. RETRAIT ET RÉINSTALLATION DE LA PORTE INVERSION DU SENS D’OUVERTURE DE LA PORTE (FACULTATIF) 1-1 Charnière supérieure A A A. Rondelles et vis de charnière à tête hexagonale de 5/16 po B 1-2 C A A.
Nivellement et ajustement des portes ■■ AVERTISSEMENT Risque du poids excessif Utiliser deux ou plus de personnes pour déplacer et installer le réfrigérateur. ■■ Le non-respect de cette instruction peut causer une blessure au dos ou d'autre blessure. Le réfrigérateur comporte deux dispositifs de nivellement réglables qui se trouvent de chaque côté de la base du réfrigérateur.
UTILISATION DU RÉFRIGÉRATEUR Utilisation du tableau de commande Régler la commande de circulation d’air Si une augmentation temporaire de la circulation d’air froid dans un compartiment particulier est souhaitée, régler la commande. IMPORTANT : Une fois le rendement obtenu, replacer la commande de circulation d’air au réglage recommandé afin que le réfrigérateur continue de fonctionner avec le maximum d’efficacité.
ENTRETIEN DU RÉFRIGÉRATEUR Nettoyage Nettoyage du réfrigérateur : REMARQUE : Ne pas utiliser de nettoyants puissants ou abrasifs tels que les nettoyants à vitre en atomiseurs, nettoyants à récurer, liquides inflammables, cires nettoyantes, détergents concentrés, agents de blanchiment ou nettoyants contenant du pétrole sur les pièces en plastique, les garnitures intérieures et garnitures de portes ou sur les joints de portes.
RÉSOLUTION DE PROBLÈMES Essayer d’abord les solutions suggérées ici. Pour obtenir de l’aide ou des conseils qui permettront peut-être d’éviter une intervention de dépannage, consulter la page de garantie de ce manuel et scanner le code à barres 2D avec votre appareil mobile, ou visiter le site Internet www.whirlpool.com/product_help. Au Canada, visiter le site http://www.whirlpool.ca.
Si les problèmes suivants surviennent Le réfrigérateur ne fonctionne pas Causes possibles et solutions recommandées Goût, odeur ou couleur grise des glaçons ■■ Non raccordé à l’alimentation électrique – Brancher le cordon d’alimentation dans une prise à 3 alvéoles reliée à la terre. Ne pas utiliser de rallonge. ■■ Pas d’alimentation au niveau de la prise – Brancher une lampe pour voir si la prise électrique fonctionne.
GARANTIE LIMITÉE DES GROS APPAREILS MÉNAGERS WHIRLPOOL® ATTACHEZ ICI VOTRE REÇU DE VENTE. UNE PREUVE D’ACHAT EST OBLIGATOIRE POUR OBTENIR L’APPLICATION DE LA GARANTIE.