
Owners Manual


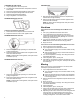
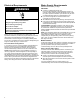

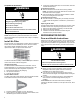

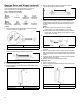
Table Of Contents
- REFRIGERATOR SAFETY
- Refrigerator Safety
- MAINTENANCE AND CARE
- Cleaning
- Changing the Light Bulbs
- Vacations
- Moving
- INSTALLATION INSTRUCTIONS
- Unpack the Refrigerator
- Location Requirements
- Electrical Requirements
- Water Supply Requirements
- Connect the Water Supply
- Install Air Filter
- REFRIGERATOR DOORS
- Door and Handle Instructions
- Remove Doors and Hinges
- Reverse Doors and Hinges (optional)
- Replace Doors and Hinges
- Final Steps
- Reversibility Kit Instructions
- Adjust the Doors
- REFRIGERATOR AND FREEZER FEATURES
- Refrigerator Shelves
- Freezer Shelf
- Door Rails or Trivets
- Can Racks and Bins (on some models)
- Deli or Meat Drawer
- Crisper
- Utility Compartment
- Ice Maker
- SÉCURITÉ DU RÉFRIGÉRATEUR
- Sécurité du réfrigérateur
- ENTRETIEN ET RÉPARATION
- Nettoyage
- Remplacement des ampoules d’éclairage
- Vacances
- Déménagement
- INSTRUCTIONS D’INSTALLATION
- Déballage du réfrigérateur
- Exigences d’emplacement
- Spécifications électriques
- Spécifications de l’alimentation en eau
- Raccordement à la canalisation d’eau
- Installation du filtre à air
- PORTES DU RÉFRIGÉRATEUR
- Instructions pour la porte et la poignée
- Démontage des portes et charnières
- Inversion du sens d’ouverture des portes et d’installation des charnières (facultatif)
- Réinstallation des portes et charnières
- Étapes finales
- Instructions pour l’ensemble d’inversion du sens d’ouverture
- Ajustement des portes
- CARACTÉRISTIQUES DU RÉFRIGÉRATEUR ET DU CONGÉLATEUR
- Tablettes du réfrigérateur
- Tablette de congélateur
- Tringles de la porte ou balconnets
- Cannettes et balconnets de porte (sur certains modèles)
- Tiroir à viande ou à charcuterie
- Bac à légumes
- Compartiment utilitaire
- Machine à glaçons

4
CHANGING THE LIGHT BULB
1. Unplug refrigerator or disconnect power.
2. The light bulb is located behind the Temperature control on
most models.
3. Remove the light shield (if applicable) as shown below.
4. Remove and replace the light bulb as shown below.
5. Replace the light shield (if applicable).
6. Plug in refrigerator or reconnect power.
REFRIGERATOR LIGHT STYLE 1
To Remove and Replace Light Bulb:
1. Reach behind the control panel and unscrew the bulb.
2. Replace the bulb with a 40 W max. appliance bulb.
REFRIGERATOR LIGHT STYLE 2
1. Remove the light shield by squeezing in on the sides and
pulling it straight down.
2. Remove the light bulb and replace it with an appliance bulb
of the same size and shape.
NOTE: To replace with an LED light bulb, order part number
W10565137 (3.6 W).
REFRIGERATOR LIGHT STYLE 3
1. Remove the light shield by squeezing in on the sides and
pulling it straight down.
2. Remove the light bulb and replace it with an appliance bulb
of the same size and shape.
NOTE: To replace with an LED light bulb, order part number
W10565137 (3.6 W).
FREEZER LIGHT
1. Slide the light shield toward the back of the compartment to
release it from the light assembly.
2. Remove the light bulb and replace it with an appliance bulb
of the same size and shape.
NOTE: To replace with an LED light bulb, order part number
W10574850 (2.0 W).
Vacations
If You Choose to Leave the Refrigerator On While You’re
Away :
1. Use up any perishables and freezer other items.
2. If your refrigerator has an automatic ice maker and is
connected to the household water supply, turn off the water
supply to the refrigerator. Property damage can occur if the
water supply is not turned off.
3. If you have an automatic ice maker, turn off the ice maker.
NOTE: Raise the wire shut-off arm to Off (up) position.
4. Empty the ice bin.
If You Choose to Turn Off the Refrigerator Before You Leave:
1. Remove all food from the refrigerator.
2. If your refrigerator has an automatic ice maker:
� Turn off the water supply to the ice maker at least one day
ahead of time.
� When the last load of ice drops, raise the wire shutoff arm
to the Off (up) position.
3. Turn off the Temperature control(s). See “Using the Controls”
in the Quick Start Guide.
4. Clean refrigerator, wipe it, and dry well.
5. Tape rubber or wood blocks to the tops of both doors to prop
them open far enough for air to get in. This stops odor ad mold
from building up.
Moving
When you are moving your refrigerator to a new home, follow
these steps to prepare it for the move.
1. If your refrigerator has an automatic ice maker:
� Turn off the water supply to the ice maker at least one day
ahead of time.
� Disconnect the water line from the back of the refrigerator.
� When the last load of ice drops, raise the wire shutoff arm
to the Off (up) position.
2. Remove all food from the refrigerator and pack all frozen food
in dry ice.
3. Empty the ice bin.
4. Turn off the Temperature control(s). See “Using the Controls”
in the Quick Start Guide.
5. Unplug refrigerator.
6. Clean refrigerator, wipe it, and dry well.
7. Take out all removable parts, wrap them well, and tape them
together so they don’t shift and rattle during the move.
8. Depending on the model, raise the front of the refrigerator so it
rolls more easily, or raise the leveling legs so they don't
scrape the floor. See “Adjust the Doors” or “Door Removal,
Leveling and Alignment” in the online Feature Guide.