
Installation Instructions
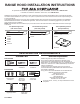


INSTALLATION INSTRUCTIONS
WARNING
Electrical Shock Hazard
Disconnect power before installing light switch.
Electrically ground range hood and light switch by
connecting ground wire to the ground screw in the
switch box.
Replace all parts and panels before operating.
Failure to do so can result in death or electrical shock.
B A
H
I
C D
E
G
F
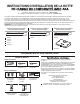
A. White wires (N)
B. Black wires (L)
C. UL Listed wire connector
D. Green (or bare) ground wire
E. Home power supply cable
#14 UL Approved cable
F. Range hood cable
G. UL Listed or CSA Approved
1/2" (13 mm) strain relief
H. Green ground screw
I. UL Listed single pole toggle
light switch
1. Mount the switch box on the wall in an easily accessible area
15" (38 cm) to 40" (1 m) above the floor. Avoid reaching over
the cooking surface.
For a single pole toggle light switch: Install a 3
1
/
2
" (8.9 cm)
deep single-gang switch box.
2. Attach the power cable to the switch box.
Clamp wiring to switch box and unit using a UL Listed
or CSA Approved 1/2" (13 mm) strain relief. Provide
6" (15.2 cm) leads inside box and fan for easier wiring.
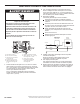
3. Connect wiring.
General instructions for all models:
Make sure both the single pole toggle light switch and
the range hood are properly grounded.
Make sure the ground wire is securely fastened to the
single pole toggle light switch ground screw. Tighten
ground screw.
Use proper wire nut sizes for number and size of wires.
Tighten screw terminals.
Make electrical connections, following appropriate
diagram.
BLACK
WHITE
RANGE HOOD
GND
120 VAC
LOAD
SINGLE
POLE
LIGHT
SWITCH
N
L
4. Mount single pole toggle light switch in switch box.
Tuck wires into switch box and fasten the control to box
using attached screws.
5. Attach switch plate.
Fasten the switch plate to the control using the short screws
from the parts bag.
6. Set the fan speed and light on the range hood to your
preference. The light switch will turn the range hood on and
off using your settings.