DW1260WA DW1260SA
For detailed operating method read the corresponding content on the instruction manual. Switch on the appliance Fill the detergent dispenser Check the rinse aid level Check the regeneration salt level Load the baskets Select a programme Press the On/Off button to switch on the appliance, Open the door. With each wash cycle. Compartment For programmes with pre-wash only. (Follow the user instructions!) Electric indicator on control panel (if provided). (On models with water softener system only.
Dear Customer, Please carefully read this manual bef ore using the dishwasher, it will help you to use and maintain the dishwasher properly. Keep it to refer to it at a later date. Pass it on to any subsequent owner of the appliance. This manual contains sections on safety Instructions, Operating Instructions, Installation Instruc tions and Troubleshooting Tips, etc. Control Panel...................................................3 Dishwasher Features.................................... ...
When using your dishwasher, follow the precautions listed below: This appliance must be grounded. In the event of a malfunction or breakdown, grounding will reduce the risk of an electric shock by providing a path of least resistance of electric current. This appliance is equipped with a cord having an equipmentgrounding conductor and a grounding plug. The plug must be plugged into an appropriate outlet that is installed and grounded in accordance with all local codes and ordinances.
Dispo se of the dishwasher packaging material correctly. All pa ckaging materials ca n be recycled. Plastic parts are marked with the standard international abbreviations: PE for polyethylene, e .g. sheet wrapping material PS for polysty rene, e.g. padding material POM PP ABS po lyoxymethylene, e.g. pla stic clips polypropylene, e.g. Salt filler Acrylonitrile Butadiene Styrene, e.g. Control Panel .
To get the best performance from your dishwasher, read all operating instructions before using it for the first time. 8 7 6 5 2 4 1 3 6 7 8 Power in dica tor light: To show the power supply. 2 Power switch: To turn on/off the power supply. 3 Salt and rinse aid warning lights: To show when the salt container or dispenser need to be refilled. 4 Start /Reset button: To start th e se lected washing program or reset the washing program when the machine is working.
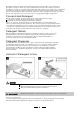
Before using your dishwasher for the first time: A. Set the water softener B. Pour 1/2 litre of water inside the salt container and then fill with d ishwash er salt C. Fill the rinse aid dispenser D. Fill in detergent The water softener must be set manually, using the water hardness dial. The water softener is designed to remove minerals and salts from the water, which would have a detrimental or adverse effect on the operation of the appliance.
Always use the salt intended for use with dishwasher. The salt contain er is located beneath the lower basket and should be fill ed as explained in t he foll owing: Attention! Only use salt spe cif ically desi gne d for t he use i n dishwashers! Every other type of salt not speci fically de sig ned fo r the u se in a d ishwasher, espe cially table salt, will damage the w ater sof tener.
When to Refill the Rinse Aid Dispenser If there is no rinse-aid warning light in the control panel, you can estimate the amount from the colour of the optical level indicator " C "located next to the cap. When th e rinse-aid c ontainer is full, the whole indicator will be dark .As the rinse -aid diminishes, the size of the dark dot decreases. You should never let the rinse aid leve l fall 1 / 4 full.
Normally new pulverised detergent is with out phosphate. Thus the water softener function of phosphate is not given. In this case we recommend to fill salt in the salt con taine r even when the hardness of water is only 6 °dH. If dete rgents witho ut phosphate are used in the case of hard water often white spots appear on d ishes and glasses. In this case please add more detergent to reach better results. Detergents without chlorine do only bleach a little.
Fill in Detergent Fill the detergent dispenser with detergent. The marking indicate s the dosing levels , as illustrate d on the righ t: A The place of main wash cycle deterg ent placed. B The place of pre-wash cycle deterge nt placed. Plea se o bserve the manufacturers dosing and storage Recommendations as stated on the detergent pac kaging. Close the lid and press until it locks in place. If the dishes are heavily soiled, place an additional detergent do se in the pre-wash detergent chamber.
Consider buying utensils which are identified as dishwasher-proof. Use a mild detergent that is described as 'kind to dishes'. If necessary, seek further information from the detergent manufacturers. For particular items, select a program with as low a temperature as possible. To prevent damage, do not take gla ss a nd c utlery out of the dishwasher immediately after the programme h as ended.
The upper basket is designed to hold more delicate and lighter dishware such as glasses, coffee and tea cups and sau cers, as well as plates, small bowls and shallow pans (as long as th ey a re not too dirty). Position the dishes and cookware so that they will not get moved by the spray o f water.
Adjusting the Upper Basket The height of the upper basket can be adjusted in order to create more space for large utensils both for the upper/lower basket. The height of the upper basket can be adjusted by placing the wheels on different h eight of the rails. Long items, serving cutlery, salad servers and knives should be placed on the shelf so that they do not obstruct the rotation of the spray arms. The shelf can be folded back or be removed when not requ ired for use.
( 3in1 ) Means: need to fill rinse into the Rinse-Aid Dispenser. For normally soiled loads, such as pots , plates,glasses and lightly soiled pans. standard daily cycle. Pre-wash(50℃) wash(50℃ ) rinse(70℃) drying 3in1 150 1.15 12.3 Pre-wash(50℃) Pre-wash Wash (65 ℃) Rinse Rinse Rinse (55 ℃) Drying 5/25g (or 3in1 ) 130 1.5 23.1 For normally soiled loads, such as pots、plates、 glasses and lightly soiled pans. Pre-wash(50 ℃) Wash (50 ℃) Rinse Rinse (65 ℃) Drying 5/25g (or 3in1 ) 160 1.3 15.
When you press the Start/Reset button to pause during washing, the program light will stop blinking and the dishwasher will mooing every minute unless you press the Start/Reset button to start. Premise: 1 A cycle that is underway can on ly be modified if it has only been running for a short time. Otherwise, the detergent may have already be en released, a nd the appliance may have already drained the wash water.
The filter prevents larger remnants of food or other objects from getting inside the pum. The residues may block the filter, in this case they must be removed. The filter system consists of a coarse filter,a flat (Main filter) And a microfilter(Fine filter). Main filter 2 1 Fo od and soil particles trap ped in this filter are pulverized by a specia l jet on the lower spray arm and washed down to drain.
Remarks: - Inspect the filters for blo cking a fter e very time the dishwa sher has been used. - By unscrewing the coarse filter, you can remove the filter system. Re move any foo d remna nts and clean the filters under running water. The entire filter assembly should be cleaned once a week. Cleaning the Filter To clean the coarse filter and the fine filter, use a c leaning b rush.
After Every Wash When not in Use for a LongTime After every wash, turn off the water supply to the appliance and leave the door slightly open so that moisture and odours are not trapped inside. It is recommend that you run a was h cy cle with the dishwasher empty an d the n remove the plug from the socket, turn off the wa ter supply and leave the door of the appliance slightly open. This will help the d oor seals to last longer and prevent odours from forming within the appliance.
Improper connection of the equipment earthing conductor can result in the risk of an for personal safety: electric shock. DO NOT USE AN EXTENSION CORD OR AN ADAPTER PLUG WITH THIS APPLIANCE. Check with qualified electrician or service representative if you areTHE in doubt whether the DO a NOT, UNDER ANY CIRCUMSTANCES, CUT OR REMOVE EARTHING appliance is properly earthed. CONNECTION FROM THE POWER CORD. Do not modify the plug provided with the appliance.
How to Drain Excess Water From Hoses If the sink is 1000 higher from the floor, the excess water in hoses cann ot be drained dire ctly into the sink. It will be necessary to drain excess water from hoses into a bo wl o r suitable container that is held outside and lower th an the sink. Water Outlet Connect the water drain hose. The drain hose mu st be correctly fitted to avoid water leaks. Ensure that the water dra in hose is no t kin ked or squashed.
Fuse blown, or the circuit breaker acted Replace fuse or reset circuit breaker. Remove any other appliances sharing the same circuit with the dishwasher Power supply is not turned on Make sure the dishwasher is turned on and the door is closed securely. Make sure the power cord is properly plugged into the wall socket. Error code:E1; Water pressure is low Check that the water supply is connected properly and the water is turned on. Door of dishwasher not properly closed.
The dishes were not loaded correctly. See notes in " Loading the Dishwasher Baskets ". The programme was not powerful enough. Select a more intensive programme. See" Wash Cycle Table ". Not enough detergent was dispensed. Use more detergent, or change your detergent. Items are blocking the path of spray arms. Rearrange the items so that the spray can rotate freely. The filter combination in the base of wash cabinet is not clean or is not correctly fitted.
Height : Width : Depth : 850mm 600 mm 580mm Water pressure: Hot water connection : Power supply: Capacity: 0.04-1.