
Manual
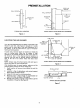

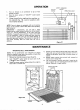


Figure 23
Figure 24
7,
8.
9o
PREPARE THE WASH WATER:
a. Place enough hot water in a suitable wash
container (figure 23) to cover the cell.
b. Dissolve four ounces of automatic dishwasher
detergent, such as Calgonite, in the water. Liquid
detergents used to wash dishes by hand are not
strong enough for good cleaning.
c. Shake the screen gently outside the house to
remove heavy dirt collections.
SOAK:
a. Lay the cell in the container and allow it to soak
for thirty minutes.
b. Then slosh the cell up and down in the solution
until it appears clean. RemoVe cell from container.
c. Then slosh the screen up and down in the solution
until clean. Drain out the dirty water.
RINSE:
a. Hold cell upright in container.
b. With a hose, rinse with warm water. (See figure
24.)
c. The hose nozzle should be held approximately ten
inches from cell plates and at a slight angle for
better cleaning effect, Rinse both sides of cell until
water is clear.
d. Flush cell frame along edges to dislodge any
trapped dirt or lint.
e. Flush and rinsescreenon both sides.
f. Stand cell and screen up and allow them to drain
for 2 hours.
10. INSTALL CELL
CAUTION: When installing the cell in a ceiling installation,
make sure it is latched securely in place before releasing it
(Figure 20).
a. Grasp the cell firmly, holding it a slight angle with
the cabinet (out at bottom).The arrow on top of
cell should point inward.
b. Insert cell at the top a_ndengage retaining pins
(Figure 19) into their respective cell-retain-
ing slots, then slide cell outward until retaining
pins are at bottoms of slots.
c. Allow ce!lto swing inward at the bottom, pushing
slightly until' it "clicks" over the safety spring clip
at bottom center of cabinet.
d. Continue to push cell inward at bottom until it
latches into the spring clips (one at each side of
cabinet). Make sure both clips are latched. (See
Figure 19).
e. Press the lower section of the "ON-OFF" switch
to turn unit on.
f. Replace the screen. Close the grille and secure it
with the two knurled screws.
10