Whynter 10,000 BTU Portable Air Conditioner Compact Size Model # : ARC-102CS INSTRUCTION MANUAL Congratulations on your new Whynter product. To ensure proper operation, please read this Instruction Manual carefully before using this product. Keep this manual in a safe place for future reference.
TABLE OF CONTENTS PAGE DISPOSAL INFORMATION 4 SAFETY PRECAUTIONS 5 INTRODUCTION / TECHNICAL DATA 6 PARTS IDENTIFICATION 7-8 CONTROL PANEL 9 INSTALLATION 10 - 12 OPERATION INSTRUCTIONS 13 - 14 REMOTE CONTROL 15 CARE AND MAINTENANCE 16 TROUBLESHOOTING 17 - 18 WARRANTY INFORMATION 20 3
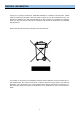
DISPOSAL INFORMATION Thank you for choosing the Whynter 10000 BTU Portable Air Conditioner Compact Size. Please follow the instructions provided in this user guide to obtain the very best performance from your portable air conditioner and take full advantage of the many features your portable air conditioner offers you. We trust that your Whynter air conditioner will provide the performance and reliability that we stand for. Please keep this user manual in a safe place for future reference.
SAFETY PRECAUTIONS WARNING TO REDUCE THE RISK OF FIRE, ELECTRICAL SHOCK, OR INJURY WHEN USING YOUR AIR CONDIITIONER, FOLLOW THESE BASIC PRECAUTIONS: Before the appliance is used, it must be properly positioned and installed as detailed in this manual. • Do not under any circumstances cut or remove the third (ground) prong from the power cord • Make sure this unit is connected to a correctly grounded power supply outlet. Do not use an extension cord or power strip • The power cord is UL listed.
INTRODUCTION / TECHNICAL DATA HOW IT WORKS The Whynter compact CFC-free, lead-free, and energy efficient 10,000 BTU portable air condi-tioner, helps you stay cool while working with better environmental standards and reducing energy consumption. This portable air conditioner is the ideal space-constrained climate-control solution. Designed with a compact modern style, the unit easily blends in with any room design and is ideal for for a kid’s room.
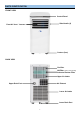
PARTS IDENTIFICATION FRONT VIEW Control Panel Side Handle (2) Front Air Vent / Louvers Casters (four) BACK VIEW Pre-filter 3M Filter (Optional, sold separately) Activated Carbon Filter Upper Air Intake Upper Drain Port Air Exhaust Lower Air Intake Lower Drain Port 7
PARTS IDENTIFICATION ACCESSORY IMAGE A B C ACCESSORY DESCRIPTION QUANTITY Exhaust hose adapter to the unit 1 piece Exhaust hose 1 piece Exhaust hose adapter to the window 1 piece Window slider kit 1 set Clear plastic plug (plug is in the upper corner of the plastic bag that holds the user manual) 1 piece Foam seal A (Adhesive) Foam seal B (Adhesive) Foam seal C (Non-adhesive) 2 pieces 2 pieces 1 piece Security bracket with 2 screws 1 set Drain hose 1 piece 3M Filter (Optional, sold separ
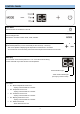
CONTROL PANEL Power Button Press to turn the air conditioner on and off Mode Button Press to change mode • Controls the 3 function modes: COOL, FAN, and DRY. Up ( + ) and Down ( - ) Buttons Adjusts set temperature (1°C/ 2°F increments) or timer hours (0 – 24 hours). This unit is capable of displaying set temperature in Fahrenheit or in Celsius. To convert from one to the other, press and hold the Up and Down buttons for 3 seconds.
INSTALLATION WARNING: NEVER OPERATE THE AIR CONDITIONER WITHOUT THE AIR FILTER Pre-Filter AIR FILTERS • Pre-Filter This portable air conditioner comes with a Pre-Filter which removes large particles such as dust, pet hair and dander. This pre-filter can be removed for cleaning by pulling the filter frame back and out. This pre-filter washable and does not need to be replaced.
INSTALLATION LOCATION The air conditioner should be placed on a hard and level surface strong enough to support the unit. The unit has casters and it should only be rolled on smooth, flat surfaces. Use caution when rolling on carpet surfaces. Do not attempt to roll the unit over objects. Never place any obstacles around the air inlet or outlet and allow at least 20" of clearance for efficient air conditioning. Fig.
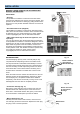
INSTALLATION WINDOW KIT INSTALLATION IN A DOUBLE-HUNG WINDOW 1. Open window or sliding door for approximately 5” Foam seal A (adhesive type) 2. Cut the foam seal A and B (adhesive type) to the proper length and attach it to the bottom of the window. Fig. 5a. 3. Adjust the length of the window bars to the same length and width of the opening of the window. Cut the window piece if necessary to fit the length of your window. Fig. 5b. Foam seal B (adhesive type) 4.
OPERATION INSTRUCTIONS BEFORE USING YOUR APPLIANCE Remove the exterior and interior packing Before connecting the appliance to the power source, let it stand upright for approximately 4 hours.
OPERATION INSTRUCTIONS TIMER (DELAYED SWITCH ON / OFF) FUNCTION This function mode enables a delayed switch ON or delayed switch OFF of the air conditioner. The time (hours) delay can be set, enabled and disabled. SETTING SWITCH OFF TIMER With the air conditioner operating in any function mode, press the TIMER button. The TIMER OFF light will come on. Then set the desired time delay OFF hours by pressing the UP and DOW N buttons. The time increments are at 0.
REMOTE CONTROL The portable air conditioner can be switched on by the remote control. To transmit signals from the remote control to the air conditioner, point the front part of the remote handset towards the control panel on the air conditioner. Reception of the signal is confirmed by a beep. The maximum signal transmission distance is approximately 8 meters / 26 feet. NOTE: Other appliances in the same room controlled by a remote control (TV, radio, stereo, etc.
CARE AND MAINTENANCE IMPORTANT: Switch off the air conditioner and disconnect the plug from the power outlet Fig.
TROUBLESHOOTING Many common portable air conditioner problems are easily resolved. Try the troubleshooting suggestions below to see if the problems can be resolved before having to contact the service department.
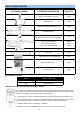
TROUBLESHOOTING Problem The unit has worked for a long time, but the room is not cold enough Possible Causes Windows or doors are open There are too many people in the room There is direct sunshine into the room The room is a kitchen or with many heat-producing appliances There is a server in the room The room is too large The unit is very noisy The unit is not level The surface underneath the unit is uneven Low power voltage Solutions Close all windows and doors You may need addi
ONE YEAR LIMITED WARRANTY & THREE YEAR WARRANTY ON COMPRESSOR This WHYNTER product is warranted to the original owner, purchased from an authorized Whynter dealer within the 48 U.S. continental states, for one year from the original purchase date against defects in material and workmanship under normal residential usage.