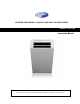
WHYNTER ECO-FRIENDLY 10,000 BTU PORTABLE AIR CONDITIONER co MODEL# : ARC-10WB Instruction Manual Congratulations on your new WHYNTER product. Please read this Instruction Manual carefully before using this product to ensure proper operation. Keep this manual in a safe place for future reference.
TABLE OF CONTENTS INTRODUCTION 3 SAFETY PRECAUTIONS 4-5 IDENTIFICATION OF ACCESSORIES 6 IDENTIFICATION OF PARTS 7 OPERATING YOUR AIR CONDITIONER 8 INSTALLATION INSTRUCTIONS 9-12 AIR FILTERS INSTALLATION 13 OPERATION INSTRUCTIONS 14-15 WATER DRAINAGE 16 REMOTE CONTROL 17 CARE AND MAINTENANCE 18 TECHNICAL DATA 19 TROUBLESHOOTING 20-21 WARRANTY INFORMATION 22 2|Page
Thank you for choosing the Whynter portable air conditioner. Please follow the instructions provided in this user guide to obtain the very best performance from your portable air conditioner and take full advantage of the many features your portable air conditioner offers you. We trust that your Whynter air conditioner will provide the performance and reliability that we stand for. Please keep this user manual in a safe place for future reference.
Your safety and the safety of others are very important to us. To reduce the risk of fire, electrical shock or injury when using your appliance, follow these basic precautions. SAFETY PRECAUTIONS Before the appliance is used, it must be properly positioned and installed as detailed in this manual. Do not under any circumstances cut or remove the third (ground) prong from the power cord. Make sure this unit is connected to a correctly grounded power supply outlet.
Do not allow children to climb, stand or hang on the appliance. The air conditioner could tip over and get damaged and/or seriously injure somebody. Keep fingers out of the air intakes and air outlets. The appliance is an electrical appliance. To avoid injury from electrical shock do not operate it with wet hands, while standing on a wet surface or while standing in water. Do not use it in outdoors or in wet conditions.
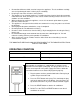
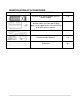
IDENTIFICATION OF ACCESSORIES IMAGE ACCESSORY NAME QUANTITY Exhaust hose, Round Adaptor and Flat Mouth Adaptor 1 set 1 set Window sliders and Clear plastic plug (plug is in the upper corner of the plastic bag that holds the user manual) Foam seal 3 pcs Remote control & Batteries 1 set Drain hose 1 pcs 6|Page
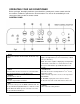
IDENTIFICATION OF PARTS Front 1. Control Panel 2. Front Air Vent / Louvers 3. Caster (four) 4. Handle (both sides) Rear 6 6. Upper air filter 7. Air outlet (hot air exhaust) 8. Power cord outlet 9. Upper air intake 10. Upper drain port 11. Lower air intake (Compressor) 12. Lower air filter 13.
OPERATING YOUR AIR CONDITIONER Before you begin, thoroughly familiarize yourself with the control panel, remote control and all of the functions. Follow the symbol for the desired function. The unit can be controlled by the unit control panel alone or with the remote control. CONTROL PANEL 1. MODE Controls the 4 function modes: COOL, AUTO, Fan only & DRY. 6. UP & DOWN O O Adjusts set temperature (1 C/ 2 F increments) or timer hours (0 – 24 hours).
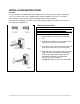
INSTALLATION INSTRUCTIONS Location The air conditioner should be placed on a hard and level surface strong enough to support the unit. The unit has casters and it should only be rolled on smooth, flat surfaces. Use caution when rolling on carpet surfaces. Do not attempt to roll the unit over objects. Never place any obstacles around the air inlet or outlet and allow at least 20 inch of clearance for efficient air-conditioning.
Window kit Installation When you use this air conditioner unit, hot air must be exhausted out of the room to complete the air exchange of the condenser. When the unit is operating in fan-only mode, no exhaust is required. Your window kit has been designed to fit most standard vertical and horizontal windows. However, it may be necessary for you to modify the installation procedures for your window. Please refer to Fig. 8 & Fig.9 for minimum and maximum window openings.
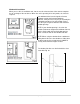
Window kit Installation in a double-hung window 1. Open window or sliding door for approximately 5” 2. Cut the foam seal (adhesive type) to the proper l ength and attach it to the bottom of the window. Fig.10. 3. Adjust the length of the window bars to the same length and width of the opening of the window. Cut the window piece if necessary to fit the length of your window. Fig. 11. 4. Close the window on the window slide bars.
Window kit Installation in a sliding door/ window 1. Open window or sliding door for approximately 5” 2. Cut the foam seal (adhesive type) to the proper l ength and attach it to the bottom of the door / window. Fig.14. 3. Adjust the length of the window bars to the same length and width of the opening of the window. Cut the window piece if necessary to fit the length of your window. Fig. 15. 4. Close the door/ window on the window slide bars.
AIR FILTER INSTALLATION Your Whynter portable air conditioner is equipped with a 2 in 1 washable Pre-Filter/ Silver Ion Filter. The washable air filter removes large particles such as dust, pet hair and dander. The Silver Ion on the air filter is designed to kill bacteria in the air and controls the growth of microbes, such as virus, fungi and spores. WARNING: NEVER OPERATE THE AIR CONDITIONER WITHOUT THE AIR FILTER The air filter can be removed by pulling up the filter frame.
OPERATION INSTRUCTIONS BEFORE USING YOUR APPLIANCE Remove the exterior and interior packing. Before connecting the appliance to the power source, let it stand upright for approximately 4 hours. This will reduce the possibility of a malfunction in the cooling system from handling during transportation. SWITCHING ON/OFF THE AIR CONDITIONER The appliance can be switched ON or OFF by pressing the Power button on the control panel or the Power button on the remote control.
TIMER (DELAYED SWITCH ON / OFF) FUNCTION This function mode enables a delayed switch ON or delayed switch OFF of the air conditioner. The time (hours) delay can be set, enabled and disabled. SETTING SWITCH OFF TIMER With the air conditioner operating in any function mode, press the TIMER button. The TIMER OFF light will come on. Then set the desired time delay OFF hours by pressing the UP and DOWN buttons. The time increments are at 0.5 hour to up to 10 hours, followed by 1 hour increment up to 24 hours.
WATER DRAINAGE When the water level of the bottom tray reaches maximum level, the unit will beep 8 times and the digital display will show P1 symbol. Also, the cooling or dehumidifying function will stop and the fan only function will start. Manual drainage To drain the water from the bottom try, carefully move the unit to a drain location, remove the bottom drain plug and let the water drain (Fig.25). The P1 symbol will disappear and the cooling or dehumidifying function can be started.
REMOTE CONTROL The portable air conditioner can be switched on by the remote control. To transmit signals from the remote control to the air conditioner, point the front part of the remote handset towards the control panel on the air conditioner. Reception of the signal is confirmed by a beep. The maximum signal transmission distance is approximately 8 meters / 26 feet. NOTE: Other appliances in the same room controlled by a remote control (TV, radio, stereo, etc.), may cause interferences.
CARE AND MAINTENANCE IMPORTANT: Switch off the air conditioner and disconnect the plug from the power outlet Drain water by removing the drain plug. Always transport the air conditioner in an upright position only. CLEANING THE AIR FILTERS To ensure the air intake is filtered properly and to assure that your air conditioner runs efficiently, it is recommended to clean the air filters at least once every two weeks. This unit has two air filters; the upper and the lower filters.
TECHNICAL DATA Cooling capacity 10,000 BTU Power supply 115v/ 60Hz Maximum power input 1130 Watts Maximum input 10.0 Amps Dehumidifying capacity 55 Pts / Day Thermostat 62°F / 17°C to 88°F / 30°C Refrigerant R-410A Air flow (max.) 380 m3/ Hour Fan speeds 3 (Auto, H, M, L) Exhaust hose length 48” / 4’ Unit Dimensions 17” W x 13.
TROUBLESHOOTING Problem The portable air conditioner does not turn on Possible Causes Solutions Power failure / outage. Restore the power supply. The automatic switch, line fuse, or breaker has been tripped. Flip the switch / change the fuse / turn the breaker back on. Also note that you may have too many appliances drawing power on one circuit, you may need to move the other appliances to another circuit. The power supply voltage is too low. The power cord is damaged. The L.C.D.I.
The unit has worked for a long time, but the room is not cold enough The unit is set to low fan speed. Windows or doors are open. Set the unit to a higher fan speed. There are too many people in the room. You may need additional cooling or another air conditioner. There is direct sunshine into the room. Close curtains or blinds and try to minimize the amount of direct sunlight into the room. The room is a kitchen or with many heat-producing appliances There is a server in the room.
ONE YEAR LIMITED WARRANTY & THREE YEAR WARRANTY ON COMPRESSOR This WHYNTER portable air conditioner is warranted, to the original owner within the 48 continental states, for one year from the date of purchase against defects in material and workmanship under normal use and service.
www.Whynter.