2,000
3 4-6 7 8-9 10 11 - 13 14 - 16 17 18 19 - 20 20
12,000
SAFETY PRECAUTIONS I I WARNING • • • • • • • • • • • • • • • • • • • • • • • • • • • • • TO REDUCE THE RISK OF FIRE, ELECTRICAL SHOCK, OR INJURY WHEN USING YOUR AIR CONDIITIONER, FOLLOW THESE BASIC PRECAUTIONS: Before the appliance is used, it must be properly positioned and installed as detailed in this manual. Do not under any circumstances cut or remove the third (ground) prong from the power cord Make sure this unit is connected to a correctly grounded power supply outlet.
Only install and operate this appliance as outlined in this instruction manual. At all times,use care when using this appliance. Do not modify this appliance in any way to avoid danger. Electrical equipment and installations regulated by national legislation must be followed. Children must not use this appliance unsupervised.
Stagnation of possible leaks of refrigerant gas in unventilated rooms could lead to fire or an explosion hazard should the refrigerant come in contact with electric heaters, stoves or other sources of ignition. Use car when storing the appliance to prevent mechanical faults. Only persons authorised by an accredited agency certifying their competence to handle refrigerants in compliance with sector legislation should work on refrigerant circuits.
,000 12,000 BTU (7000 BTU SACC) 10,000 BTU (9,500 BTU DOE) 82 Pts / day 330 194 CFM 1200W / 10.5A CEER / EER 6.88 / 9.55 20.5 18.8 35 Large Exhaust Hose: 5.9" diameter Large Hose Connector: 5.9" diameter with 5.0" diameter reducer Small Intake Hose: 5.0" diameter Small Hose Connector: 5.0" diameter Fixture and Window Kit: 5.0" diameter Window Kit: 6.
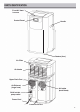
Front Air Vent / Louvers Control Panel Handle Casters (four) Air Filter Air Intake Upper Drain Port --..i.i Air Exhaust (large hose) Built-in drain ----+1++-.
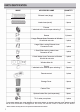
IMAGE ACCESSORY NAME QUANTITY 1)))- Exhaust hose (large) 1 piece 1)))))))))))))))))))) Intake hose (small) 1 piece � � � � � m � CT � ID 01�1 0 �, 0) ����� 0 �& - -'!i Fixtures ** attached to the covers upon unboxing ** 2 pieces Screws 8 pieces 1 Large Exhaust Hose Connector to Window Kit with tab cut-outs 1 piece 1 Large Slide Locking Exhaust Hose Connector to unit 1 piece 1 Small Slide Locking Intake Hose Connector to unit 1 piece 1 Small Intake Hose Connector to Window Kit wi
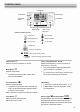
CONTROL PANEL LCD Display C) Power Button .. 8 Fan Speed Button ° ! �� nn - - 0 F -ctJ UU c- ., 0 88hr lSTOPI �o; Mode Control Timer Button ,,, [�]CJ Timer/Temp Set Control Warning Light Indication symbols on LCD ctJ e Cooling mode High Fan speed Dehumidifying mode Medium Fan speed Fan only mode Low Fan speed I\ -'O',,_ ,, , Heating mode nn·F •c QQ l�I l!!!.J / I \ !STOP! Display set temperature Warning Light and Stop display 0 88hr Display timer setting: Auto Switch On/Off C
82
INSTALLATION Run the remaining water line into the exhaust hose through the opening in the exhaust hose adapter. This adapter must be installed on the exhaust outlet of the unit. If the adapter is not installed in this position you will need to adjust the adapters. Run the excess water line into the cavity of the exhaust hose.
INSTALLATION Location The air conditioner should be placed on a hard and level surface strong enough to support its weight. The unit is equipped with caster wheels for portability. It should only be rolled on smooth, flat surfaces. Use caution when rolling on carpet surfaces. Do not attempt to roll the unit over objects. The air inlet and outlet should be free of any obstructions and be placed with at least 20" of clearance for efficient air-conditioning and circulation.
OPERATION INSTRUCTIONS BEFORE USING YOUR APPLIANCE • Remove the exterior and interior packing • Before connecting the appliance to the power source, let it stand upright for approximately 4 hours.
OPERATION INSTRUCTIONS • The temperature setting range of this air conditioner is from 61 F to 77F. To set the temperature, press the+ or buttons. Once the set temperature is achieved, the compressor and the fan will stop NOTE: This unit uses heat pump from heating and the heating mode does not work when temperature is below 45F. To set the fan speed, press the Fan Speed button. In Heating mode, the difference in noise level between the 3 fan speeds is not very noticeable when the compressor is on.
1. Keep the exhaust hose as short and straight as possible The exhaust hose removes heat from the room. It should remain as short and straight as possible without sharp bends or twists to maximize efficiency. If the exhaust hose must be extended, do not exceed 9'. 2. Turn the air conditioner on early Turning the air conditioner on early instead of waiting until the hottest point of the day will allow the unit to be more effective.
REMOTE CONTROL The portable air conditioner can be switched on by the remote control. To transmit signals from the remote con trol to the air conditioner, point the front part of the remote handset towards the control panel on the air condi tioner. Reception of the signal is confirmed by a beep. The maximum signal transmission distance is approxi mately 8 meters I 26 feet. NOTE: • Other appliances in the same room controlled by a remote control (TV, radio, stereo, etc.
CARE AND MAINTENANCE IMPORTANT: • Switch off the air conditioner and disconnect the plug from the power outlet • Drain water by removing the drain plug • Always transport the air conditioner in an upright position only CLEANING THE AIR FILTERS • To ensure the air intake is filtered properly and to assure that your air conditioner runs efficiently, it is recommended to clean the air filters at least once every two weeks • This unit has two air filters; washable pre-filter and an activated carbon filter.
2020