
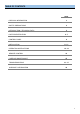
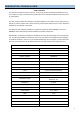
Specifications Sheet


9
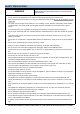
INSTALLATION
WARNING: NEVER OPERATE THE AIR CONDITIONER WITHOUT THE AIR
FILTER
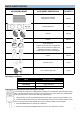
Your Whynter portable air conditioner is equipped with a wash-
able Pre-Filter and an Activated Carbon Filter.
The washable Pre-Filter removes large particles such as dust,
pet hair and dander. The Activated Carbon filter is designed to
remove smoke and other odors. It is recommended you replace
the Activated Carbon filter every 2-3 months or as needed. Fol-
low the steps below to install the filters.
1. Pull up the pre-filter frame (Fig. 1a)
2. Place the activated carbon filter on the pre-filter frame by
inserting it through the three pins (Fig. 1b)
3. Once the activated carbon filter is secured, insert the assem-
bled filter frame into the unit.
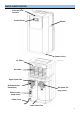
WATER DRAINAGE
The dehumidifying capacity of this unit is 76 pints per day. The patented self-evaporating function of the ARC-
122DS unit fully exhausts all condensation automatically in most environments when humidity is less than 70%.
Areas with more than 70% humidity, the self-evaporating function can still exhaust about 98% of the moisture
and the remaining 2% of moisture will be collected in the water tank of the air conditioner.
When there is excess water condensation inside the unit, the air conditioner stops running and shows a warning
light (refer to page 8). This warning light indicates that the water condensation needs to be drained using the fol-
lowing procedures:
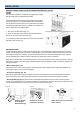
• Manual drainage (Fig. 2a)
Carefully move the unit to a drain location, remove the bottom drain plug and let the water drain. Replace the
drain plug and plug in unit to resume operation.
• Continuous drainage (Fig. 2b)
Remove the upper drain plug from the back of the unit and install the drain hose (sold separately). Place the
open end of the hose to a drain area. This method is recommended if uninterrupted operation is desired.
• Auto Pump drainage (Fig. 2c) This unit has a condensate pump feature that can pump out (and up) water
through the included drain hose for continuous water removal. Remove the pump drain plug from the back of the
unit and install the drain hose. Place the open end of the hose to a drain area.
Attach drain hose for
Continuous Drainage
Fig. 2b
Fig. 1a
Fig. 1b
Remove bottom
drain plug for
Manual Drainage
Fig. 2a Fig. 2c
Attach drain hose for continuous
water removal