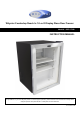
Whynter Countertop Reach In 1.8 cu ft Display Glass Door Freezer Model # : CDF-177SB INSTRUCTION MANUAL Congratulations on your new Whynter product. To ensure proper operation, please read this Instruction Manual carefully before using this product. Keep this manual in a safe place for future reference. V 3.7.
Table of Contents PAGE Safety Precautions 3-4 Parts and Accessories 5 Product Features / Technical Data 6 Installation 7-8 Installation / Operation and Controls 9 - 10 Cleaning and Maintenance 11 - 12 Troubleshooting 13 - 14 Warranty Information 15 2
Safety Precautions WARNING TO REDUCE THE RISK OF FIRE, ELECTRICAL SHOCK, OR INJURY WHEN USING YOUR GLASS DOOR FREEZER, FOLLOW THESE BASIC PRECAUTIONS: Read all instructions before using the appliance. Never clean appliance parts with flammable fluids. The fumes can create a fire hazard. Do not use an excessively wet cloth, industrial solvents, and oil-based products to clean this appliance. To clean the glass door freezer, use only mild detergents. Never use harsh chemicals or solvents.
Safety Precautions Transport the appliance in an upright position only. Always place the appliance on even and hard and level surface. Close the freezer door immediately after putting in any items to maintain the internal temperature of the unit. Avoid placing the freezer near external heat sources or direct sunlight. Make sure the freezer is placed on a flat, level, and solid surface. Place your appliance on a hard and level floor that is strong enough to support it when it is fully loaded.
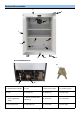
Parts and Accessories 3 4 6 5 1 8 7 2 9 10 11 12 13 BOTTOM REAR SECTION 16 15 14 1. Recessed Door Handle 5. Light 9. Drain Cover / Drain 13. Leveling Leg (4) 2. Door 6. Internal Fan 10. Pilaster (4) 14. Drain Tube 3. Temperature Control Knob / Light Switch (Rear) 7. Slide-Out Freezer Wire Shelves (2) 11. Door Lock 15. Compressor 4. Door Hinge Cover 8. Shelf Clips (8) 12. Lock Latch 16.
Product Features / Technical Data Ideal for any small space where cold storage is needed, the Whynter Counter-top Reach In 1.8 cu ft Display Glass Door Freezer can also be used in the kitchen, offices, garages or basements. This space-saving glass door freezer is designed with a flush back, allowing it to fit cleanly against the wall or into corners. This freezer features a stainless steel trimmed glass door, adjustable temperature control, and a lock for securing the contents.
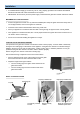
Installation Excessive Weight Hazard Two or more people should move and install glass door freezer. Failure to do so can result in back or other injury. REMOVE PACKAGING MATERIALS IMPORTANT: Do not remove any permanent instruction labels or the data label on your glass door freezer REMOVE TAPE AND GLUE FROM YOUR GLASS DOOR FREEZER BEFORE USING To remove any remaining tape or glue, rub the area briskly with your thumb.
Installation A standard electrical supply (115 VAC only, 60 Hz, 10A), properly grounded in accordance with National Electrical Code and local codes and ordinances is required. IMPORTANT: Do not kink or pinch the power supply cord between the glass door freezer and wall or cabinet. MOVEMENT OF YOUR APPLIANCE Position the glass door freezer in a dry and well-ventilated place. Keep the glass door freezer away from direct sunlight, heaters, and corrosive gases or chemicals.
Installation / Operation and Controls 1. Determine the proper location for the shelf clips. The reference slots on the pilaster can serve as a guide to ensure all clips are properly located. 2. Insert top tab of the shelf into the desired slot of the pilaster. The retaining tab should be facing upwards as shown. 3. Insert the bottom tab into the appropriate slot on the pilaster. The shelf clip may need to be squeezed slightly during installation. 4. Install all remaining shelf clips as described above. 5.
Operation and Controls Prior to storing the frozen food, pack it in plastic bags, aluminum sheets or freezing containers and place into the glass door freezer. Fresh foods should not be stored together with frozen foods. Do not keep glass-bottled drinks such as beer or soda, as the glass may shatter and canned items may burst. Do not use this glass door freezer as a refrigerator as food can become frozen.
Cleaning and Maintenance CLEANING Outside/Exterior Wipe with a clean cloth lightly dampened with appliance polish wax or mild liquid dishwashing detergent. Dry and polish with a clean, soft cloth. Do not wipe the glass door freezer with a soiled dishwashing cloth or wet towel. Do not use scouring pads, powdered cleaners, bleach, or cleaners containing bleach. Inside Use warm water and baking soda solution–about a tablespoon of baking soda to a quart of water.
Cleaning and Maintenance ENERGY SAVING TIPS The glass door freezer should be located in the coolest area of the room, away from heat-producing appliances or heating ducts, and out of direct sunlight. Let hot foods cool to room temperature before placing in the glass door freezer. Overloading the glass door freezer forces the compressor to run longer. Foods that freeze too slowly may lose quality or spoil. Be sure to wrap foods properly, and wipe containers dry before placing them in the glass door freezer.
Troubleshooting Many common glass door freezer problems are easily resolved. Try the troubleshooting suggestions below to see if the problems can be resolved before having to contact the service department.
Troubleshooting Many common glass door freezer problems are easily resolved. Try the troubleshooting suggestions below to see if the problems can be resolved before having to contact the service department.
ONE YEAR LIMITED WARRANTY This Whynter Glass Door Freezer is warranted, to the original owner within the 48 continental states, for one year from the date of purchase against defects in material and workmanship under normal use and service. When making a warranty claim, please have the original bill or invoice of purchase with purchase date available.