
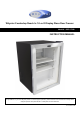
User Manual


8
Installation
A standard electrical supply (115 VAC only, 60 Hz, 10A), properly grounded in accordance with National
Electrical Code and local codes and ordinances is required.
IMPORTANT: Do not kink or pinch the power supply cord between the glass door freezer and wall or cabinet.
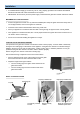
MOVEMENT OF YOUR APPLIANCE
Position the glass door freezer in a dry and well-ventilated place. Keep the glass door freezer away from di-
rect sunlight, heaters, and corrosive gases or chemicals.
Clean the interior surface with lukewarm water using a soft cloth.
Place your appliance on a hard and level floor that is strong enough to support it when it is fully loaded.
If the appliance is needed to be lifted, two or more people should move glass door freezer. Failure to do so
can result in back or other injury.
We do not recommend installing the appliance on carpet.
LEVELING THE GLASS DOOR FREEZER
It is important for the glass door freezer to be leveled in order to work properly. It can be raised or lowered by
turning the four leveling legs on the bottom of the appliance. If the glass door freezer is not leveled during in-
stallation, the door may not close or seal properly, causing cooling, frost, or moisture problems. It is very im-
portant that the glass door freezer is at level in order to function properly.
NOTE: This glass door freezer comes with 4 leveling legs.
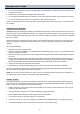
We recommend using a carpenter’s level to check the machine.
Place a carpenter’s level on top of the product to see if the glass
door freezer is level from front to back and side to side.
Adjust the height of the legs as follows:
Turn the leveling leg to the right to lower that side of the
glass door freezer
Turn the leveling leg to the left to raise that side of the
glass door freezer
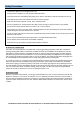
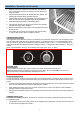
SHELF CLIP INSTALLATION
Retaining tab
Top tab
Bottom tab
SHELF CLIP
Properly Installed Clip Improperly Installed Clip
Top tab fully inserted
into slot
Bottom tab fully
seated
Shelf clip should not be
installed upside down