
Instructions / Assembly

5
x Position your portable freezer in a location where there is
proper air circulation and electrical connections.
x Keep the portable freezer away from heat and direct
sunlight if possible.
x This portable freezer is suitable for vehicle use and
camping however, the appliance should never be
exposed to rain.
x This portable freezer should not be placed in a built-in or recessed area. It is
designed to be freestanding.
x The normal operation of the freezer depends on heat radiation from the condenser.
For the initial use, remove all packaging and allow at least 6” of clearance around
the perimeter of the freezer.
1. Remove all interior and exterior packaging.
2. Position the freezer in a dry and well-ventilated place. Keep the freezer away
from direct sunlight, heaters and corrosive gases/chemicals.
3. Clean the interior surface with lukewarm water and a soft cloth.
4. When inserting the AC power-cord into the power socket, make sure the
power socket is a grounded 115V~AC / 60Hz socket. Also, make sure that the
unit’s grounding prong has not being tampered with.
Note: When inserting the DC power-cord, make sure the input is a 12V~DC / 24V
power source.
5. When moving the freezer, always use both handles to the carry the unit as
level as possible. This is in order to protect the compressor and the sealed
system.
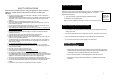
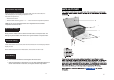
Movement and Installation Instructions
Proper Location
Because this unit is
compressor based
appliance, ample
space is required
around the unit to
allow it to exhaust
l
6
Your portable freezer uses a digital control system for adjusting the thermostat.
OPERATING YOUR
PORTABLE FREEZER
Test-Run
UNDERSTANDING THE TEMPERATURE CONTROL SETTING
The control system allows for the voltage cut-out to be set to three (3) different settings
depending on the environment & situation that the appliance is being operated in. Low
voltage supply to the appliance can result in poor cooling performance and damage to
the supply battery.
When using 12V DC, the digital readout will show the factory setting 10.0V DC. To
ensure that suitablebattery voltage can be maintained the controller has been
programmed to offer three (3) cut-out levels-11.8,10.7 & 10.0V DC.
When using 24V DC, the digital readout will show the factory setting 22.2V DC. To
ensure that suitable battery voltage can be maintained the controller has been
programmed to offer three (3) cut-out levels- 25.0, 23.5 & 22.2V DC.
To set the battery cut-out to the required level follow these steps:
ķPress “Set” button to switch from temperature setting to low-voltage setting, press
once to set the temperature, and press twice to set the low-voltage.
ĸ Push the “+” or “-” to adjust the setting. The display will flash four (4) times with the
selected setting. To check press “SET” once and the selected setting will flash and then
return to current voltage input.
When the appliance is disconnected from the power source the battery cut-out remains
at its last setting.
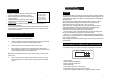
Auto
Low Speed
SetSet
Mo d e
+
-
Temp
Battery
Vo lta g e
12
34
576
1.SET: Set button
2.Button for adjusting temperature +
3.Button for adjusting temperature –
4.Mode: Mode button
5.Auto indicator: yellow when running normal
6.low-speed indicator: green when low-speed working
7.LED indicator: display the temperature (°F), voltage and battery condition