
Miro Direct Air Assembly


10
Assembly Instructions for Fresh Air System
WIKING Miro 1 and WIKING Miro 2
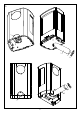
For a fresh air connection at the back of the stove (drawing 1):
1. Break off the pre-cut plate (1) at the bottom of the rear plate.
2. Pulltheinsulationsleeve(2)ontotheexi-hose(3)andmounttheexi-hoseontheconnector
bush (4).
3. Tightentheexi-hosewiththestrap(5).
For a fresh air connection beneath the stove (drawing 2):
1. Pulltheinsulationsleeve(1)ontotheexi-hose(2)andmounttheexi-hoseontheconnector
bush (3).
2. Tightentheexi-hosewiththestrap(4).
WIKING Miro 1 with pedestal and WIKING Miro 2 with pedestal
For fresh air supply through the rear of the pedestal (drawing 3):
1. Removetherearplateofthepedestal(1)byliftingitupandpullingitawayfromthepede-
stal.
2. Break off the pre-cut plate (2) at the bottom of the rear plate.
3. Break off the pre-cut plate (3) at the top of the rear plate of the pedestal.
4. Pulltheinsulationsleeve(4)ontotheexi-hose(5)andmounttheexi-hoseontheconnector
bush (6).
5. Tightentheexi-hosewiththestrap(7).
6. Leadtheexi-hoseoutthroughtherear.Reattachtherearplateofthepedestalbyhookingitto
thetopandloweringitintotheslotsinthebottom.
For fresh air supply through the bottom of the pedestal (drawing 4):
1. Removetherearplateofthepedestal(1)byliftingitupandpullingitawayfromthepedestal.
2. Breakoffthetwopre-cutplates(2+3)oftherearplateofthepedestal.
3. Break off the pre-cut plate (4) at the bottom of the rear plate.
4 Pulltheinsulationsleeve(5)ontotheexi-hose(6)andmounttheexi-hoseontheconnector
bush (7).
5. Tightentheexi-hosewiththestrap(8).
6. Leadtheexi-hosethroughthepedestalandintotheoor.
7. Reattachtherearplateofthepedestalbyhookingittothetopandloweringitintotheslotsin
the bottom.
English