
Assembly Instructions

Assembly Instructions
IMPORTANT:
• ALL INSTALLATION WORK SHOULD BE DONE BY ACCREDITED PROFESSIONAL.
• SHUT OFF POWER SUPPLY AT FUSE OR CIRCUIT BREAKER!
• USE ONLY THE SPECIFIED BULBS. DO NOT EXCEED THE MAXIMUM WATTAGE!
House Wires
Fixture Wires
Hot
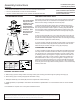
How to Identify the Fixture’s Wires
Hot Neutral Ground
Smooth
Ribbed
Bare Metal,
Green, or
Green Inner
Thread
Black
White
Black Inner
Thread
White Inner
Thread
PENDANT INSTALLATION - PREPARING FOR
INSTALLATION
Remove all of the contents from the carton. See the important notes above.
Shut off the power at the circuit breaker and completely remove the old
xturefromtheceiling,includingtheoldmountingstrap.
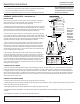
1.Takethemountingstrapassemblyfromthepartsbag.Oneendofnipple(F)
shouldbeattachedtomountingstrap(A)withwasherandhexnut(CandD)in
place.Canopyloop(H)isattachedtotheother.Securelyattachmountingstrap
(A)tothejunctionboxusingmountingscrews(B)andascrewdriver.
2. Unscrew canopy loop collar (I) from canopy loop (H). Pass canopy (G) over
themountedcanopylooptotesttheheight.Approximatelyhalfofthecanopy
loop’sexteriorthreadsshouldbeexposed,andthecanopyloopcollarshould
tsnuglyontothecanopyloop.Removecanopy(G)andadjusttheheightof
nipple(F)andcanopyloop(H)untilthedesiredheightisreached.
3.Oneofconnectorrods(N)hasthexture’swiresinside.Hookconnector
rods(N)totheframeatloops(Q)andthenpullthexturewiresuntiltaut.
Attach the top of connector rods (N) to canopy (S) at loops (R). Top loop (L)
isonthexturewires,butnotattachedtothebodyofthexture.Passthe
xturewiresthroughtoploop(L).Pullthewiresuntiltautandthreadtoploop
(L)ontothexturebodyatcanopy(S).
4.Bymeasuring,determinethecorrectnumberofchainlinksneededfor
properhangingheight.Ifnecessary,useapairofplierstoopenandremove
anyexcesschain.Attachonechainconnector(K)toeachendofchain(J).
Useoneofchainconnectors(K)toattachchain(J)totoploop(L)andclose
thechainconnector.Feedthexturewiresupthroughthechain(everythree
linksorso),pullingthewiresuntiltaut.Slidecanopyloopcollar(H)and
canopy (G) onto the chain/wire. Use the free chain connector (K) to attach
chain(J)tocanopyloop(H).
FINISHING THE INSTALLATION
6.Tightensmallroundhead(T)ontothetopofcanopy(S)usingascrewdriver.
7.Raisecanopy(G)uptotheceilingandslidecanopyloopcollar(I)upbeneaththecanopy.Tightlythreadcanopyloopcollar(I)onto
canopy loop (H) to secure canopy (G) in place.
7.Slideglassshades(P)oversockets(M)andsecureinplacewithsocketcovers(O).
8.
Installlightbulbs(notprovided)inaccordancewiththexture’sspecications.Donotexceedthemaximumrecommended
wattage.
Yourinstallationiscomplete.Turnonthepowerandtestthexture.
For Customer Service, please
contact the place of purchase.
Please note that the xture may be hung as a
pendant or a ushmount, please decide how
you would like the xture to be installed and
refer to the related instructions.
CLEANING TIPS
Treat the xture gently! Regular cleaning will reduce the need for deep cleaning. For regular cleaning, turn off the light and wipe down the
xture with a clean lint-free cotton or microber cloth. Never spray cleaner directly onto the xture.
CONNECTING THE WIRES
5.Haveanassistantsupportthextureweightwhilecompletingthewiring.Cutawayexcesswire.Attachthexture’swirestothe
powersupplywiresfromthejunctionbox.Connectblacktoblack(orsmooth);whitetowhite(orribbed);groundtoground(green
orcopper).Twisttheendsofthewirepairstogether,thentwistonawireconnector.Makesurealltwistsareinthesamedirection.If
thereisnogroundwire(greenorcopper)fromthejunctionbox,locategroundscrew(E)onmountingstrap(B)andwrapthexture’s
groundwirearoundthegreengroundscrew(E).Useascrewdrivertosecuregroundscrew(E)ontothemountingbracket.Tuckall
wiresneatlyintothejunctionbox.
Please note that
mounting strap
(A) is used in
this installation
option. In this
conguration,
canopy (S) will
need to be attached
to top loop (L).
S
R
Q
M
N
O
P
L
H
T
A
B
F
K
G
I
H
D
K
J
C
E