
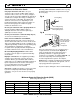
Specifications

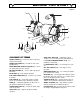

BEFORE YOU START
9
ASSEMBLY INSTRUCTIONS
Your bench grinder requires only the assembly of the
eye shields and proper adjustment of the tool rests.
For your safety, do not plug the grinder into a power
source until all adjustments are complete. An
adjustable wrench and a Phillips screwdriver are the
only tools you will need to make all normal
adjustments and wheel changes on this grinder.
WARNING:
• DO NOT assemble when the grinder is plugged in.
• ALWAYS make sure the switch is in the "OFF" position.
• ALWAYS check that the grinding wheel is secure.
• BE SURE that all screws holding the end covers are tight.
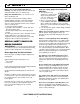
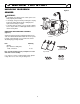
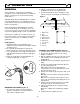
EYE SHIELD (Figure 3)
1. Position the eye shield (1) with flat side up, and
align the mounting holes to the eye shield
bracket (2). Slip the bolt (3) through the mounting
holes, align a washer (4) on both sides of each
eye shield mounting hole.
2. Attach the knob (5).
3. Tighten the knob (5) until the eye shield is in the
desired position.
Note: The eye shield must move freely, yet stay in place
once it is tightened.
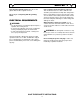
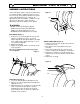
TOOL RESTS (Figure 4)
1. Loosen the bolts (1) with an adjustable wrench.
2. Slide the tool rest arm (2) forward or backwards to
adjust the tool rest.
3. Adjust both tool rests to a distance of 1/16" from the
surface of the wheels. This distance must be
maintained for proper operation. As the wheel
wears down, the tool rest must be re-adjusted to
maintain a 1/16" clearance.
SPARK ARRESTORS (Figure 5)
1. Adjust the spark arrestors (1) above both wheels
to a distance of 1/8".
2. This distance must be maintained for proper
operation.
3. As the wheel wears down, the spark arrestors
must be re-adjusted to maintain the 1/8" distance.
4. Adjust by loosening the screw (2) and slide the
spark arrestor to the 1/8" distance from the wheel
surface.
5. Tighten the screw (2).
2
1
1/8"
21
1/16"
32
4
5
1
Figure 5
Figure 4
Figure 3