
Owner's manual


•Specified brake hose kits may not work with all Years, Makes and Models of vehicle that this brake kit is applicable to, due to possible
OEM manufacturing changes during a production vehicle's life. It is the installer's responsibility to ensure that all fittings and hoses are
the correct size and length, to ensure proper sealing and that they will not be subject to crimping, strain and abrasion from vibration or
interference with suspension components, brake rotor or wheel.
•In absence of specific instructions for brake line routing, the installer must use his best professional judgment on correct routing and
retention of lines to ensure safe operation. Test vehicle brake system per the 'minimum test' procedure stated within this document
before driving. After road testing, inspect for leaks and interference. Initially after install and testing, perform frequent checks of the
vehicle brake system and lines before driving, to confirm that there is no undue wear or interference not apparent from the initial test.
Afterwards, perform periodic inspections for function, leaks and wear in a interval relative to the usage of vehicle.
•Repeat this entire procedure for the other wheel.
•Bleed the brake system. Reference the general information and recommendations below for proper bleeding instructions.
•Install the wheel and torque the lugs to manufacturer’s specifications.
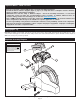
Assembly Instructions (Continued)
Page 4
Additional Information and Recommendations
•NOTE: With the installation of after market disc brakes, the wheel track may change depending on the application. Check your wheel
offset before final assembly.
•Please read the following concerning balancing the brake bias on 4 wheel disc vehicles.
This Corvette rear kit can be operated using the stock OEM master cylinder. However, as with most suspension and tire
modifications (from OEM specifications), changing the brakes may alter the front to rear brake bias. Rear brakes should not lock
up before the front. Brake system evaluation and tests should be performed by persons experienced in the installation and proper
operation of brake systems. Evaluation and tests should be performed under controlled conditions. Start by making several
stops from low speeds then gradually work up to higher speeds. Always utilize safety restraint systems while operating vehicle.
•
For optimum performance, fill and bleed the new system with Wilwood Hi-Temp° 570 grade fluid or EXP 600 Plus. For severe braking
or sustained high heat operation, use Wilwood EXP 600 Plus Racing Brake Fluid. Used fluid must be completely flushed from the
system to prevent contamination. NOTE: Silicone DOT 5 brake fluid is NOT recommended for racing or performance driving.
•To properly bleed the brake system, begin with the caliper farthest from the master cylinder. Bleed the outboard bleed screw first, then
the inboard. Repeat the procedure until all calipers in the system are bled, ending with the caliper closest to the master cylinder. If the
caliper is fitted with bleed screws on four corners, make sure the bottom bleed screws are tight. Only bleed from the top bleed screws.
NOTE: When using a new master cylinder, it is important to bench bleed the master cylinder first.
•Test the brake pedal. It should be firm, not spongy, and stop at least 1 inch from the floor under heavy load.
If the brake pedal is spongy, bleed the system again.
If the brake pedal is initially firm, but then sinks to the floor, check the system for leaks. Correct the leaks (if applicable) and then
bleed the system again.
If the brake pedal goes to the floor and continued bleeding of the system does not correct the problem, either air may be trapped
in the system, or a master cylinder with increased capacity (larger bore diameter) may be required. Wilwood offers various
lightweight master cylinders with large fluid displacement capacities (custom fabricated mounting may be required).