
Product Manual

Page 2 of 4
006100 Rev T Date 04-08-15 DBM
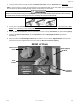
4. Using a second person to help; Position the Back Frame Forks over the Seat Frame and align holes.
HINT: If you do not have a helper; Rest the bottom of the Upholstered Back on the rear portion of the Upholstered
Seat and push the Back Assembly slightly forward to help steady the chair back.
5. Use (1) one of the Clevis Pins and insert it FROM the inside of Back Frame Fork, THROUGH hole in Seat
Frame and, THROUGH outside of Back Frame Fork. REPEAT FOR OPPOSITE SIDE OF CHAIR. (FIG.2)
6. Insert (2) Bow Tie Cotter Pins, into the small holes on ends of the (2) Clevis Pins you just installed. (FIG.1)
7. Remove the Bow Tie Cotter Pins and the Clevis Pins from the Back Support Struts (attached to
backframe).
8. Align the holes of the Back Support Strut with the holes in the seat frame Angled Bracket and insert the
Clevis Pins into these aligned holes and secure with the Bow Tie Cotter Pin. (FIG.2)
Failure to correctly install clevis pins connecting Back Frame fork holes and Seat Frame Rail holes, will cause back
to operate poorly and may cause injury to the user or damage the chair and void warranty.
FIG.1
FIG.2
Back Support
Strut
Angled
Bracket
Seat
Frame
Back Frame
Forks
REAR of Chair