WALK BEHIND SCRUBBER Operating Instructions (ENG) Bedienungsanleitung (GER) Istruzioni operative (ITA) Instrucciones de funcionamiento (SPA) Manuel d’utilisation (FRE) MODELS: SCEX264 10052320 SCEOX264 10052290 SCEX324 10052330 SCEOX324 10052300 IPX4 Read these instructions before using the machine Bitte lesen Sie diese Anleitungen, bevor Sie die Maschine in Gebrauch nehmen Leggere attentamente queste istruzioni prima di azionare la macchina Lea las instrucciones antes de utilizar la máquina Lire ce
MACHINE DATA LOG/OVERVIEW MODEL _______________________________________ DATE OF PURCHASE __________________________ SERIAL NUMBER ______________________________ SALES REPRESENTATIVE # _____________________ DEALER NAME ________________________________ OPERATIONS GUIDE NUMBER ___________________ PUBLISHED __________________________________________ Copyright 2002 Windsor Industries, Printed in USA YOUR DEALER Name: _____________________________________________________________________________________________
TABLE OF CONTENTS Machine Data Log/Overview.........................2 Table of Contents..........................................3 HOW TO USE THIS MANUAL Vacuum Motors................................. .........4-11 Actuator Scrub Deck......................... .........4-12 Greasing Axles ................................. .........4-13 Machine Troubleshooting ................. .........4-14 How to use this Manual.................................1-1 GROUP PARTS LIST SAFETY Control Handle................
HOW TO USE THIS MANUAL This manual contains the following sections: - - HOW TO USE THIS MANUAL SAFETY OPERATIONS MAINTENANCE PARTS LIST The HOW TO USE THIS MANUAL section will tell you how to find important information for ordering correct repair parts. Parts may be ordered from authorized Windsor dealers. When placing an order for parts, the machine model and machine serial number are important. Refer to the MACHINE DATA box which is filled out during the installation of your machine.
IMPORTANT SAFETY INSTRUCTIONS When using an battery powered appliance, basic precaution must always be followed, including the following: READ ALL INSTRUCTIONS BEFORE USING THIS MACHINE. ! WARNING: To reduce the risk of fire, electric shock, or injury: Use only indoors. Do not use outdoors or expose to rain. Use only as described in this manual. Use only manufacturer’s recommended components and attachments.
HAZARD INTENSITY LEVEL The following symbols are used throughout this guide as indicated in their descriptions: HAZARD INTENSITY LEVEL There are three levels of hazard intensity identified by signal words -WARNING and CAUTION and FOR SAFETY. The level of hazard intensity is determined by the following definitions: ! WARNING WARNING - Hazards or unsafe practices which COULD result in severe personal injury or death.
SAFETY LABEL LOCATION NOTE: These drawings indicate the location of safety labels on the machine. If at any time the labels become illegible, promptly replace them. SAFETY DECAL 86252530 PRV NO. 81494 BATTERY CAUTION 86252520 PRV NO. 80885 CIRCUIT BREAKER DECAL 86243530 PRV NO.
TECHNICAL SPECIFICATIONS ITEM Nominal power Rated Voltage Rated Amperage Batteries Scrub Brush Motors Vacuum Motor Propelling Motor Mass (GVW) Weight empty without batteries Solution Control Solution tank capacity Recovery tank capacity Scrub brush diameter for 26 in. (66 cm) scrub head Scrub brush diameter for 32 in. (81 cm) scrub head Scrub brush pressure Scrub brush speed Tires Casters Foundation Pressure (at recommended tire psi) Maximum Speed Coverage with 26 in. (66 cm) scrub head Coverage with 32 in.
TECHNICAL SPECIFICATIONS ITEM Height Length with 26 in. (66 cm) scrub head Length with 32 in. (81 cm) scrub head Width without squeegee and scrub head Width of squeegee for 26 in. (66 cm) scrub head Width of squeegee for 32 in. (81 cm) scrub head Width of scrub path for 26 in. (66 cm) scrub head Width of scrub path for 32 in. (81 cm) scrub head MEASURE 45 in. (114 cm) 64 in. (163 cm) 66 in. (167 cm) 24 in. (61 cm) 35 in. (89 cm) 39 in. (99 cm) 26 in. (66 cm) 32 in.
HOW THE MACHINE WORKS The Saber Cutter is a battery powered, selfpropelled, hard floor scrubber intended for commercial use. The appliance applies a cleaning solution onto a hard floor, scrubs the floor with brushes, and then vacuums the soiled water back into the recovery tank. The machine's primary systems are the solution system, scrub system, recovery system, and directional control system. The function of the solution system is to store cleaning solution and deliver it to the scrub system.
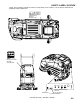
COMPONENTS 12 14 7 3 1 2 6 11 9 5 15 13 4 8 10 1. Control Panel 2. Front Cover 3. Recovery Tank 4. Recovery Tank Drain Hose 5. Scrub Head Shrouds 6. Solution Tank 7. Solution Tank Cover 8. Solution Tank Drain Hose 9. Solution Strainer 10. Squeegee 11. Aqua-Mizer 12. Top Cover 13. Vacuum Motor 14. Recovery Tank Dome 15.
CONTROLS 2 13 5 3 6 9 8 7 16 15 1 4 10 14 12 11 3-5 CUTTER 24V (SCE) 86037020 04/04/07
CONTROLS 1. 2. 3. 4. 5. 6. 7. 8. 9. Key Switch Emergency Shut Off Switch Speed Control Knob Propel Control Lever Reverse Button Brush Switch Actuator Switch Solution Control Knob Vacuum Switch 1. KEY SWITCH Controls the power for machine functions. 10. Squeegee Lift Lever 11. Squeegee Pitch Adjustment Knob 12. Squeegee Deflection Adjustment Knobs 13. Battery Charge Level Indicator 14. Parking Brake 15. Hour Meter 16. Brush Pressure Indicator 4.
CONTROLS 7. ACTUATOR SWITCH Adjusts the amount of brush pressure to the floor by raising or lowering the scrub deck. To increase brush pressure, press the bottom of the switch. To decrease brush pressure or rise the scrub deck, press the top of the switch. 10. SQUEEGEE LIFT LEVER Raises and lowers the squeegee. To lower the squeegee, lift the lever from its raised position. To raise the squeegee, lift the lever from its lowered position. 11. SQUEEGEE PITCH ADJUSTMENT KNOB 8.
CONTROLS 13. BATTERY CHARGE LEVEL INDICATOR Indicates the charge level of the batteries. The meter display is divided into 10 vertical bars. Bar illuminated on the far right indicate full charge. Bars flashing near the left side indicate the batteries should be recharged. Further operation of the machine could damage the machine or the batteries. When the machine is left overnight with less than a full charge, the display may initially indicate a full charge.
MACHINE OPERATION PRE-RUN MACHINE INSPECTION FILLING SOLUTION TANK Do a pre-run inspection to find possible problems that could cause poor performance or lost time from breakdown. Follow the same procedure each time to avoid missing steps. NOTE: See maintenance section for pre-run machine inspection checklist items. FOR SAFETY: Before leaving or servicing machine; stop on level surface, turn off machine and remove key. 1. Turn the machine power off. 2.
MACHINE OPERATION NORMAL SCRUBBING TO BEGIN SCRUBBING Plan the scrubbing pattern in advance. The longest track is around the perimeter of the area to be cleaned. For efficient operation, the runs should be the longest possible without turning, stopping, or raising and lowering scrub deck/squeegee. NOTE: In order to achieve the best possible results, the area which is to be cleaned should be swept before scrubbing. Large debris, strings & wire must be removed to prevent being caught in brushes or squeegee.
MACHINE OPERATION DOUBLE SCRUB RECOVERY TANK For floors which are heavily soiled or have thick accumulations of floor finish may not clean sufficiently with one pass. In these cases it will be necessary to double scrub. To double scrub, make the first pass over the surface being cleaned with the squeegee up, vacuum off, the solution on, Aqua-Mizer removed and brushes down. This allows the solution to stay in contact with the soil while loosening the surface accumulation with the brushes.
MAINTENANCE SERVICE SCHEDULE Before starting the work period End of work period before storing MAINTENANCE Check battery acid level Check vac hose connections Clean the squeegee blades Inspect brushes or pads for debris: wire string, wear Inspect vac fan shut off float screen DAILY * * * * MONTHLY ANNUALLY * Drain & rinse tanks * Raise squeegee assembly Raise scrub deck assembly Charge the batteries. Remove the pad drivers/brushes Check the brushes/pads for damage and/or wear Clean squeegee blades.
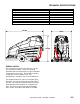
MAINTENANCE 5 1 12 7 11 9 6 3 8 2 1. Batteries 2. Squeegee 3. Aqua Mizer 4. Scrub Brushes 5. Float Shut-Off 6. Solution Strainer 7. Brush Motor 8. Traction Motor 9. Circuit Breakers 10. Brush Shroud & Brush Skirts 11. Vacuum Motor 12.
MAINTENANCE 1. BATTERIES The batteries provide the power to operate the machine. The batteries require regular maintenance to keep them operating at peak efficiency. The machine batteries will hold their charge for long periods of time, but they can only be charged a certain number of times. To get the greatest life from the batteries, charge them when their charge level reaches 25% of a full charge. Use a hydrometer to check the charge level.
MAINTENANCE TO CHARGE THE BATTERIES CHECKING BATTERY SPECIFIC GRAVITY Use a hydrometer to check the battery specific gravity. ! WARNING When servicing machine, avoid contact with battery acid. ! CAUTION Batteries emit hydrogen gas. Explosion or fire can result. Keep sparks and open flame away. Keep covers open when charging. Battery Check ! WARNING Wear eye protection and protective clothing when working with batteries. ! WARNING CHECKING GRAVITY A. Hydrometer B.
MAINTENANCE 5. Replace the battery caps, and leave them in place while charging. 6. Unplug the battery connector from the machine. CHANGING BATTERIES Stop the machine in a clean area next to the charger. Turn off machine. FOR SAFETY: When charging, connect the charger to the batteries before connecting the charger to the AC wall outlet. Never connect the charger to the AC wall outlet first. Hazardous sparks may result.
MAINTENANCE TO REMOVE SQUEEGEE ASSEMBLY 2. SQUEEGEE BLADES The front squeegee blade allows solution to pass through channels in the blade into the squeegee assembly while maintaining vacuum to provide lift. The front blade has four wear surfaces and can be rotated for extended life. The front blade should not require regular replacement under normal use. The rear blade wipes the floor to a near dry condition. It is important the rear blade be in good condition to properly do its job.
MAINTENANCE TO ADJUST SQUEEGEE PITCH 1. Choose a smooth, level surface. Turn “ON” the key switch. Lower the squeegee and drive forward at least 2 feet (60cm.). 2. With the squeegee down, stop the machine. Do not allow machine to roll back. FOR SAFETY: Before leaving or servicing the machine; stop on level surface, turn off machine and remove key. 3. Determine the differences, if any, in deflection of the squeegee blade between each end and the middle.
MAINTENANCE 4. SCRUB BRUSHES There are four different types of brushes available to cover applications from cleaning heavily soiled floors to polishing. A pad driver is also available to take advantage of the many cleaning pads on the market. Please refer to the following to assist in selecting the proper brush or pad for the work at hand. UNCOATED FLOORS 1. With the scrub deck up, turn “OFF” the machine.
MAINTENANCE 6. SOLUTION STRAINER The solution strainer is located in front of the left front wheel. The solution strainer protects the solenoid valve from debris. If there is little or no solution flow to the ground, check the strainer for debris. Drain the solution tank and clean the solution strainer. To remove the strainer, turn the bottom part of the strainer counterclockwise until the bottom is separated. Clean out the debris from the wire mesh and re-assemble.
MAINTENANCE 8. TRACTION MOTOR ! WARNING Do not use a pressure washer to clean around the motors. Use tap pressure only. TRACTION MOTOR CARBON BRUSH REPLACEMENT FOR SAFETY: Before leaving or servicing machine, stop on a level surface, turn off machine and remove key. 1. Disconnect batteries from machine. 2. Disconnect the electrical connection to the traction motor. 3. Remove brush cap. 4. Release brush from spring tension. Remove screw connecting brush wire lead to brush holder.
MAINTENANCE 11. VACUUM MOTOR (Refer to the Vacuum Group in the parts section of manual) ! WARNING Do not use a pressure washer to clean around the vacuum motors. Use tap pressure only. Care must be taken so that water is not directed into vacuum motor air intakes. CHANGING VACUUM MOTOR 1. Remove side cover. 2. Disconnect electrical connector to the vacuum motor. 3. Loosen clamp and disconnect hose from vacuum intake. 4. Remove vacuum motor mounting bracket bolts, which are located under frame. 5.
MAINTENANCE 12. ACTUATOR SCRUB DECK REMOVAL/REPLACEMENT FOR SAFETY: Before leaving or servicing machine, stop on a level surface, turn off machine and set parking brake (If option is installed). 1. Remove front cover. 2. Remove the two nuts below the scrub deck that attach the actuator bracket. 3. Remove clevis pin and rue ring from lower bracket of actuator, make sure not allow actuator bracket to rotate. 4. Disconnect actuator from wiring harness. 5.
MAINTENANCE RECOMMENDED GREASING: 1-2 strokes of Mobiltemp®78 or compatible clay-based or calcium-based grease.
MACHINE TROUBLESHOOTING PROBLEM Poor or no water pick-up CAUSE Squeegee out of adjustment Debris caught on squeegee Worn squeegee blades Vacuum hose clogged Vacuum motor does not run, or runs slowly Brush motors do not run, or runs slowly Faulty vacuum switch Worn vacuum motor brushes Debris caught in scrub brushes Worn brushes or pads Improper detergent, brush or pad used Low scrub brush down pressure Low battery charge Circuit breaker(s) tripped Loose connection Faulty brush motor contactor Worn brush
MACHINE TROUBLESHOOTING PROBLEM Little or no solution flow to the floor No power to machine CAUSE Solution tank empty SOLUTION Fill solution tank Solution flow turned off or set too low Solution strainer plugged Solution hoses obstructed Turn on or increase flow setting Clean solution strainer Clear obstruction from hose Clean or replace Solution solenoid valve obstructed or stuck Vent hole in solution tank lid obstructed Battery disconnected Emergency shut-off activated (If included) Battery connecti