
- Spencer Installing and Operating Instructions Vacuum Cleaning Systems A,B,C, D ,V

9
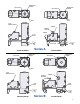
Balancing (For Series V see Form ZZ)
Turn the machine on with inlet blocked to check balance. If
there is excess vibration due to an unbalanced condition
after reassemble, use the following balancing procedure:
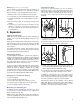
1. Mark the position of the end impeller hub on the shaft.
2. Loosen the bolts or screws holding the impeller on the shaft.
3. Rotate the impeller 90° on the shaft, retighten the bolts or
screws.
4. Run the machine again at operating speed and check
vibration.
5. Repeat this procedure until the best balance (least
vibration) is obtained. If satisfactory results are not
achieved, contact the Spencer Service Department for
recommendations.
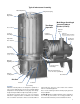
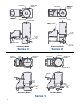
3. Separator
Shaking the Filter Bags
NOTE: The vacuum producer must be turned off during bag
shaking, or loosened dirt will immediately redeposit on the
filter bags.
Grasp the external bag shaker handle and move it back and
forth vigorously for 5 to 10 seconds. This action loosens dirt
that has accumulated inside the filter bags, allowing it to fall
into the dirt can.
For portable Industravac models, bag shaking should be
done after each use; for stationary models, after each shift
to maintain optimum vacuum performance.
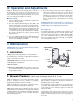
Emptying the Dirt Can
For new Industravac applications, check the rate of dirt accu-
mulation in the dirt can and then establish a regular emptying
schedule. If the application characteristics change, modify the
schedule to suit. The can should be emptied when it is no
more than 3/4 full. Or, for convenience, it can be emptied by
weight rather than volume, at any lesser level.
To remove the dirt can, lift the bail arm in front of the separator,
lowering the container onto the floor where it can be wheeled
away on its casters for emptying. To replace the can, simply
push it into place under the separator. A self-locating guide
positions the can correctly. Lower the bail arm, lifting the can
into position and sealing it against the rubber gasket.
Changing Door and Dirt Can Gaskets
1. Peel off old gasket.
2. Clean old adhesive off gasket seat.
3. Check replacement gasket for fit; trim if necessary.
4. Coat gasket and seat with rubber cement, apply gasket.
5. Check for airtight seal after cement is dry.
Maintaining the Equalizing Line
Periodically check the equalizing line, if present, to be sure it
is clear and free of leaks, If problems occur, replacement
kits are available from Spencer.
NOTE: Spencer disposable dirt can liners must always be
used if an equalizing line has been installed or mechanical
and environmental damage will result.
Changing Filter Bags
Keep a set of spare filter bags in reserve at all times.
Examine the bags in service periodically and replace them
with genuine Spencer filter bags when visibly worn. Also
look for leaks, which are signalled by dirt on the outside of
the bags or on the bag head or by dust in the discharge
airstream.
1. To install a new filter bag, compress the spring collar at
the bottom of the bag.
2. Insert the compressed spring collar into the bag head
opening and allow it to resume its original shape.
3. Pull up on the bag to be sure it is properly seated. The
recess in the spring collar must be at the bag head opening.
(Entire collar should not be below bag head.)
4. Install buckle on the narrow tab of filter bag and attach to
hook on shaker plate. Pull on tab end to remove slack.
In addition to standard cotton sateen filter fabric, various
other materials are available in Spencer replacement bags.
They offer specialized properties suited to adverse condi-
tions such as dampness, abrasion or chemical attack.
Special-purpose filters are also available, such as optional
HEPA (High Efficiency Particulate Air) filters with a filtration
efficiency of 99.97% at 0.3 micron particle size. For recom-
mendations, consult your Spencer Representative.