WC50IN installation guide:Layout 1 23/4/08 12:51 Page 1 Winemaster C50 IN Instructions for installation and use
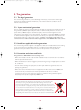
WC50IN installation guide:Layout 1 23/4/08 12:51 Page 2 Contents Introduction: From the vine to the wine 3-5 1. Layout of premises 1.1. Hot air outlet 1.2. The cellar 1.2.1 Insulation 1.2.2 Insulation of walls and ceiling 1.2.3 Insulation of the floor 1.2.4 Insulation of the door 1.2.5 Insulation of other elements 2. Installing the Wine C50 IN 2.1. Drilling the wall 2.2. Dimensions 2.3. Installation examples 2.4 Installing the ducts 2.5 Installing the water flue 5-7 4. Servicing 4.1.
WC50IN installation guide:Layout 1 23/4/08 12:51 Page 3 Setting the temperature Preset to 12°C, adjustable between 4 and 25°C* Maximum outdoor temperature 35°C** Cooling power 1 200 W at 15°C ** Electricity supply 230-240 V - 50 Hz - with earth connection (supplied with 3 m cable) Electrical power 950 W Lighting Fluorescent tube and switch built into the device Heating power 500 W The circuit breaker must be at least 16 Amps.
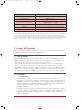
WC50IN installation guide:Layout 1 23/4/08 12:51 Page 4 IMPORTANT The validity of the WINEMASTER guarantee depends on the values in the "Choice of insulation" table being strictly respected, for all the cellar walls, including floor and ceiling + door, as well as perfect continuity of insulation and installation in accordance to the user guide. C50 In insulation MINIMUM THICKNESS OF INSULATION (mm) for 12°C cellar temperature CELLAR VOLUME (m3) MINIMUM THERMAL RESISTANCE R : m² .
WC50IN installation guide:Layout 1 23/4/08 12:51 Page 5 1.2.3 FLOOR INSULATION The cellar floor must be able to support shelves and the wine stored on them. You should therefore choose an insulating material with adequate compression resistance for this part. Manufacturers recommend appropriate insulation or materials designed specifically for floor insulation, in their documentation.
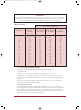
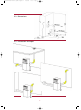
WC50IN installation guide:Layout 1 23/4/08 12:51 Page 6 2.2. Dimensions 2.2.
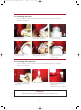
WC50IN installation guide:Layout 1 23/4/08 12:51 Page 7 2.4 Installing the ducts The connections must be sealed to prevent condensation forming on the walls of the air-conditioner. 1. Place the inside duct on the flue collar 2. Stick the adhesive tape across the flue collar and the duct. 3. Take it round several times to ensure a good seal. 4. Position the insulation duct, then the ring clamp 5. Close the head of the ring clamp after tightening it manually. 6.
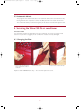
WC50IN installation guide:Layout 1 23/4/08 12:51 Page 8 3. Using the Wine C50 IN C50IN must be installed by complying with the national rules of electric installation. 3.1 Connecting the air-conditioner Connect the male plug to a 230V / 16A power socket. Switch on the air-conditioner by pressing button 1 on the diagram below. The fan on the cellar side comes on immediately. The compressor may not come on until 2 minutes later if the temperature in the cellar is higher than the set temperature.
WC50IN installation guide:Layout 1 23/4/08 12:51 Page 9 3.3 Automatic defrost The program of the thermostat will run an automatic defrost time several times a day. During this time the compressor cannot sart. Only the fan in the cellar can function. The condensate water produced during this period will be evacuated through the tube. 4.
WC50IN installation guide:Layout 1 23/4/08 12:51 Page 10 5. The guarantee 5.1. The legal guarantee The contractual guarantee is, to the advantage of the buyer, not exclusive of the legal guarantee for hidden mistakes and defects, in accordance with the conditions of art. 1641 ff of the Civil Code. 5.2. 2-year contractual guarantee The air conditioner has a 2-year guarantee for all defects of production. During the term of the guarantee, FONDIS replaces all parts that are demonstra-bly defective.