
Inc GAS COOK TOPS INSTALLATION INSTRUCTIONS


13
Dimensions in parentheses are in
millimeters unless otherwise specified.
INSTALLATION INSTRUCTIONS
COOKTOP INSTALLATION
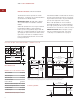
GAS SUPPLY LINE CONNECTION
A
ssemble the flexible metal connector from
the gas supply pipe to the pressure regulator.
You will need to determine the fittings
r
equired, depending on the size of your gas
supply line, flexible metal connector and shut-
off valve. Refer to the illustration below.
Use a pipe-joint compound made for use with
natural and LP gas. If a flexible metal connec-
tor is used, be sure the tubing is not kinked.
Open the shut-off valve in the gas supply line.
Wait a few minutes for the gas to move
through the line. Refer to the illustration on
page 10.
GAS LEAK TESTING
Use a brush and liquid detergent to test all gas
connections for leaks. Bubbles around connec-
tions will indicate a leak. If a leak appears, shut
off gas valve controls and adjust connections.
Then check connections again. Clean all the
detergent solution from the cooktop.
1
/2" Nipple
(use pipe-joint
compound on ends)
1
/2" Nipple
(use pipe-joint
compound on ends)
Pressure
Regulator
1
/2" Adapter
1
/2" Adapter
Shut-Off
Valve
Flexible Metal
Connector
Gas supply line connection
SURFACE BURNERS
INITIAL LIGHTING
T
he surface burners use electronic igniters in
place of standing pilots. When the cooktop
control knob is pushed in and turned to the
H
IGH position, the system creates a spark to
light the burner. This sparking continues until
the electronic ignition senses a flame.
Be sure to place the burner heads and caps on
each burner base and position the burner
grates over the burner bases and heads before
lighting.
To check operation of the surface burners,
push in and turn each control knob to the HIGH
position. The flame should light within four
seconds.
If the burners do not light properly, turn
control knob to the OFF position. Check that
the burner heads and caps are in the proper
position. Check that the power supply cord is
plugged in and that the circuit breaker or
house fuse has not blown. Check that the shut-
off valve is in the ON position. Check operation
again, if the burners do not light properly at
this point, contact a Wolf authorized service
center.
IMPORTANT NOTE:
Initial lighting of the
surface burners may take slightly longer, as air
in the system must be purged before gas can
be supplied to the burner.
Never test for a gas leak with a match or
other flame.