
Inc Ventilation Hood Installtion Instructions


8
WOLF PRO VENTILATION HOOD LINERS
WALL PREPARATION
Construct the wood wall framing flush with
the wall studs and centered in the location
that the hood liner will be mounted.
Refer to the illustrations below for the location
of mounting holes for Pro hood liners and a
cross-section of a typical installation.
HOOD LINER PREPARATION
If you are installing LBLOWER-120INT, refer
to the internal blower information on page
1
1 and follow installation instructions
provided with the blower.
The hood liner assembly is shipped with
the transition attached. The transition is
s
hipped upside down in the top of the hood
liner. It must be removed and reinstalled in
the proper position. Refer to the illustration
on the following page.
Remove the filters by pushing each filter up
at the angle it is placed in, and rotate down.
Remove the center filter first. Gloves should
be worn to provide the proper grip when
removing filters.
Separate the transition from the top plate
by removing the four shipping screws.
Do
not discard the screws
, they will be
needed to reinstall the transition to the top
plate.
Attach the transition to existing ductwork
with sheet metal screws and duct sealing
tape.
Framing must be tied together and to
ceiling joists to provide enough structural
strength to support the weight of the hood
liner and internal blower, if applicable.
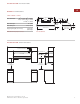
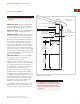
Decorative
Hood
#10 Screw
#10 Screw
Hood Liner
1
/2" (13) Drywall
Installation cross-section
If wall framing is not available, wall
anchors must be used.
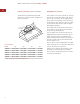
2
3
/4"
(70)
8" (203)
4"
(
102
)
2"
(51)
Mounting holes for hood liners