OWNER'S MANUAL INSTALLATION & OPERATION WKGHD & WKGHC GAS CONVECTION OVENS MODELS WKGHD ML-767589 WKGHC ML-767590 For additional information on Wolf Range or to locate an authorized parts and service provider in your area, visit our website at www.wolfrange.com WOLF RANGE DIVISION OF ITW FOOD EQUIPMENT GROUP, LLC WWW.WOLFRANGE.COM P.O. BOX 696 LOUISVILLE, KY 40201-0696 FORM 30982 Rev. F (Dec.
IMPORTANT FOR YOUR SAFETY THIS MANUAL HAS BEEN PREPARED FOR PERSONNEL QUALIFIED TO INSTALL GAS EQUIPMENT, WHO SHOULD PERFORM THE INITIAL FIELD START-UP AND ADJUSTMENTS OF THE EQUIPMENT COVERED BY THIS MANUAL. POST IN A PROMINENT LOCATION THE INSTRUCTIONS TO BE FOLLOWED IN THE EVENT THE SMELL OF GAS IS DETECTED. THIS INFORMATION CAN BE OBTAINED FROM THE LOCAL GAS SUPPLIER.
Installation, Operation, and Care of WKGHD & WKGHC GAS CONVECTION OVENS KEEP THIS MANUAL FOR FUTURE USE GENERAL Your Convection Oven is produced with quality workmanship and material. Proper installation, usage, and maintenance will result in many years of satisfactory performance. It is suggested that you thoroughly read this entire manual and carefully follow all of the instructions provided.
LOCATION The equipment area must be kept free and clear of combustibles. Maintain clearances from combustible or non-combustible construction for at least 3" (7.6 cm) from the side and 3" (7.6 cm) from the back of the oven. The installation location must allow adequate clearances for servicing and proper operation. The oven must be installed so that the flow of combustion and ventilation air will not be obstructed. Adequate clearance for air openings into the combustion chamber must be provided.
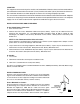
without depending on the connector and the quick-disconnect device or its associated piping to limit appliance movement. Attach the restraining device at the rear of the oven as shown in Fig. 1. If disconnection of the restraint is necessary, turn off the gas supply before disconnection. Reconnect this restraint prior to turning the gas supply on and returning the oven to its installation position. Separate instructions for installing casters to the oven are included with the casters.
Install right side panels on both ovens. Connect the piping between the top oven and bottom oven. Pipe joint compound must be resistant to the action of propane gases. CHIMNEY The manual gas valve at the bottom of the control panel should remain off until all electrical connections are made and the ovens are checked or used. LONG FLUE EXTENSION RIGHT ANGLED FLUE EXTENSION LEVELING Once the oven is in its permanent position, place a carpenter's level on the oven rack.
GAS CONNECTION GAS DATA Model WKGHD, WKGHC INPUT BTU/HR MANIFOLD PRESSURE Natural Propane Natural Propane 25,000 25,000 3.5" w.c. (0.8 kPa) 10" w.c. (2.5 kPa) Gas supply connections and any pipe joint compound must be resistant to the action of propane gases. The oven is provided with a regulator integral to the gas solenoid valve, and requires no regulator external to the device. A gas shutoff valve is supplied with each oven and is located at the bottom of the control panel.
FLUE CONNECTION Ventilation requirements will vary with each installation and must comply with Vapor Removal from Cooking Equipment, NFPA-96 (latest edition) and with local codes. Considerations to be kept in mind include: • Flue connections should never be made directly to the oven. • The oven should be located under a hood which has an adequate connection to an exhaust duct and extends 6" (15 cm) beyond the oven sides.
LIGHTING THE WKGHD OVEN Open the manual valve. Plug in, turn the MASTER switch ON and turn the thermostat to its maximum setting. Both the ON and HEAT lights should be lit. If the HEAT light is not on, make sure the door is closed. After 5 seconds, the spark ignition system will initiate and the solenoid valve will open, allowing gas flow to the burner for a period of 7 seconds.
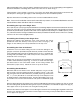
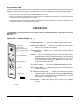
CONTROLS — MODEL WKGHC Built before October 1999 (Fig. 6) HEAT LIGHT THERMOSTAT TEMP ERATUR E TEMPERATURE KNOB ROAST BUTTON READY LIGHT HEAT READ Y HOLD BUTTON ROAS T HOLD THERMOMETER BUTTON TIMER TIMER KNOB TIME TIME BUTTON TIME START/STOP BUTTON START STOP GENTL BAKE E ;;; ;; ;;; ;;; ;;; ; ;;; POWER ON GENTLE BAKE BUTTON ON / OFF / OVEN COOL SWITCH OFF COOL DOWN LIGHT da;la;la sjf IN jj;flPU G INST d;a SH MA RUCT "ON" IO ST ads;f NS ER PO FAILS STION. SWITC H TO TO LIG IF OV HT.
Roast Button Light (If On and not timing product, indicates the roast mode is selected.) • The displayed temperature settings will be for the roast temperature except when the Thermometer Button is lit. • Rotating the Thermostat Knob will change the roast set temperature. • Cook time can be adjusted using the Timer Knob. • The time displayed is the initial set cook time. • It is possible to select the Hold mode using the Hold Button.
Gentle Bake Button Selects the gentle bake time setting. A roast time must first be set. The gentle bake time can then be set at the roast time value or less. The gentle bake time will be the portion of roast time to operate in the gentle bake mode. Gentle bake mode will start first. When gentle bake time has lapsed, the remainder of the roast time will be in the non-gentle bake mode. Use Gentle Bake when cooking delicate product, such as strudel, muffins, cupcakes, meringue pies, etc.
BEFORE FIRST USE Before using the oven for the first time, it must be "burned in" to release any odors that might result from heating the new surfaces in the chamber. 1. Using a clean damp cloth, wipe the inside of the oven, including the racks. 2. Close the oven doors, push the ON / OFF / OVEN COOL switch ON, turn the THERMOSTAT to 300°F (149°C) and allow the oven to cycle for 6 to 8 hours before turning the ON / OFF / OVEN COOL switch OFF. USING THE WKGHC OVEN Preheating 1. Close oven doors.
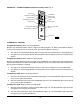
CONTROLS — MODEL WKGHC Built after October 1999 Always displays [HR:Min] when setting the Time. Displays [HR:Min] if the countdown Time is more than 1 Hour. Displays [Min:Sec] of the countdown Time is less than 1 Hour. Displays Temperature in °F. OVEN READY R&H MODE OVEN HEATING MENU SELECT PRIMARY SECONDARY 1 2 SET 1 3 Indicates the oven is in the Roast and Hold Mode. OVEN READY Indicates the oven is preheated and ready for cooking. Indicates the oven is preheating.
MANUALLY SETTING THE TEMPERATURE AND COOK TIME To Set the Temperature • Press the SET button. Press the TEMPERATURE button; StPt displays to indicate Set point. • Use the Up and Down Arrow keys to increase or decrease the displayed Temperature value. • Press the SET button again to save the Temperature set point in the computer. To Set the Cook Time • Press the SET button. Press the TIME button. Tine displays to indicate TIME.
Always Set the Temperature Before Setting the Time • Press the SET button. Press the TEMPERATURE button; StPt displays. Use the Up and Down Arrow keys to increase or decrease the Temperature. To save, press the SET button again. At startup, the display will initially show a GROWING BAR . When the oven temperature reaches the Set Point, the set temperature displays.
ROAST AND HOLD OPERATION — WKGHC OVEN Roast and Hold cooks the product in two stages. During First Stage Cooking, the oven temperature is regulated by the Roast thermostat for the amount of time set on the Timer. After the lapsed time counts down to 00:00, Second Stage Cooking begins. During Second Stage Cooking, the burners are off as the temperature in the oven declines to the Hold Temperature. The door should remain closed during Second Stage Cooking.
CLEANING Disconnect the electrical power to the machine and follow lockout / tagout procedures. Clean outside of the oven daily by wiping with a clean damp cloth. Clean porcelain oven interior daily with soap or detergent and water. Rinse thoroughly and wipe dry with a soft clean cloth. Optional Stainless Steel Oven Interior Soap or detergent and water usually handle routine cleaning. Rinse thoroughly and dry with a soft clean cloth.
MEAT & FISH PRODUCTS Product Temp. Prime Rib (20 lb. rare) (9.1 kg) Rolled Roast Beef Veal Roast Boned (15 lb.) (6.8 kg) Stuffed Pork Chops Lamb Chops Steamship Round (80 lb.) (36.3 kg) Meatloaf Hamburger Patties (4 oz.) (113 gr.) Meat Pot Pies Chicken Parts Fish Sticks Time (min.) No. Shelves (121) 2 3/4 Hr. 2 (135) (135) (149) (190) (135) (163) (204) (177) (149 – 163) (177) 2 1/2 Hr. 21/2 Hr. 25 – 30 12 2 3/4 Hr. 40 8-10 40 30 – 40 18 2 2 3 5 1 3 5 5 5 5 Time (min.) No.
MAINTENANCE The oven and its parts are hot. Use care when operating, cleaning or servicing the oven. Disconnect the electrical power to the machine and follow lockout / tagout procedures. LUBRICATION The fan motor comes with sealed bearings and requires no lubrication. The door hinges and mechanism require occasional lubrication with mineral oil.