
Installation Guide

CONTENTS
1 Assembly, doors/drawers
Note: Mounting hardware is not provided. Use mounting
screws manufactured specifically for the enclosure material
e.g. wood, metal, brick, or stone. The mounting holes
accommodate a #10 screw.
Note: The opening dimensions provided are for a standard
installation. For a flush installation, refer to the overall
dimensions in the Wolf design guide and adjust the
opening dimensions accordingly.
OUTDOOR STORAGE INSTALLATION
1
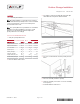
Verify the opening dimensions.
STORAGE DOORS AND DRAWERS
DESCRIPTION WIDTH HEIGHT DEPTH
Single Drawer 27
1
/
4
" 9
3
/
4
" 24
1
/
4
"
Paper Towel Drawer 14
3
/
4
" 8
1
/
4
" 19
1
/
4
"
2- or 3-Drawer 12
1
/
4
" 19
1
/
4
" 18
1
/
4
"
Drawer | Door 28
3
/
4
" 19
1
/
4
" 18
1
/
4
"
Tall Dry Storage 22
1
/
4
" 32
1
/
4
" 20"
Short Dry Storage 34
1
/
4
" 19" 20"
Single Trash | Recycle 16
1
/
4
" 24
1
/
4
" 19
3
/
4
"
Double Trash | Recycle 16
1
/
4
" 24
1
/
4
" 22
3
/
4
"
2
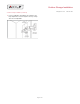
Remove drawers and/or doors.
3
For drawers, rotate the left slide tab up and the right
slide tab down, then pull the drawer forward.
4
For doors, rotate the back of the hinge away from the
frame.
5
Place the assembly inside the opening.
6
Verify the assembly is level, then secure the assembly
to the opening.
7
Install the drawers and/or doors.
Outdoor Storage Installation
wolfappliance.com 800.222.7820
827889 REV-A 06/2017
Page 1 of 2
*827889$REVA*