
Product Manual

INSTALLATION INSTRUCTIONS
For Models 843-844 – Orient Express DD Train Horns
Your purchase of a Wolo Orient Express Horn is the choice to compliment your vehicle. Our products are manufactured with the finest
materials. Each horn is tested to insure it meets all manufacturing specifications before it is packaged. If you need help installing your new
Wolo horn, our technicians are available to answer your questions, Monday thru Friday, 9 AM
to 4 PM EST by calling 1-888-550-HORN (4676).
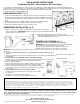
HORN INSTALLATION (Fig. A)
1. Locate a mounting location that is a solid metal surface such as the vehicle’s frame or chassis to
help prevent excessive vibration which could damage the horn. the Cannon BallExpress TrainHorn.
For best results, the front of the horn should be unobstructed so that the sound can carry straight
ahead.
2. Use the base of the horn as a template, mark the hole locations and drill to size 9/64"
3. Place the gasket between the mounting surface and the base of the horn.
4. Secure the horn with the hardware provided and tighten evenly.
COMPRESSOR INSTALLATION (Fig. B)
5. Install the compressor in the engine compartment in a dry location that is safe from the
engine and exhaust heat. IMPORTANT: Compressor must be mounted not further than 8 to
10 inches from horn for proper sound.
6. Cut the plastic tubing to length and connect the horn to the
compressor. Avoid making any kinks or sharp bends in tubing that will
restrict airflow and alter the horn‘s sound.
ELECTRIC VALVE WIRING (Fig. C)
7. Electrical Connection – Using Vehicle Factory Wiring
IMPORTANT: You are not required to use the relay supplied with the kit
because the vehicle factory system already has a relay.
A. For two (2) wire systems: If vehicle’s factory horn has two (2)
terminals, simply transfer wires to the compressor’s terminals.
IMPORTANT: when testing the horns if compressor turns on but the horn does not sound, reverse the wires connected to the
compressor.
B. Forone(1)wiresystems:Ifvehicle’sfactoryhornhasone(1)terminal,simplytransferthewiretothecompressor’spositive(+)
terminal.
C. Using a 16-gauge wire, the compressor’s negative terminal is connected to any metal body bolt. of
rust and paint.
7. Electrical Connection For A New Horn Button Switch (Not Included)
Install the relay in a dry location with the terminals facing downward near the compressor. Refer
D. Connect relay terminal 87 to the positive terminal at the bottom of the
compressor using wire provided.
E. Connect relay terminal 85 to the horn switch terminal. The other horn switch
terminal is connected to ground, (body of vehicle) using wire provided.
F. Connect relay terminals 86 & 30 to positive (+) 12 volt battery, alternator or
accessories. Use 16 gauge or heavier wire. A 20-ampere fuse is installed as
shown in Fig. E.
G. Recap of Terminal Connections for New Horn Switch:
Terminals: 30/86 - the two terminals are connected to 12 volts positive
(+) using a fuse.
Terminal: 85 - connect to horn switch negative (-).
Terminal: 87 - connect to positive (+) terminal of compressor.
Warranty
Wolo Manufactur ing Corporation (“Wolo”) warranties to the original purchaser, for three months from the date of purchase, that this
product is free from defects in workmanship and materials. If there is such a proven defect, Wolo, at its option, will either repair or replace
the item free of charge, if it is returned to Wolo within three months from the date of purchase together with proof of purchase as described
below. Wolo reserves the right to inspect any defect prior to settling any warranty claim by repair or replac ement. This warranty is limited
as above provided and Wolo will not be responsible for fire or other casualty or accident, due to neglect, abuse, abnormal use,
modifications, faulty installation of this product, or natural causes.
ANY EXPRESSED WARRANTY NOT PROVIDED HEREIN IS EXCLUDED AND DISCLAIMED. THE IMPLIED WARRANTIES OF MERCHANTABILITY
AND OF FITNESS FOR A PARTICULAR PURPOSE ARE EXPRESSLY LIMITED TO A TERM OF THREE (3) MONTHS. UNDER NO CIRCUMSTANCES
SHALL WOLO BE LIABLE TO PURCHASER OR ANY OTHER PERSON FOR ANY SPECIAL OR CONSEQUENTIAL DAMAGES, WHETHER ARISING
OUT OF BREACH OF WARRANTY OR OTHERWISE.
To obtain warranty service, return the product prepaid, and include the original bill of sale showing the date of purchase. Provide with the return a brief description of the
problem. Also, include with the return a check or money order in the amount of $20.00 to cover return shipping. Mail to:
Wolo Manufacturing Corp.
One Saxwood Street, Deer Park, NY 11729
© 2006 W olo Mfg. Corp All Rights Reserved. Attn: Warranty Service
A ground connection should be free
to Figure E for wiring.