
Company Brush Cutter User Manual


Dealer Service 35
MAN0963 (2/16/2012)
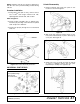
17. Check gear backlash, backlash should be between
0.006" and 0.016". You should not have to adjust
for backlash.
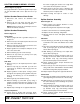
18. Place seal (3) over shaft and press into housing
using a tube of the same diameter. Seal should be
flush with housing when properly installed. Repeat
process for opposite end shaft. Splitter Gearbox
Inspection
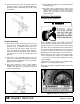
1. Place top cover (10) on housing and secure into
position using six cap screws (11).
2. Check gearbox for leaks by: plugging all holes
except one, applying 4 psi of compressed air, and
immersing gearbox in water. Verify gearbox does
not leak.
NOTE: Excessive air pressure will damage seals.
3. Remove gearbox from water and dry off.
4. Remove upper plug on right side of housing (oil
level hole). Add SAE 80W or 90W EP oil until it
runs out side level hole. Replace plug.
5. Install breather (12) in top cover.
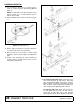
Reinstallation on Cutter
NOTE: Gearbox is heavy: do not attempt to move it
without mechanical assistance.
1. Place gearbox on cutter and secure into position
using four cap screws and lock nuts.
2. Torque hardware to 175 lbs-ft.
3. Attach all drivelines to gearbox.
4. Install all shields.
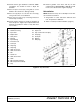
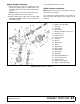
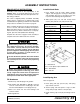
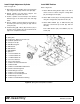
Figure 16. Splitter Gearbox - Style B
1. Bearing
3. Oil seal
4. Snap ring
5. Shim
6. Pinion gear
7. Shaft 1-3/4, 20 spline, wing
8. Gear
9. Shaft 1-3/4, 20 spline, center
10. Cover
11. M10 x 30 Cap screw 8.8
12. 1/2 Breather