MODELS W2005, W2006, W2007 CLASSIC FENCE INSTRUCTION MANUAL Phone: 1-360-734-3482 • On-Line Technical Support: tech-support@shopfox.biz COPYRIGHT © JANUARY 2000, REVISED MARCH 2004 BY WOODSTOCK INTERNATIONAL, INC. WARNING: NO PORTION OF THIS MANUAL MAY BE REPRODUCED IN ANY SHAPE OR FORM WITHOUT THE WRITTEN APPROVAL OF WOODSTOCK INTERNATIONAL, INC.
CONTENTS INTRODUCTION ............................................................................................ 2 ¦¦¦¦ General ........................................................................................................... 2 Warranty ......................................................................................................... 3 SAFETY PRECAUTIONS ................................................................................... 4 INSTALLATION .................................
INTRODUCTION General Thank you for purchasing Woodstock International’s SHOP FOX® Classic Fence. This fence is classic in its design and function, and provides a perfect upgrade for table saw owners who expect precision and ease of installation. It has been designed to fit almost all contractor and cabinet-style table saws and is easy to install. The SHOP FOX® Fence features include: • Wide T-shape style design for maximum accuracy and support. • Single locking action cam lever.
Warranty Woodstock International, Inc. (Woodstock) warrants this product against defects in workmanship and materials under normal use and service for a period of one year. This warranty extends to the original purchaser from the date of purchase. This warranty does not apply to defects due directly or indirectly to misuse, abuse, negligence, accidents, repairs or alterations or lack of maintenance.
SAFETY PRECAUTIONS These safety rules cannot cover every situation in a woodshop. Consider your conditions when setting up and using your SHOP FOX® Classic Fence. 1. KNOW YOUR TABLE SAW. Read the owner’s manual carefully. Learn the tool’s applications and limitations, as well as its particular hazards. 12. USE A PUSH STICK WHEN CUTTING NARROW PIECES. 13. DO NOT REACH BEHIND TABLE SAW TO GRAB CUTOFF PIECE. If wood binds against saw blade it will kick back faster than you can let go. 2.
INSTALLATION Inventory Installation of the SHOP FOX® Classic Fence involves mounting the front and back rails to your table saw, setting the fence on the rails and doing a simple alignment. First check the contents of the package: Model W2005 Fence Assembly .............................. 1 Back Rail ..................................... 1 Front Rail ..................................... 1 Front Rail Rectangular Tube ............... 1 Scale ........................................... 1 Drill and Tap ........
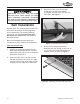
3. UNPLUG the saw power cord, and TURN OFF the power switch before you begin fence installation procedures. Accidental saw startup while installing or adjusting the fence will result in serious personal injury. Position the back rail so its top edge is flush with the table top and the rectangular cut-outs are in line with the miter slots. See Figure 1. Rail Installation On most saws, the mounting holes for the rails will match the existing rail mounting holes.
Mounting The Front Rail Mounting The Front Rail Tube 1. Align the side of the front rail with two rectangular cutouts against the edge of the table. 1. Orient the machined flat edge of the tube so it faces the table edge. 2. Set the top edge of the front rail so it is flush with the table top and the cutouts are in line with the miter slots. If your saw table has a beveled front edge, then align the top of the rail with the bottom edge of the bevel. See Figure 3. 2.
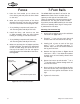
Fence 7-Foot Rails 1. Raise the lock handle up to release the fence locking tab and place the fence down on the rails. The W2006/2007 extended 7' rail set for the SHOP FOX® Classic Fence increases the rip capacity to the right of the blade to 54''. These are mounted in the same manner as the standard rails. The long rail set also includes legs which provide added stability for the table saw/fence assembly when large or heavy work is positioned on the table. 2.
Extension Table An extension table should be mounted between the fence extension rails to provide workpiece support. The extension table width should be sized to fit in the gap between the rails. The length of the table extension can be set so the table replaces the existing right wing of the saw (if your saw is so equipped) or can be used in conjunction with the existing wing. 2.
Blade Guard Magnetic Switch The SHOP FOX ® Classic Fence is intended to work with all table saw blade guards. After installing the rear rail you will be able to reinstall the guard assembly without interference with the rail. A typical installation is shown below in Figure 8. At the left hand edge of the front rail there are pre-drilled holes which can be used to mount the table saw ON/OFF switch to the rail.
ADJUSTMENTS Your SHOP FOX® Classic Fence requires little adjustment since most of the features are builtin to the fence at the factory. The primary adjustment is to adjust the fence so it is parallel to the saw blade. UNPLUG the saw power cord, OFF the power switch before fence adjustment procedures. saw startup while adjusting the result in serious personal injury.
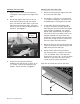
Fence-to-Table Clearance It is important to minimize the gap between the bottom of the fence and the table so thin material will not slide under the fence during operation. This clearance must be uniform along the table surface. It is also very important that the fence does not contact the table surface when sliding from side to side. The support pads, two on the T shaped rail and one on the end of the fence, support the fence above the front and rear rails.
Scale and Cursor The self adhesive scale and magnified cursor provide fast and accurate fence positioning. 1. 2. Zero Point for right of blade use Loosen the adjusting screws on the magnified cursor until the cursor can be adjusted. Approx 57⁄8'' Raise the table saw blade guard out of the way. With the fence mounted on the right side of the blade, slide it over until its left edge touches the side of the blade. See Figure 12. Scale 1⁄2'' From Front Edge Figure 13.
Correcting Mounting Hole Misalignment If the front and back mounting holes do not line up with the existing holes in the table top, it will be necessary to drill additional holes using one of the three following methods. Drilling and tapping holes into the edge of the table, drilling through the edge of the table and securing the rail with long bolts, washers, and nuts, or drilling holes in the rail that align with the holes in the table top. Drilling Through-Holes 1.
OPERATIONS To operate this, or any tool, safely and efficiently, it is essential to become as familiar with its characteristics as possible. Take as much time as necessary to become acquainted with the SHOP FOX® Classic Fence. The time you invest before you begin to use it will be time well spent. Using a Wood Fence Facing The SHOP FOX® Classic Fence can be faced with 3⁄4" kiln dried hardwood, plywood or medium density fiber board (MDF) in place of the HDPE plastic fence sides.
W2005 Fence Parts Diagram NOTE: The W2006 is a combination of the W2005 Fence and the W2007 Legs and 7' Rails.
W2005 Standard Rail Parts Diagram 26 Shop Fox® Classic Fence -17-
W2007 Leg and 7' Rail Parts Diagram NOTE: The W2006 is a combination of the W2005 Fence and the W2007 Legs and 7' Rails.
W2005 Parts List REF 1 2 3 4 8 8A 12A 14A 15A 16 16A 17 17A 18 20 22 23 26 PART # X2005001 X2005002 X2005003 X2005004 X2005008 X2005008A X2005012A X2005014A X2005015A XPB19 X2005016A XPB88 X2005017A XPB18 XPB25 XPS06 X2005023 XPFH21 DESCRIPTION FENCE LOCKING TAB KNOB BEARING PAD LOCKING LEVER FENCE BODY FENCE FACING MAGNIFIED CURSOR SCALE FRONT RAIL TUBE HEX BOLT 1/4-20 X 1/2 FRONT RAIL SUPPORT HEX BOLT 1/4 - 20 X 1-3/4 REAR RAIL HEX BOLT 3/8-16 X 1 HEX BOLT 3/8-16 X 1-3/4 PHLP HD SCR 10-24 X 3/8 SET S