
Installation Sheet


3
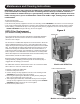
Unpacking
1. Remove all packing material. Recycling is recommended.
2. Carefully remove the hand dryer from the shipping carton, using care not to drop the appliance.
3. Inspect carefully for any damage that may have occurred during transit. Check for any loose, missing or damaged
parts. If the hand dryer is damaged, promptly inform the dealer where you purchased it.
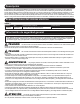
Installation
1. Disconnect the power source.
2. Using Table 2 to determine the recommended mounting height, select a mounting location for the hand dryer where no
reective surfaces or objects (such as a hand basin) are directly under the infra-red sensor eye. The infra-red sensor
eye is visible from the bottom of the dryer. The minimum mounting distance from bottom of the dryer to a reective
surface is 18 in (46 cm). When two or more dryers are installed, they should be spaced apart 24 in (61 cm). Avoid
placement where the dryer may be directly exposed to natural light (sunlight).
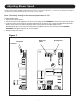
3. Use the security hex key supplied to turn the cover mounting screws clockwise to remove the cover from the dryer.
4. Using the mounting template provided, mark locations for the mounting bolt holes on the wall. For stud walls, ensure at
least one fastening location will be secured to a stud.
5. Fasten the base to the wall, using the type of bolts recommended in Table 3.
6. Each dryer must have its own dedicated circuit.
7. Connect the dryer to the nearest suitable distribution panel.
8. Replace cover, turn screws counter-clockwise making certain not to over-tighten.
IMPORTANT: Consult local and general regulations before performing dryer installation. Ensure the
electrical network is not overloaded. Always connect to a branch circuit with circuit breaker or fuse
protection with an electrical rating greater than the model hand dryer’s rated amperage shown in Table
1 - Electrical Specications in accordance with the required electrical codes such as NEC (National
Electrical Code) and/or CEC (Canadian Electrical Code).
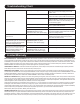
Recommended Mounting Heights from Floor to Dryer Bottom Edge in. (cm.)
Men’s washrooms 46 (117)
Women’s washrooms 44 (112)
Children’s washrooms, ages 4-7 32 (81)
Children’s washrooms, ages 7-10 36 (91)
Children’s washrooms, ages 10-13 40 (102)
Children’s washrooms, ages 13-17 44 (112)
Handicap Mounting Height 37 (94)
Table 2
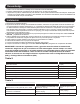
Table 3
Type of Wall Type of Bolt Minimum Bolt Length
Hollow Tile, Lath, Wall Board or Metal
1/4” (M6) screw Type or Wing Type
toggle Bolts
Dependent on wall
thickness
Cement, Brick, or Tile Covered Cement or Brick 1/4” (M6) Stud Type Expansion Bolts 3” (76mm)
Stud Wall with wood Backing No 16 (M8) Wood Screws 23/4” (70mm)