
Instructions / Assembly


1
INSTRUCTION MANUAL
LIGHT FIXTURE
IMPORTANT SAFETY INSTRUCTIONS
CAUTION: Make sure power is turned off at the electrical panel box before beginning
your installation. Turning the power off at the wall switch is not sufficient to prevent
electrical shock.
INSTRUCTIONS PERTAINING TO RISK OF FIRE OR INJURY TO PERSONS
1. Read all instructions prior to beginning the installation process.
2. Do not install this lighting system in or near a wet location.
3. CAUTION: HOT SURFACE. Keep away from curtains and other combustible
materials.
4. THE BULB IS HOT! Make sure that the bulb is cool before re-lamping the fixture.
5. This fixture is intended to be mounted to a 4"square x 2-1/8"deep metal octagon
outlet box. The box must be directly supported by the building structure.
6. Remove the fixture and the mounting packages from the box and make sure that no
parts are missing by referencing the illustrations on the installation instructions.
NOTE: All electrical connections must be in accordance with local codes and the
National Electrical Code. If you are unfamiliar with methods of installing electrical
wiring, secure the services of a qualified licensed electrician.
SAVE THESE INSTRUCTIONS
TOOLS NEEDED (not included): Ladder, Safety goggles, Gloves, Flathead
screwdriver, Phillips screwdriver, Electrical tape, Wire cutters, Bulb.
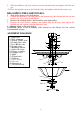
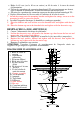
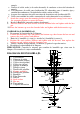
ASSEMBLY INSTRUCTIONS (AS SHOWN IN DIAGRAM):
1. Make sure the main power to the circuit is OFF.
2. Remove the mounting bracket assembly from the canopy and install mounting
bracket to existing outlet box with outlet box screws provided.
3. Secure the threaded tube on to the canopy assembly and tighthen with the upper
hex nut of threaded tube.
4. Pull wires through mounting plate.
5. Wrap the ground wire under and around the ground screw which is marked “GND”,
and fasten the ground screw to make sure the ground wire is securely connected.
6. Make the electrical connections (Required Supply Circuit: 120V 60Hz):
a. Connect the white wire(s) from the fixture to the white wire of the supply circuit.
b. Connect the black wire(s) from the fixture to the black wire of the supply circuit.
c. Connect the green colored (or bare copper) wire to the grounding conductor of the
supply circuit.
d. Use U.L. Listed wire connectors suitable for the size, type and number of
conductors. No loose strands or loose wires should be present.
e. Secure wire connectors with U.L. Listed electrical tape.
f. Carefully tuck connected wires back into the outlet box.
7. Attach the canopy onto the mounting bracket and tighten the canopy screw on to the
mounting bracket to secure the fixture.
8. Install the light bulb (bulb sold separately).
EC7760OB4